
If you decide to start repair, it is necessary to think about the replacement of window sills in the apartment. Most often, such products put immediately after installation of windows, since their installation must be accompanied by careful sealing, and for this it is necessary to process the entire design - and the windowsill, and the window. Sometimes the replacement is carried out after redevelopment or after the repair is already complete.

If you need to install a wider or narrower window sill, then you must carefully dismantle the old one, and install a new item.
For example, when you need to install broader devices or, on the contrary, narrower. In such cases, it is required to make a neat dismantling of the old product, after which you install a new item.
Some recommendations
At first glance, the operation still requires knowledge of the main stages, since the wrong replacement of windowsill can adversely affect the function of the window.
The reason for the installation of a plastic device is the replacement of old structures - sometimes the window is still completely strong, repair or replacement it is not needed, but the condition is very crying.
To date, there is a huge selection of materials - wood, plastic, stone, concrete, chipboard, metal. The choice depends on your taste.
Wood and concrete needs to be frequent painting, since the increased humidity together with temperature drops very negatively affects the paint condition - it cracks and disappears.
More practical is the installation of plastic structures - they do not need painting, easily clean and wash.
Replacing the windowsill - work, though not particularly complicated, but quite dirty, so it is necessary to perform it before starting repairs or general cleaning to exclude dusting of surfaces.
First of all, you need to choose the material.
Today there are many diverse options - from familiar plastic systems to exotic granite.
Article on the topic: Electric power supply from a snow scooter and a screwdriver for a child with their own hands
Practical and inexpensive option - PVC elements, but they do not differ in high environmental friendliness, because they are most often installed in office space.
If you have made an expensive repair in the apartment, the chipboard and MDF surfaces look great - they are durable and beautiful, but you should know that any damage to the outer layer leads to swelling, since their internal layers do not tolerate moisture.
Installation
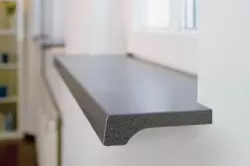
The installation of a plastic window sill is a rather simple procedure that is literally literally everyone. They are very functional products - they are not exposed to moisture, heat-resistant, easy to handle.
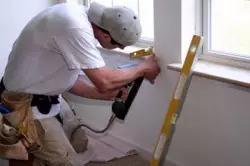
First of all, we will define with the equipment and the tool that will be needed for installation work (both from plastic and wooden):
- Scarpel or chisel;
- Perforator;
- mounting foam;
- a hammer;
- saw for plastic or tree;
- silicone sealant;
- Cement mortar.
Dismantling
It is possible to dismantle the old element using a scarpel, a chisel or a perforator - with these tools first remove the cement solution in the ends of the design.
Then the old window sill be bored by the hammer with unsiler, after which they pull out. The released place is freed from the construction trash, dried solutions, dust, after which the new canvas is trying.
If necessary, the place is under the new level.
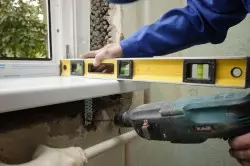
High-quality window sill is a durable and stable design. All seams at the junction with the window frame should be well covered with sealant or mounting foam. This prevents cold air ingress, draft from the street and helps to keep warm inside the room.
On both ends of plastic or wooden bases, it is necessary to cut down certain parts to make sure the system to the window item.
It is important to monitor that there are no gaps near the wall, however, it is necessary to leave the place (to align in terms of the level). Also a new plate of the product can be cut according to the parameters of the old web.
Article on the topic: Methods of sticking of embossed paper wallpapers
In the case of using MDF, chipboard or wooden devices, their untreated ends need to be covered with a sealant to increase moisture resistance (plastic does not concern).
If the height of the new element is less than the height of the old one, then the cement screed on the required height should be performed on the required height, which will then be installed.
- To install the windowsill, use the mounting foam - it is applied by longitudinal stripes. At the same time, the 1st strip must be applied directly near the window (will be an additional protector from the cold), then the bands are applied at any distance.
If you install the windowsill on wooden bars, it is necessary to put the mounting foam between them, install the worktop on it. Shorts (both side and rear) is also needed.
Final moments

Reduce the finished window sill and enjoy a beautiful view.
The windowsill is aligned in terms of the level, then focus from it to the top of the window opening. The mounting foam after frozen will expand, and this emphasis will not allow it to move the level alignment.
Then the window sill is set by the spacer load, after which the canvas is removed from below. Remember that the mounting foam is extremely difficult to remove.
If she still hit the surface, it should not be considered a knife or other sharp objects - it is better to take advantage of the chemicals.
After the frozen (as a rule, at least 24 hours), it is cut off an excess mounting foam, the joints close up with the help of silicone sealant.