
Table of contents: [Hide]
- Positive trash features
- Cons of the ceilings made of wood
- Ceiling arrangement from boards
- Production of crates
Wooden ceilings in construction are made mainly in the baths, saunas and private houses. These facilities have lightweight beam overlaps and therefore can only withstand the ceiling of the boards. A similar type of interior decoration is a sign of wealth and warmth. He creates in the house not only a cozy interior and a relaxed atmosphere, but also has environmental cleanliness. But the greatest pleasure you will deliver the ceiling from the boards with your own hands.

First of all, it is necessary to prepare high-quality paro and waterproofing, and then engage in the installation of a wooden ceiling.
If you decide to make a ceiling of boards, you need to seriously approach the choice of material and hold a number of preparatory work:
- It is necessary to check how smooth surface is. If you need alignment, you will have to do this by applying a putty or shuffle;
- It is necessary to determine whether there will be a wet room. In this case, it is taken into account whether the building will be heated in the cold time, if not, then such a ceiling coating is not the best option;
- If there is a possibility of condensate or direct moisture penetration on a wooden finish, the source is desirable to eliminate, otherwise the ceiling after several years will have to make a major overhaul;
- It is necessary to take into account the degree of sunlight, the burnout process depends on this. So that the material is not exposed to light, the well-treated wood is selected;
- Determine whether heat and sound insulation is important. If it is provided, then first it is better to mount the roughing finish, and then lay the insulation material, which hits the cover from the boards.
Before you start making the ceiling, wooden boards are processed by a protective solution that does not allow for different kinds of pollution and absorb moisture.
Article on the topic: Black and White Curtains in the Interior of Rooms: Designer Tips
Positive trash features
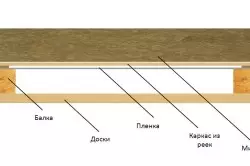
Wooden ceiling device diagram.
The ceiling made of boards has some advantages:
- Well-processed material has high strength.
- It has good thermal insulation and sound insulation.
- Present tree gives pleasant feelings, pleasing eyes.
- Installation does not require special skills and makes it possible to make the ceiling skin from the boards with their own hands.
Back to the category
Cons of the ceilings made of wood
Along with the advantages, like any building material, the wooden ceiling has its drawbacks:
- Wooden designs are not resistant to wet climatic conditions, under the influence of moisture they can deform and partially contracted.
- If there are sharp drops of temperature, the boards will lose the initial species and also deform.
- In the premises decorated with wood, it is strictly forbidden to use cleaning and detergents, as they contain chemistry.
- The ceiling finish with wooden material is considered expensive pleasure, and therefore for people with small prosperity this option may be inaccessible.
- It is possible to deformation after several years due to a change in temperature, poor processing, strong humidity, all this can lead to a change in color and the appearance of various kinds of beetles.
There is still one nuance - this is the ability to choose a material. When you buy boards, you need to consider from which part of the tree the material is made. If the board is cut from the core of the barrel, then it will crack soon, but if from the edge, then serves a long service.
For ease of installation, the details of the plating should not exceed 25 mm, but the length can be from 1 m to 6.5 m.
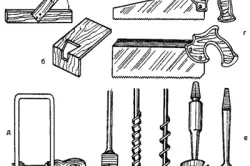
Board processing tool: A - Eruna; b - Template Schip "Lastochkin Tail"; in - hacksaw for longitudinal sawing; g - tanking saw; D - Lobzik; E - a set of drills on a tree: 1. The center with a flat head ("Perka"); 2. screw; 3. Spiral; 4. Cork; 5. Zenkovochkoy.
Article on the topic: How to strip the house outside: Material Review
When choosing a finished boards for landscaping with a large humidity, it is better to purchase panels already treated with a waterproof special means from all sides, including the grooves. And when installing, you need to leave small intervals for ventilation between the panels.
For interior decoration, a wooden finishing material made of pine is in great demand, since this tree view is lightweight and durable, without any problems.
To cover the ceiling with wood, various elements are used, such as a edged board, lining and in rare bare cases.
Back to the category
Ceiling arrangement from boards
Before making the ceiling, you need to consider that the room in height will decrease by 10-15 cm. You still need to pay in advance, where the wiring will be held and the lamp or other electrical appliances will be located.
Preparatory work.
To cover the ceiling with wood, it is necessary to prepare the following materials:
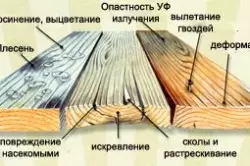
Options for damage to boards.
- Chalkboard or lining made of natural wood;
- Rake cross section 40x20;
- screws 2.5x25;
- Dowel shock 6x60;
- fat fishing line;
- Haller or decorative plank;
- paint material;
- screwdriver;
- Lobzik;
- hacksaw;
- level;
- roulette;
- a hammer.
Before starting the finish, an insulating layer is superimposed, which is made from vapor and waterproofing materials. To do this, you need the following: Ruberoid, mounting foam, nails, insulation and fiberboard (or plasterboard).
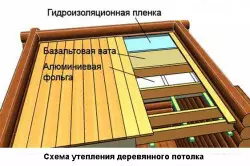
Wooden ceiling insulation scheme.
- The first thing is a vapor barrier. For the manufacture of this layer, a vapor barrier film or a foil insulation is used. One of the materials are steed on the ceiling between beams along the entire length, taking into account the height of the beam, and fasten it with construction clips.
- The next step is the insulation, its stealth at the level with the beam of overlapping. As a heater, you can use Minvatu or Ceramzit, and the foam. The insulation is imposed by waterproofing.
- Follow the shield, which lies perpendicular to the ceiling beams. Thanks to the shield you can move, without thinking about the ceiling loads. When laying insulation near the chimney, you need to choose a heat-resistant material that can withstand a very high temperature. Also at the location of the chimney between the ceiling beams and the insulation is made asbestos gasket.
- If the house provides the second floor or attic, then the insulation can not be stacked, but you can set the noise insulating layer. Dry sand or sawdust is used as this layer.
Article on the topic: Small panels: what it is, the advantages and disadvantages of the material
In conclusion of the preparatory work, the lamp is manufactured and only then the ceiling is trimmed with special boards, which are mounted on the principle of clapboard.
Before starting to mount the ceiling of the boards with their own hands, you need to create a crate, which is made from a cross section of 20x40 mm, while observing the distance between them about 30 cm.
Back to the category
Production of crates
With the help of the level, the line is stretched in the middle and the edge of the ceiling. It is designed to attach the rails, the first of which is placed near the wall. Rake places perpendicularly fastening the lining. After the lamp is installed, measure the length of the boards, and is excessively cut off.
- The most optimal option for fastening the lining is self-tapping screws. In order to hide the mounts, they are screwed into the groove. If you fail to hide the hats of the screws, then you can apply decorative screws, they will give the interior a kind of charm.
- After the ceiling is ready, it must be painted or covered with varnish. There are still special dyes that give the ceiling natural texture of walnut, oak or pine. The ceiling is painted, and the last stroke will not be superfluous along the surface of the "zero" sandpaper to clean the surface from random veins and bubbles.
To date, the decoration from the boards became fashionable and in his own way, and it remains to think from what other material you can make a ceiling so that it brings only warmth and comfort to every home.