
The windows of plastic today are becoming more and more popular. Not the last role in this is playing small compared to eurowindows of wood cost. Some owners prefer to install window sills and slopes on their own - it saves a significant amount. Such work is not particularly difficult for a person who has at least minimal construction skills.

The installation of plastic windows provides reliable sealing and heat protection.
Installing the windowsill and slopes are the final operations when installing plastic windows. The installation steps are quite simple and will not require any special construction skills. When installing plastic windows, the device of slopes and window sills is not necessary (provided that the thermal insulation carried out), but to create a beautiful interior, such elements are important.
Installation of window sills
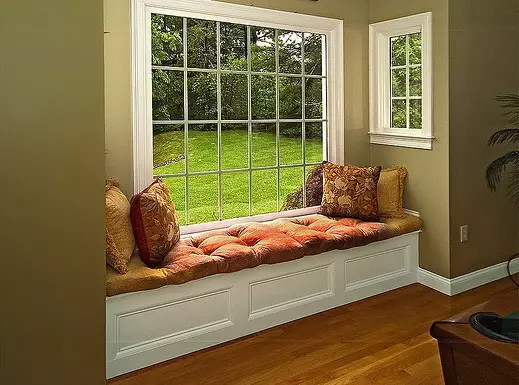
Installing the window sill is carried out so that he does not speak too much forward. So it does not create obstacles to warm air coming from the battery.
After the PVC window is delivered to the place, you can move to the mounting of the window sill. He should slightly speak out of the opening, at the same time, as it were, leaning on the wall. These protrusions do not have a width to be more of the starting strip of slopes - it will need to be installed later. Installation will not require special tools or serious skills for working. To dipping the windowsills at the desired length, you can take a simple saw or electric jig. During this operation, it is necessary to observe accuracy and cut, trying not to have a large pressure on the windowsill.
When mounting the windowsides, it is necessary to take into account the properties of the material from which they are made.
From how much qualified and competent will install, the life of the design of plastic windows is depends.
It is also taken into account how the installation of the window itself is. In places of contact of warm and cold air, condensate - moisture will be absorbed into the wood, from which the windowsill is made, which, of course, does not contribute to his durability. So that this does not happen, the windowsill must be separated from the walls and thermally insulated. When performing these conditions, it can be avoided that the windowsill will freeze and collapse.
Article on the topic: Decorative asphalt design. We do the usual coverage of unusual
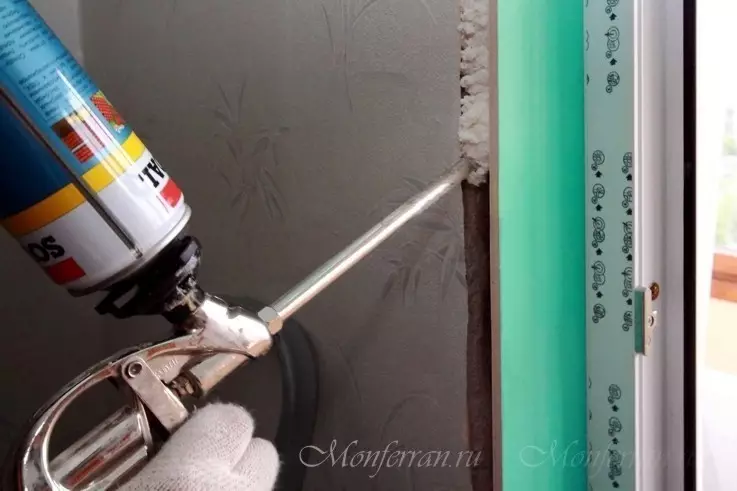
Fixing the windowsill must be made using a mounting foam. It will perfectly capture the windowsill with the surface of the slope, fill the emptiness and serve as a good thermal insulating material.
In order not to form condensate, the windowsill must be separated from the walls and thermally insulated.
Installing the window sill for plastic windows should be carried out so that it does not very much advocate. So he will not create obstacles to warm air coming from the battery. In the panel type houses, the windowsill are installed from plastic, the width of which is approximately 25 cm. If the window sill is purchased with broader sizes, it is easy to cut it off from the back side. The prepared detail will need to be brought to the subcast space about 1 cm, fix with wedges - from plastic or wood. In order to properly fit the windowsill for the desired size, it will take to measure the length between the walls by the window, in the outer edge of the opening, from the window to the wall. The finished element should be a bit already than the width of the window opening - it is so more convenient to install it, but it is already only a bit - with an incorrect measurement, the slopes will not be disappeared into the windowsill, but will be empty below. When drinking the windowsides, absolute symmetry should be achieved on both sides for those parts that appear beyond the opening.
Sequence of work
Before taking optional, you need to prepare everything for work. The space under the window is cleared - you need to completely remove the garbage and possible contamination, after cleaning the surface is slightly moistened. If installation is performed using vapor barrier, a piece of material should be wider than the opening. A pair insulation tape is glued with a narrow part to the frame, wide, after laying a foam layer, to the way.After that, you can proceed to filling the gap. Window spaces are filled with mounting foam. Pour foam follows lines, as dense as possible, so as not to leave empty space. Sometimes they do not pay special attention to the resulting clearances, considering that when the foam expansion completely breaks the remnants. When filling the seam foam more than 5 cm first, it should be filled with a foam of approximately half, after 15 minutes the procedure must be finished - fill it all to the end. The space should be provided for foam to expand - for this purpose, it is necessary to marry only three quarters.
Article on the topic: Combining wallpaper in the interior: in the living room (hall), in the kitchen, hallway
Wood bars are exhibited on the edge of the window for support. The thickness of them is selected in such a way that the windowsill can enter the space under the window, and the gap would not have remained. In order for the installation to be more even, the bars should be arranged strictly horizontally or with a slope toward the room. After that, you can fill in the foam space that left between the bar. A very large layer of foam can not be attributed to good options - this will contribute to the fact that the windowsill simply argue the arc. The space can be insulated using the material of the appropriate purpose or at least apply a thin layer of foam to the surface. Now you can also put the windowsill gently on bars. The installation of the windowsill is almost completed; It remains only to fill the last gaps and on top to counter the foam to place the load with sufficient weight about a day.
Installing slopes
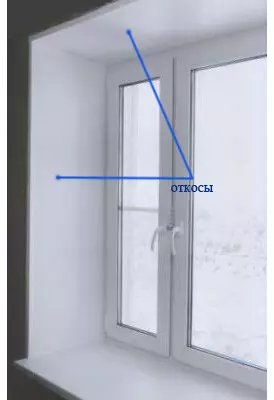
Sucks - opening windows located outside or indoors.
There was a turn of the final stage - this is the installation of slopes. Sucks - open windows, located outside or indoors around the window perimeter. This element should be attributed to decorative - their goal is to hide the fasteners of the joints and frames. The sloping device setting plastic windows is completed. The slopes are not so complex for installation, in combination with the window, they have excellent thermal insulation, sound insulation, durable and simple. The interior of the room with them looks more beautiful, completed.
To arrange the window in this way, the plastic panel will be required. In the panel houses where the slopes are narrow, a simple plastic panel without a varnishing coating, in the brick houses it is better to use a sandwich panel. You will also need other tools for sloping devices:
- Plastic strips - P-shaped, F-shaped;
- Wooden rail about 15 mm thick;
- stapler with brackets;
- Perforator;
- level;
- insulation material;
- knife, scissors for cutting metal;
- fasteners;
- White silicone.
Article on the topic: Heal of flooring height: Installation standards and types
Tools for installing slopes: perforator, level, material for insulation, white silicone, stapler with brackets.
While the slope setting is not fully completed, the protective elements from the plastic are not necessary - it will be possible to save the parts clean, neat. At first, the rake is mounted on the outer edge of the perimeter of slopes - with drills and self-tapping screws. To get smooth lines, you should use the level. With the help of such a design, the plastic is given hardness. When building support for plastic, it is not necessary to docile deficient rails - later they will still be hidden.
When using self-edges along the edge of the window, a starting strip is styled. Then the plastic panel will be inserted into it. It must be achieved that the starting strip fit as much as possible. Now it has arrived to attach the F-shaped strip. It is measured in accuracy in the size of the slope, and the remaining "tail" is simply cut off.
On both sides at the top of the plank will be a mustache. But it is very easy to remove with scissors for metal. Starting Planca is attached to the slate rail with the application of the bracket. It should be attached to the bottom strip - plastic will be inserted into this space later. If necessary, such a strip can cover and damaged wallpaper. The next step is cut exactly in size to the panel of plastic. It must be pushed first in the starting bar, and then in the near, inside the insulation layer should be laid. It turns out this way a hermetic space in which heat is preserved. If the jokes turned out to be uneven, you can close them using white silicone.