Photo
Do you need shelves or cabinets on loggias?
The rack on the balcony became extremely popular lately. Almost all of our apartments are equipped with a balcony or loggia. Traditionally, it is here that there are unnecessary things at the moment, home billets, tools and many different things. Without a certain system of ordering, all things are sooner or later turn into an inesttic and uncomfortable trash, taking your living space.

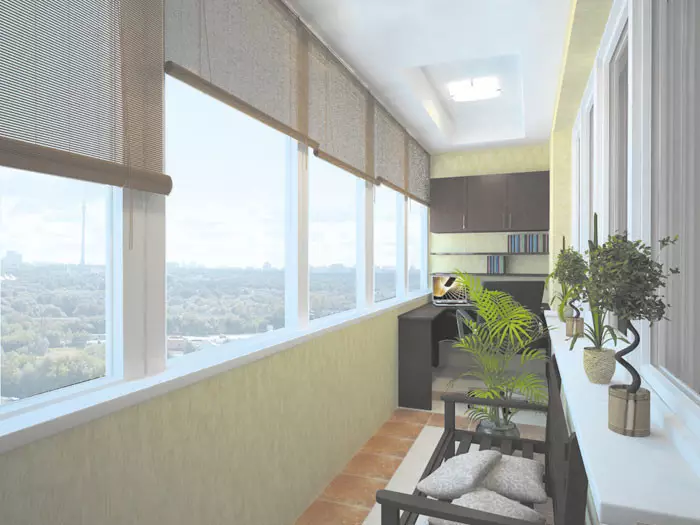
Shelves with plated colors will allow your loggia to become a cozy oasis, a sort of winter garden, where it is so pleasant to drink a cup of tea in the evening.
But putting quite a bit of effort, you can make loggias not just functional, but also attractive premises, real pride of the apartment.
Shelves and wardrobe will come to the rescue. It is they will help to organize space as efficiently as possible by highlighting each item its certain place.
The closet on the loggia is the perfect place to store conservation, tools, books or rarely used equipment. And the shelves with plated flower pots will allow your loggia to become a cozy oasis, a sort of winter garden, where it is so pleasant to drink a cup of tea in the evening. Both the cabinet and the shelves do not occupy a lot of space, so do not be afraid to significantly reduce the area of the loggia. Even on the contrary, the suspended structures allow you to maximizely ergonomically and efficiently use space, to visually expand it or lengthen it.
Racks must necessarily meet the following requirements:
• High strength;
• moisture resistance;
•safety;
• Optimal placement.
Racks for the balcony, no matter whether you are planning a colors shelves or a full cabinet, must meet the following requirements:
- high strength;
- moisture resistance (insufficient protection of window frames or intensive watering of colors can damage, wooden structures are subject to special danger);
- Safety (all structures on the loggia, it does not matter, they are made by a master or do it yourself, must be securely fixed);
- Optimal accommodation (loggia originally not possess large spaces, therefore, building metal or wooden structures with their own hands, it makes no sense to make them cumbersome and prevented the penetration of light into the room).
Article on the topic: Homemade concrete mixers: manual, electric
Installation of rack with your own hands
Racks for the balcony can be metallic, wooden, from laminated chipboard, plywood or combination of materials. Metal - the most durable. If the cabinet should hold very heavy items, it makes sense to make a metal frame. Laminated chipboard is more popular than wooden, since they are easier to care for them, and even laminated chipboard is very aesthetic. If you decide to make a wardrobe or shelf with your own hands, it is better to create a balcony drawing to determine the place and size of structures, as the doors must be opened, etc. Already at this stage, it is easy to identify problem nuances, which will avoid alterations or excessive consumption of materials. For the manufacture of racks, you will need it:

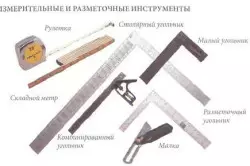
It is very important to have a high-quality measuring instrument, which makes it possible to build an exact design.
- wooden bars (approximately 50x50 cross section);
- level;
- drill;
- self-tapping screw or bolts (3-4 mm shorter plate thickness);
- dowels;
- loops (for closed racks);
- Chipboard (or other material you have chosen);
- Metal fastening corners.
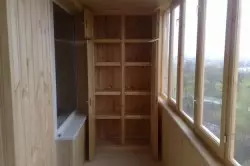
First, the loggia is marked. If the rack takes the entire floor of the floor to the ceiling, then the dowels, respectively, on the floor and on the ceiling, wooden bars are fixed. The latter must be formed in accordance with the depth and width of the shelves strictly parallel to each other. Between the main bars are made of transverse jumpers. The next stage is the screwing of chipboard of chipboard to the bars to form a shelving box. The rear wall can be closed by a chipboard with a sheet or other material to prevent the intensive formation of dust.
Colors Shelves: Production Stages
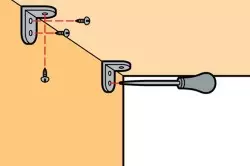
To secure the shelves inside the box, use metal corners with holes.
It makes sense to make shelves different in height so that it is convenient to put things in all possible forms and sizes. To secure the shelves inside the box, use metal corners with holes. For one shelf, you will need 4-6 corners: two on the side walls of the box and two on the back wall, if it is available. Chipboard can be purchased already cut under the desired dimensions. If you drive it yourself by the jigsaw, make sure that there are no chips on the colored surface.
Article on the topic: Balcony of MDF panels (photo and video)
Check the mounting of the corners using a level. If the corners are perfect, only then the shelves are screwed to them. If the racks for the balcony must be closed, the loops should be attached to the side walls (2-3 pieces depending on the size of the door) to which the chipboard is hung. Cabinet doors are equipped with handles. You can additionally use magnets or latches. If the rack is made of an unprepared tree, it should be painted or processed from fungus, moisture and pests. Laminated chipboard is not necessary to process. Make the shelves for flowers or closet on the loggia do it yourself quite simple. And efforts spent rapidly reign on the balcony and attractive species.