
Knitting is creativity with which unique things are created. People can engage in almost all ages. When knitting any product with sleeves should pay attention to the style of sleeves. There are eight shafts of the sleeves: in a vtachny, sleeve without a bay, with a shallow armor, with a pursuit, rlange, bat, flashlight, kimono. In this article, we will talk about the Facon "Rlange". To knit the product, this style is quite useful there will be a pattern of the sleeves "Raglan". Applying the resulting canvas to the pattern in the process of knitting will help avoid many problems and will relieve the need for bandages. How to sew a sleeve "Raglan"? You will learn about it very soon.
Often in journals for knitting there are models with a faon rlange. Below you can learn how to knit the sleeve Raglan Ipes. It can be knit both from above and below. Consider the first option when the rusher knits from below. And there are two possible options: knitting with seam and seamless.

Raglan with seam
In this case, all parts of the product knit separately, and then stitched. First you need to make a pattern . Building patterns of the main parts (before, back) is made similar to the pattern with a swap sleeve. The difference is only in the premium and neck. Below are photos for a visual example.
Sticks with a swatch
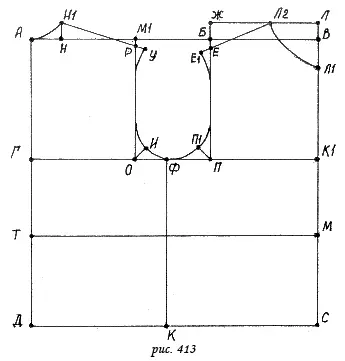
Logsa Rlan.

The photo shows that the bottom of the patterns are absolutely identical, only the top changes.
It will already be possible to calculate loops. To build patterns, you will need source data, that is, measurements. You will need to remove the following measurements:
- The length of the back to the waist;
- Length of the product;
- The length of the regulated;
- Neck girth;
- Chest girth;
- The length of the sleeve;
- Sleeve width at the wrist;
- Sleeve width at chest level.
Article on the topic: Stands under the crochet circles. Schemes
The measurements were removed, now you can draw the pattern.
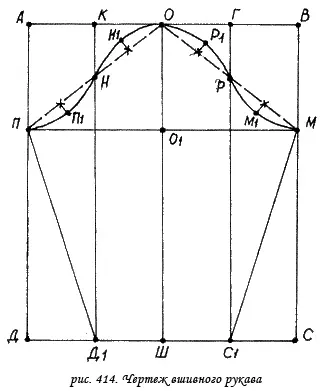
Ralan's sleeve construction begins with a rectangle drawing Absond, where hell is the length of the sleeve, and AB is width.
From the point and down lay the length equal to 1/6 of the gripping of the chest plus 6 cm on the free felting. Denote P. P. This will be the height of the regulated. Similarly, we do on the other hand. From the point B measure the desired length and denote the point of M. From point P to the right, we deposit 2.5 cm, the point we denote as P1, from the point M to the left weeping 2 cm, the resulting point is denoted by M1. Next, the segment AB Delim in half and put the point of O. from the point to postpone 3 cm on both sides. And we put the points to and G. from the point g to postpone 2.5 cm, we denote it g1. This point is connected to points O and M1. To designate the bottom line equal to the width width, we divide the segment of the SD in half. The resulting point will be the letter sh. You have the measurements of the width of the sleeves, they must be divided into half. The resulting number of centimeters lay on both sides from point sh, we denote them D1 and C1. Thus, our sleeve Raglan consists of the following points: K, O, G1, M1, M, C1, W, D1, P1. More clearly can be seen in the photo below.

Pattern of the enclosure sleeve Ralan is ready. Now you can safely begin to knit a hood. To do this, we recruit the appropriate wrist width, the number of loops and knit sleeve, regularly applying to the pattern. To expand the sleeves on both sides, make an increase. Having reached the armor, it is necessary to close the first 3-4 hinges, then we reduce the loop in each second.
As you can see, applying the pattern knitting sleeves Ralan on the knitting needles becomes simple and easy.
After all the details are connected, it remains only to connect them. Make it is required very carefully, so as not to spoil the appearance of the finished product. It is best to cross the use of vertical seam . In this case, the seam is almost imperceptible. The seam is performed as follows: details place the front side up against each other. Since the edge will not be needed, they should be bent inside out so as not to be disturbed. From the inside, we enter the needle in the middle of one looping, after we take and fix the opposite side on the thread, we return to the first part.
Article on the topic: Openwork scarves with knitting needles: Schemes and descriptions of working with video