
There is nothing complicated in the wall facing the wall. With a smooth surface
Good materials and tools, it can make even a beginner. Other
it's if the walls have large enough irregularities and differences, then beautiful and
Exactly laying the tile will be more difficult, especially if you do it for the first time. Such
Cases usually adjust the differences with a larger or smaller amount
Glue directly during tile laying.
Facing tile can be laid both before and after the floor. it
Depends on the premises and the project.
If the walls first are separated, then the floor tile is installed before
laying the lowest row of cladding.
If there will be no tile on the wall behind the bathroom and on her sides, and the floor is covered with all
Whole, first it is better to install an outdoor coating. After laying outdoor
tiles, she needs to quickly dry at least a day (see manufacturer's instruction
glue). You can proceed to the walls of the walls when the tile can be more than
Walk and install in the room bath. At the same time before starting work already
The installed floor tile must be covered with thick cellophane or other
Material, so that it can not be blic and scratched.
Also, do not forget to decide where to put the bath,
Sink, toilet, where to hang the heated towel rail. If their location is not
will change after repair and the pipe does not need to be replaced, then you can proceed to
Tile work. If the location position is changed, then you need to mount
new wiring. In other words, tested the sewage pipes, cold and hot
Water to the new location of the above plumbing devices. For
The need for pipes can be hidden by trimming them with plywood, plasterboard or other
suitable material (do not forget to make the door to the valves of hot and cold
water). You can also seize the bath on the outside (with the door to water),
Then covering the trim tile.
list
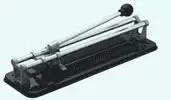
Tile laying materials
list
Tile laying tools
Preparation of base for wall cladding

The surfaces on which the tile is stacked:
Plastered base - if it is new, then it should be completely
dry If the old and was covered with paint, then it is necessary
Scratch to ensure good adhesion with glue.
Plasterboard sheets (GLC) - must be attached to solid
The base that is not exposed to deformation. It is desirable that the plasterboard was
Waterproof, first of all it concerns bathrooms.
Concrete base.
The base already covered with tiles. On the old tile can also be
Stick a new one, if the first is perfectly kept on the wall. Besides, in
This case is not recommended to save on glue for tiles, because Need
Special mixture capable of gluing tile on the tile.
The painted base should be well scratched to improve
Adhesion (clutch).
You can start laying the tile when the surface is cleaned, aligned, on
It does not have greasy and soap spots, it completely dried after
shuttering (if any), the walls are projected
corresponding compositions, there are no residues of old glue, etc.
Search the lowest point
Walls with wall cladding

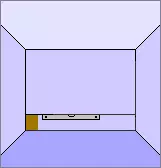
Laying of facing tiles starts from the second row. Lower row
Located last and cuts off where necessary. Crossings for
Facing tiles are usually used in size 1.5 or 2 mm.
First you need to find and note the corresponding horizontal and
Vertical lines to start laying the tile.
First of all, it is necessary to locate the lowest point of the wall.
If the room is small, such as bathroom, then this can be done using
Level (Waterpas).

Need to make a mark in an arbitrary location on the wall at an altitude equal to height
one facing tile (that is, the height of the first row of tiles) that you
Going to stick. Next, using the level at this height you need to draw
Absolutely horizontal line. In the same way, we act with all the walls,
those. We get horizontal lines throughout the perimeter of the room. Via
Roulettes Measure the distance from the floor to the feature obtained and reveal the lowest low
label. It is she who will be the starting point. If around the perimeter of the room
It turned out to be a flat line and the distance from the floor to this line everywhere equally,
You can proceed to the next step. If the distance from the floor to the line is everywhere
Miscellaneous, starting from the lowest tag, at its level we spend another clear
Horizontal line with Waterpas around the perimeter of the room. From this
The new horizontal line will begin the second row of facing tiles.
If the room is large enough and the level (Waterpas) will be hard
determine the lowest point of the room, then this can be done using
Hydrohrowing.
The procedure for action is the same as when installing a screed. We put the mark B.
arbitrary location on the wall at an altitude equal to the height of one facing tile
(i.e., the height of the first row of tiles) that you are going to stick. Zero
The mark of one of the flasks we combine with this point, and transfer the second flask to place,
where it is necessary to make the markup of the horizontal (for example, in another angle of the room).
After leveling the water level in the flasks on zero marks, put
The second mark is about the second flask. Thus, you need to measure all the corners
premises, and also desirable to make intermediate labels on the walls (than
More measurements, the better).
At the same time, for measurements, the first (basic) label should be used that
Reduce the error of the arrangement of the horizontal plane.
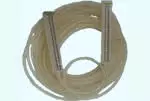
Next, a folding cord or a long rail will be required, with the help of which
A line is carried out connecting all the risks. It turns out absolutely smooth trait
The perimeter of the entire premises.
Then, with the help of a roulette, it is necessary to measure the distance in the entire room from
Floor to the feature obtained and reveal the lowest mark. Starting from the lowest
Tags, at its level we carry out another clear horizontal line using
same hydroeer throughout the perimeter of the room. The principle of action is the same:
we combine the zero mark of one of the flasks with the lowest point of the room, the second
The flask is moving around the perimeter of the whole room and put the mark after alignment
Water level in flasks. Next, connect all the marks using a long rail or
Missing cord. From this new horizontal line and will begin the second
A series of facing tiles.
On the resulting horizontal line it is recommended to nail the profile or
Direct wooden rail. This will help start laying the tile, and will
Prevent tiles slide below this line down the wall.
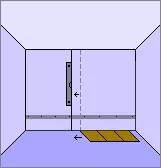
Optimal location of tiles when cladding walls

First, you need to think in advance where to start laying the tile on the wall,
Depending on the overall project and the size of the tiles. This will help to avoid unnecessary.
Crimping and unattractive joints in the corners of the room between the tiles.
First you need to find the center of the wall using roulette. After that, Ot
found center to the right to the angle (or to the end of the region, which is necessary
Lining) on the floor through crossbars lay down the tiles that are going
Stick on this wall.
If in order to finish the series you need less than 1/2 tiles, then "point
The center "must be moved to the left to find the optimal position of the tiles.
Such regulation will insure most of the tiles on both ends of trimming, and
Laying will be most attractive. It is not recommended to leave trimming in
Corners are less than 1/2 tiles, and the more very narrow (2-3 cm). As a result, such laying
Will look ugly.

After the optimal location of the center of the Center is found, you need
On the wall to hold a strictly vertical line from the floor to the ceiling at this point. it
You can do with the level (Waterpas) or a plumb.
In the same way, we act with all the walls of the room, finding the optimal
The position of the "point of the center".
Wall Facing: Laying Wall Tile

Decide where to start. If there is an outer angle, start there and move on
Direction to the inner corner. If all the corners are internal, then start in the "point
Center "from the vertical line. Holding a toothed spatula at an angle of 30-45 degrees,
Equally apply glue on the wall. Take a small square at once
Walls, about 60x60 cm until you get the skill. After applying glue
The surface must be covered with tiles as quickly as possible (read the instructions
Glue manufacturer). In hard-to-reach places where it is hard to apply glue on the wall,
Apply it directly to the tile before laying.
Leave the tile to the wall and put on it, slightly moving to the sides. Too
Strong push will squeeze glue in the seam between the tiles. Often use the level
To check horizontal and vertical tiles alignment.
After several tiles are laid on the wall, it is necessary to clean the glue from
Seams between them. Do not let him snack, because First, it will be difficult
Remove, secondly, it will prevent the evaporation of moisture from glue, thirdly (rarely),
It may affect the formation of cracks on the tile shard, and then on the glaze.
Thus, install the tile in the entire room to the ceiling, constantly
Checking the installation level. After this tile should dry
about 24 hours before removing the profile or wooden rail (if they
used). Be sure to read the manufacturer's instructions on the package.
While the glue dries out, you can do the installation of sliced tiles.
Wall Facing: Cutting Ceramic Tile

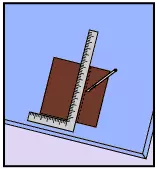
Cut tile is not hard. Straight cuts are easy to make tiles.
In addition, some of them can also be made round cuts in the tile
(Read the manufacturer's instruction). If glass cutter is used, then scratch
It is using a ruler the necessary line on the glazed surface of the tile.
Glazed side up Put the tile on the edge of the table (or any
Suitable subject) So that the incision coincided with this edge. Click down S.
Both sides of the tile until it breaks along the seam.
If you need to make a cut out of the wrong shape, for example, around the bath or
sinks, then if possible, move this item from the wall to so much to in
The tile placed the resulting gap between the wall and the object. After
Draw on it a felt-tip pen neck the necessary form on the contour of the subject.
Sometimes it is impossible to push the item from the wall. In such cases, you can make
Paper pattern in the size of the tile. Through the cross, the template is applied to the wall,
smoothed, and it makes the necessary cuts along the contour of the subject. Further
The template is superimposed on the tile, and the marker markings are made on it. For this
Markups need to scratch the glass cutter line, then, applying tile forceps,
Shake a unnecessary piece. As the contour line approaches, press off
Tiles are all smaller and smaller pieces. Clean the cutting edge with a sharpening stone
(Flying), finally customizing the cutout.
Also for curly cuts, you can use a clip with a clip of cutting
ceramic tile. The flexibility of the canvase makes it easy to change the direction and
drink curly cuts.
In addition, you can use a grinder with a suitable disk.

Bulgarian can also be fired and polished cutout.
Sometimes the pipe passes through the whole tile, it is necessary to make a round
cutout. It can be done:
With the help of a suitable stoveturis;
With drill, making holes over the entire cutout circuit;
Cutting the tile in half in the center of the pipe and doing in each of the pieces
semicircular cuts.
In order to apply marking on the tile, you need to attach a tile first by
One side of the pipe, then under it or above it. On the tile, apply the lines on
Level of top, bottom and sides of pipes. On these labels spend on the surface of the tile
Lines at right angles to its edges. Inside the received rectangle draw
The circle of the corresponding diameter (tube dimer). If you make a cut,
cutting the tile in half, then it must be cut through the center of the future
Circle. Depending on the direction of the pipe, the tile can be cut by
vertical or horizontal so that the pipe itself is maximally hidden
Bog between halves tiles. Next you need to cut on each half
The semicircle as described above.
If the pipe passes through the jack between the tiles, the procedure is modified
accordingly. Do not forget to put crosses, otherwise tags for tiles
Will not be in that place.
Wall cladding: Laying of the Lower Row
wall tile

Before proceeding with this stage, install the floor tile (if this
Not yet done).
The lower row stacked after the rest of the facing tile is already tight
Keeps on the wall. First of all, delete the profile (Wooden Rake). Then,
After trying on each tile, lay the lower row. Cut it from below where it
necessary. The easiest thing is to do it with a grinder (especially if you need to spill
Little). It is possible to cut the tile and cut these cuts immediately.
Wall Facing: Shutters

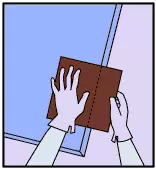
Before grouting the surface, the entire surface must be carefully cleaned,
Remove the remnants of the glue on it. If you need to use a solvent and knife.
Next, knead the grout, strictly following the instructions of the manufacturer on the package.
Use a rubber spatula to apply grout. Carefully treat everything
seams.
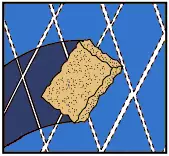
Wrap an extra grout from the surface with a clean damp sponge. Thereafter
Treat the seams with a rubber eraser or a toothbrush handle, removing unnecessary
grout. Thus, you can seal the grout in the connections and get rid of
Explosions.
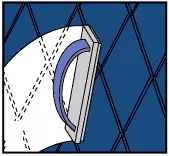
Remove the grout in the places between the bathroom and the wall. These intervals in the future
Filled with sealant to ensure waterproof.
After the grout dry suhes the surface with a dry cloth.
Article on the topic: Home Textiles: Types, Materials, Features