
Table of contents: [Hide]
- Popular types of laying on the floor
- Tools and material
- How to lay a laminate on the floor: instruction
- We put the first row
- We put the second and subsequent ranks
- We put the last row
Among the floor coverings, the dominant place is occupied by laminate. Such a generally accepted name has been fixed by the coating, which is a Fiberboard with high density, more precisely - the Fiberboard plate covered with a laminated film and having a special impregnation. The drawing applied to the protective film can recreate wood texture in all its varieties, as well as ceramic tiles, marble, etc. Laminate actually replaces expensive parquet and inefficient and cold linoleum.
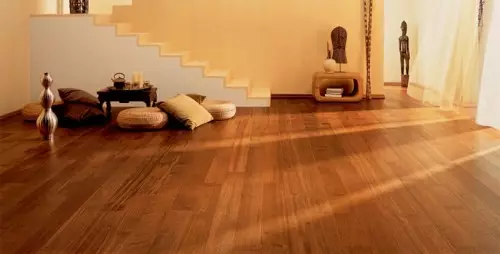
Laminate is resistant to moisture, high temperature, sunlight.
At the same time, it has the following advantages: hygienic, moisture-resistant, heat-resistant, resistant to sunlight, resistant in abrasive terms and for various chemicals. In addition to the listed advantages and advantages, laminate has another one - accessibility both by price and laying, as it can be done on its own. Laying of laminate on the floor in the room does not require special education.
Popular types of laying on the floor
Before proceeding with the disclosure of the order, the rules and sequence of laying laminate on the floor alone, it is worth dealing with the species of the procedure itself.
It is placed both along the room and across it, and diagonally. In the last form of laying a laminate on the floor, a lot of waste is formed, this occupation is more time-consuming. In this regard, the direct laying of the material on the floor is more preferable. In addition, it is believed that the laminate looks better if it is laid along the room.
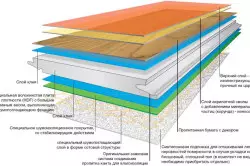
Laminate structure diagram.
At the same time, diagonal styling increases the space in a visual relationship. To obtain the necessary visual effect, the direction of laying is determined depending on the illumination, the light source. For premises with several windows, it is necessary to take into account the light falling from the largest window.
In the laminate packaging or in its documentation, the maximum styling width is indicated. It is necessary to take into account when purchasing laminate for large rooms. Recommended in the corridors and narrow rooms to lay the laminate across the long walls, and in rooms with one window - longitudinally light. Recently, steel styling from different types of coatings has become fashionable. In any case, it is necessary to be attentive to instructions and take into account the size and illumination of the room.
Article on the topic: Vintage doors: Photo Overview and Methods of manufacture
Back to the category
Tools and material
You need to start with the acquisition of a substrate for laminate and the following tools:
- roulette;
- a hammer;
- Electric jigsaw (if not - mechanical);
- mounting bracket;
- bar;
- Plank wooden and marker or special pencil.
Types (methods) laying laminate depending on manufacturers are:
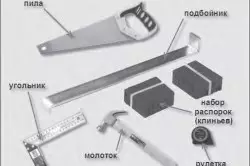
Tools for laying laminate.
- Kvikstep, implying independent connection of the flooring separately - on one board;
- Type assuming the laminate assembly for the entire length of the room and then docking among themselves (laying of entire rows).
Which of the species is preferable? The first, since in addition to its reliability, it is recommended by manufacturers.
Types of laying on the method of connecting boards are distinguished - through locks and with glue. The laying with the help of adhesive is in fact not applied - there is no demand for it.
As for the calculation of the laminate, there is a simple formula: the width of the room is multiplied by its length, the percentage of trimming consumption is added.
An indicator that takes into account the consumption of trimming with rectangular laying will be 10%, with diagonal - 20%.
After a careful selection of laminate, the lighting and size of the room is not excluded the possibility of putting it on their own. Where to begin?
Back to the category
How to lay a laminate on the floor: instruction
Now the time of phased disclosure of the process of traditional laying of laminate has come.
Laminate laying options.
Adaptation of the laminate to the temperature regime of the room.
Laminate in packing must be left for 48 hours in the room where it will be laid. At the same time, the temperature in the specified room should be not lower than 18 degrees, and humidity is not more than 75%. If the store did not work out to make the rejection of boards with defects, then it can be implemented now.
Preparation of the surface under laminate laying.
First of all, the surface should be perfectly even and durable. It is important that it is clean and dry. Laminate can be put on parquet or linoleum under the condition of their reliable assault. It is impossible to lay a laminate on the carpet. If the surface is not made of wood or not covered with linoleum, then it is necessary to make vaporizolation - cover the surface with polyethylene film or construction foil.
Now the line of the substrate for laminate.

Laminate laying scheme with adhesive way.
It provides moisture protection function, as well as thermal and sound isolation. Under the laminated floors use various substrates. The most popular: polyethylene, cork and bitumen-cork materials. The substrate is recommended to sharpen as laminate styling - a joint in the junction. So it will not be interpreted under their feet. The junctions can be fixed by applying a sticky tape. The substrate will not be needed if the laminate is purchased, which already has an insulating substrate.
Article on the topic: Proper Drain Device Shower Cab
Back to the category
We put the first row
The masonry of the first row of laminate begins on the far corner of the room with the calculation to move from the corner to the doors. It puts along the wall on the floor. Boards are connected by ends. It is more convenient to work with click locks (easy and convenient during styling, snapped without a hammer) - quite minor efforts to connect the boards. As for locks like Lock (here, to connect the boards, you need to insert the crest of one part in the groove of another and latch the lock using the hammer), then without a hammer it is not necessary.
Scheme of proper docking laminate.
It is important to remember that the quality of work depends on the accuracy of laying the first boards. The first board rests on the wall, and the second falls so that the ridge is in front of the groove to ensure the docking. That is, the castle should snap up - the crest of the second part should go into the groove of the first board, as a result of which they should be tightly connected. Such order is stacked the whole range.
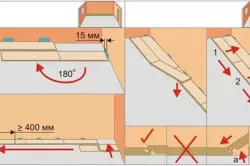
The first row of laminate (important feature!): Laying of laminate requires a mandatory presence of a gap of 8-10 mm between a number of boards and wall. This is due to the peculiarity of the tree change over time in volumes. If this requirement is not respected, the laminate may be subjected to strong deformation. The gap for insurance from these linear extensions is fixed with wedges. Instead of special wedges, you can use pieces of cropped boards.
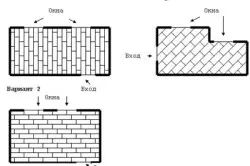
In the case of a large area of the room, in which laying the laminate, in its middle the seam of 20 mm width is made. Seam can be covered with a plank having a texture of laminate. The circuit of the board cuts up to the desired length. In order not to damage the laminated surface of the board, discharge them face down. If it is necessary that the laminate is laid tightly and securely, the chess order of laying should be applied. In addition to reliability, it is also beautiful.
Back to the category
We put the second and subsequent ranks
To ensure the above chess order, or brickwork, the first board of the second row we saw in half. That is, to ensure chess order, each second row begins with half the board. From the second row, the connection of the boards is already carried out with the end and longitudinal sides.
Article on the topic: Dismantling Bath - We solve the task with ease!
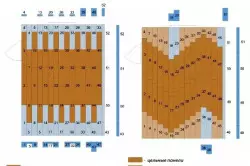
Laminate panel layout schemes.
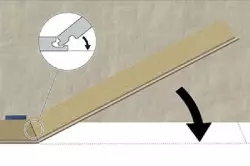
Comb (spike) in the groove of another board must be inserted at an angle from 30 to 45th. After attachment, the board is lowered to a horizontal position and is forgiven to the already laid board. There are cases when, due to the presence of a barrier, the connection of the boards locks is not possible. Then the locks are spill, and the boards are glued special for laminate with glue.
Laying of laminate: Second feature. It is necessary to know that glue with time due to moisture is washed out, as a result of which slots appear in the joints of the joints. When laying the second and subsequent rows, do not forget about the wedges between the boards and the wall. They must be around the perimeter of the room.
Back to the category
We put the last row
The most difficult and difficult is the laying of laminate of the last row. This is due to the fact that in the process of laying, in fact, you always have to cut all the boards of this row along. It rarely happens when the width between the penultimate nearby and the wall can coincide with the width of the board taking into account the antidiffamation clearance. The electric jigsik can help here.
Laminate laying scheme.
If a laminate is used with lock locks, the last row is easy and convenient to put it with the assembly bracket.
When laying a laminate near door openings, it is necessary to preserve the gap between the wall of the room and the door jambs. If the door box is made of wood, then the laminate must be laid in this way so that under the platband lay free.
After completing all the works related to laying laminate, proceed to the installation of the plinth, using an electric drill and a corner-pattern. Before the plinth, cover the gaps, the spacer wedges remove, the edges of the insulating layer align. It should be noted that, along with the substrate, the plinths are an important auxiliary material for laying laminate. Good plinths have light weight, resistant to moisture.
For locking laminates, readiness is determined with the installation of plinths. If you installed them, you can be proud of new skills.
There is nothing complicated in self-laying laminate. At the same time, it is unambiguous that the maximum accuracy and patience is needed.
These recommendations will help you in choosing and acquiring a laminate, will give clear and understandable ideas about the necessary materials, tools, types and methods of laying laminate.
Laminate with your own hands for your home can be necessary. Laying of laminate on the floor is a fairly exciting process.