
So as not to knock your teeth in a cold apartment or private
House, you need to think in a timely manner.
The first and most weighty source of heat loss in homes is the walls. But, if in a country house, in the country or in the garage, the insulation is most often solved in favor of outdoor performance, then in the apartment, especially if it is facade and located in the areas of the city, where it is forbidden to change the architectural appearance of the building, preference is given
Inner warming.
Hansard insulation is also possible only from the inside. Although, in fairness, it should be noted that the insulation of the walls of the foam inside the apartment requires further repair and finishing works.
In addition to foamflast, for internal insulation can be
Used: mineral wool, expanded polystyrene or even spraying polyurethane
foam. However, most owners prefer precisely foam. Why
Is this thermal insulation material?
Advantages of insulation of foam from the inside:
- low cost;
- non-toxicity. This parameter is especially important because
The inner insulation of the walls of the walls of the foam is performed;
- Simple, intuitive technology for performing work;
- the opportunity to warm up with their own hands;
- Excellent thermal insulation properties of foam (coefficient
thermal conductivity 0.038 W / m ° C).
It is better to illustrate this indicator by an example. For
obtaining the same result you need to use 100 mm foam and 160 mm.
Mineral wool. Comparison with other materials is presented in the diagram.
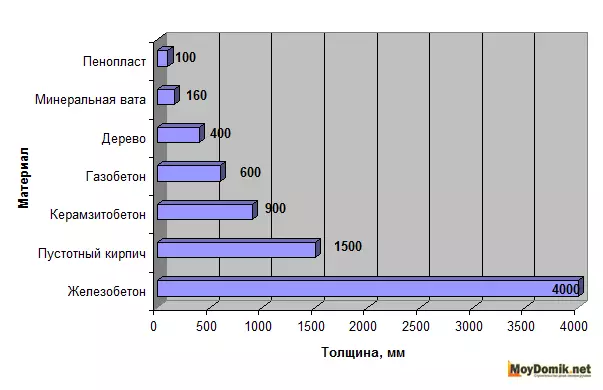
Diagram - Comparison of thermal insulation properties of foam with other materials
The diagram shows that most effectively still, will
Use foam for insulation of walls from the inside.
Foam selection for wall insulation
Basic requirements taken into account when choosing foam
Such: density and required thickness. As for the density, then with more
It is easier to work with a dense material. He will not fly away in the form of balls by
All room.
According to the norms of DSTU B.V..2.7-8-94 "Plates of polystyrene foam.
TU "Polyfoam is divided into four groups and has the labeling of the following order:
PSB-C 15, PSB-C 25, PSB-C 35 and PSB-C 50. The properties of each brand are indicated in
Table
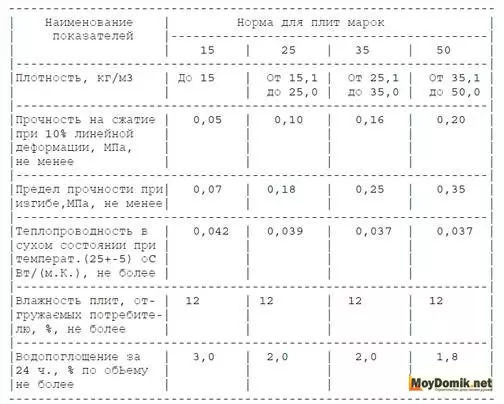
Table - Polyfoam selection for wall insulation - marking and properties
PSB letters mean a method of manufacturing foam -
Pressure method. The properties of these brands are unchanged for a long period
time (up to 40 years).
Article on the topic: How to put the slopes with your own hands?
At the same time, many mistakenly believe that the numbers at the end
Markings indicate the actual material density. However, it is not. After all
According to the Mentioned Dasta

Extract from DSTU about foam density
Therefore, in fact it turns out that the PSB-C -15 has a density of +/- 9 kg / m3. And PSB-C 50 - +/- 30 kg / m3. Take this in the calculation!
Tip:
For insulation of the walls you need to take a brand not lower than PSB-C 25.
The second point is the required thickness of the sheet. Many are asked
The question is which thickness of the foam to choose. The answer depends on a number of factors:
- Temperature regime in the region;
- The direction and strength of the wind;
- Wall material (brick, concrete, wooden);
- The expected increase in heat after insulation.
Tip: To improve the properties of foams should be purchased
Not one sheet with a thickness of 100 mm, and two 50 mm thick. and put their flashes
So that the shake of the first layer fell to the middle of the second layer sheet.
Instructions for the insulation of walls by foam from the inside
For work, you will need a building material and tool.Material:
- Styrofoam;
- Serpentine ribbon for sealing joints;
- polymer mesh;
- cement-based glue;
- umbrellas (special dowels for fastening foam);
- Universal primer;
Tool:
- Roller or painrol brush for primer and container for it;
- Perforator and drill;
- spatulas;
- sandpaper;
- Level, line and labeling pencil.
Provides work in several stages:
1. Pretending stage
The importance of this stage is difficult to overestimate. Because from quality
The basics depends and the quality of the clutch of the sheet with the wall and the ability of the foam save
its thermal insulation properties.
Before you get to work:
- Replace windows if necessary. Otherwise
The effectiveness of insulation will be reduced to zero;
- Clean the wall from wallpapers, clogged with nails, etc.;
- close all the cracks;
- Remove fungus. If it is not washed off, you need to consider it
emery paper;
- dismantle the plinth;
- Crop out floor covering on sheet thickness. Material
Mounted only on the bearing coating;
- Align possible irregularities wall. Otherwise
Between the sheets there will be air, which is fraught with displacement of the dew point.
Tip: To eliminate small defects, use putty,
To align the wall with transitions more than 10 mm - only plaster.
2. Preparatory stage
At this stage, the following steps:- Prepared Wall is processed by primer. From wide
Pitrate varieties give preference to a universal mixture
Verified manufacturer. For example, good reviews about Ceresit St-17. After it
Application on the wall is formed a thin film that will provide both bioprotechnics and
The best adhesion of the adhesive mixture with the wall;
Article on the topic: Zigzag pattern in the interior (12 photos)
Tip: Do not use the sprayer to apply primer.
So it is applied and dries unevenly, and this reduces its properties.
- The wall should dry. To do this, it is enough to provide
good air ventilation in the room;
- Marking is applied. As practice is evidenced, walls
Most apartments of the Soviet period building (Khrushchev and Panel Houses),
uneven. If you have the same, then draw the line, as close as possible to the floor.
On it you will even even. Then the subsequent ranks of the sheets will fall
relatively smooth Why relatively? Yes, because DSTU is provided
Deviation +/- 10 mm on a sheet of size of 1x1 m. At the bottom and on the sides, we embarrass
trimming foam. For the same reason, you do not need to do a large number
Billets and apply the drawing to the entire wall - only at an angle.
3. The main stage
Wall insulation by foam from the inside can be performed by two
ways:
- Frame method . This method is used if planned
Further trim plasterboard or clapboard. It is mainly due to
What the thickness of the received UD and the SD profiles are 27 mm. Polyfoam is stolen between
with them. And thickness of 27 mm. clearly little in order to perform high-quality
Wall insulation by foam inside the house. But, under the lining the skeleton method
Suitable as it is impossible. This is due to the fact that it is equipped for it
Wooden frame with a thickness of a bar of at least 50 mm.
- Frameless way . If planned wall decoration
putty.
How to insulate the walls of foam from the inside - sequence
Performances with a frameless way of insulation under putty or plaster
We proceed to the installation of foam on the wall. Work starts
bottom, from a remote angle.
- A glue solution is applied to the sheet. The method of applying is shown
in the scheme;
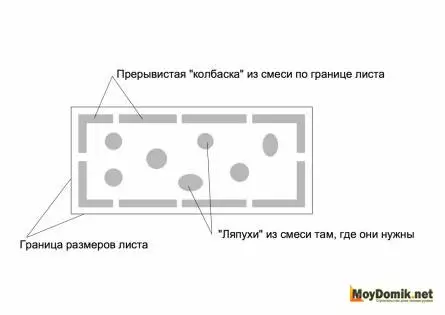
Method for applying glue on foam
- The sheet is applied to the wall and the floor (if it is uneven, then
drawn strip) and pressed;
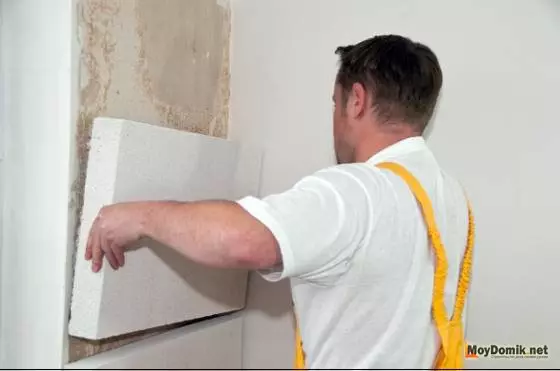
Applying foams to the wall and semi
Tip:
Davit is not much, otherwise the sheet is sold.
- A hole for a dowel-umbrella (fungus) is drilled in the center of the sheet;
- the umbrella is fixed by a sheet;
Tip: The umbrella hat should drown a little in the foam
Or be lonely with a sheet. Otherwise difficulties may arise with
Finish finish.
- For more reliable fixation in the corners of the sheet are also clogged
umbrellas.
Accessing umbrellas for reliable foam fixation
- If polystyrene polystyrene plates are smooth, you can perform
Installation according to such a scheme.
Article on the topic: Features of living room design with a TV on the wall
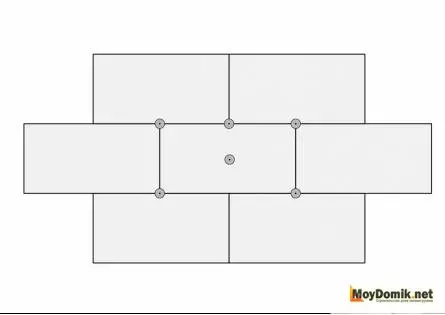
Foam mounting scheme
Such a device allows you to save on umbrellas, but
Makes the installation of a few "hlipping".
So that the insulation of the walls of the foam from the inside was more
Qualitative, the sheets of the second row are shifted. This installation scheme will ensure the absence
Perpendicular junctions.

Scheme of the displacement of foam sheets when mounting
- that the design does not miss the heat when the sheets is not
there must be cracks;
- To arrange the upper row you need to fit the sheets by
size. The foam cuts with a conventional hacksaw or a building knife (if its
The thickness does not exceed 50 mm);
- Sealing seams. Seams with a thickness of more than 10 mm need to be seen
trimming foam. Those that are less than 10 mm. you can blow foam;
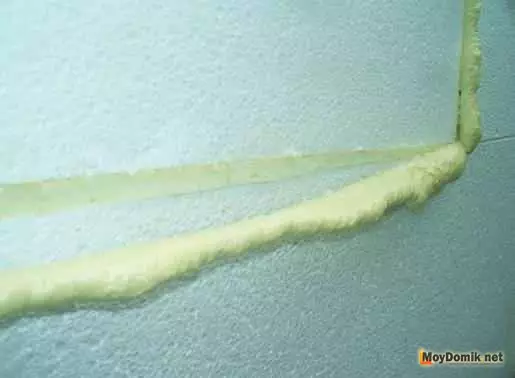
Sealing seams foam
Tip:
To the piece kept tightly, on his back side
You need to apply foam.
- Sticker Sickle Ribbon. The tape is good because it has one
The side treated with glue. It is easy to glue. The price of ribbons is insignificant, in here
value is difficult to overestimate, because It protects the seam from the deformation. Without
The use of tapes on the seam will go cracks;
Tip:
Dipping joints are eliminated by a grater for foam.
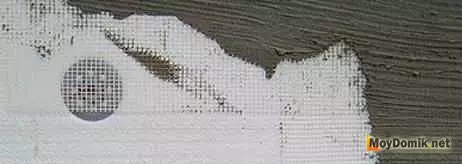
- Melting of umbrella hats. Only those who are recessed in
Styrofoam. In principle, the hats "hide" and during the putty wall. But then
The subsequent mixture will be applied with a thick layer, and will dry longer.
4. Finishing stage
- Glue is applied to the top sheet surface. Layer width
equal to the width of the reinforcement grid.
- A grid is applied and hiding under the mixture layer.
- After the wall is completely dry, you can start
Decorative finish.
Tip: Try not to allow folds on the grid. They are bad
Disguised in the future.
Folds on the grid
Wall insulation from the inside by foam - video
In conclusion, I would like to note, on what should not save when
internal insulation foam:
- on ventilation. To do this, do in the windows
Special holes. Metalplastic windows are equipped with them by default, and
Here in the wooden frames of the holes are not provided. Ventilation is needed in order
To avoid condensate.
- On the thickness of the insulation. The picture shows how to shifts
Dew point.
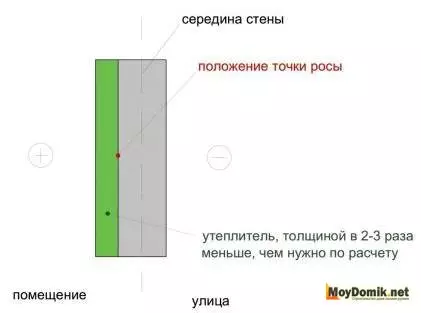
Displacement point dew - scheme
- on the density of the insulation. Low density insulation not
Allows you to get the planned effect from the insulation of the walls of the foam from the inside.
Foam density - factor
- on the quality of the primer. Poor-quality primer will not protect
You from the appearance of mold and the development of fungi.

Education fungus and mold on the walls
To note, insulation of foam of balconies and loggia has
Its specifics with which you need to get acquainted additionally.