
Protect your home and, first of all, its foundation will help the installation of the drainage with their own hands. However, in order for the system to work efficiently, it is important that it be competently designed and mounted. Accumulating on the roof and freely, without directional assignment, rolling from the roofs, melting and rainwater are capable of becoming a variety of trouble. Excess moisture causes putrefactive processes, the appearance of fungi and mold in the interior and on the external walls. Even more serious problems can be torture, sizing the foundation, change in the geometry of the walls. Even if it is possible to avoid serious damage, the appearance of the building will be spoiled. The drain allows you to avoid similar problems.
Types of drainage and their features
The design distinguishes two types of drainage.
With a high risk of freezing drainage in climatic zones with harsh and frosty winters, it is preferable to install Internal systems . The same designs are recommended for flat roofs.
The main elements of the internal systems are:
- Reception funnels for collecting water,
- pipelines by which water is going to the collector,
- collector himself,
- Connectors for cleaning work.
When installing the inner drain, the following conditions must be observed:
- The bias for free drain towards the funnel should not be less than 2%.
- Vertical risers are necessarily passing through heated rooms.
- The funnels are installed, taking into account the area of their cross-section: for each square centimeter there should be no more than 0.75 square meters. m. Roof area.
- The joints of the edges of the funnels with the roof should be carefully sealed.
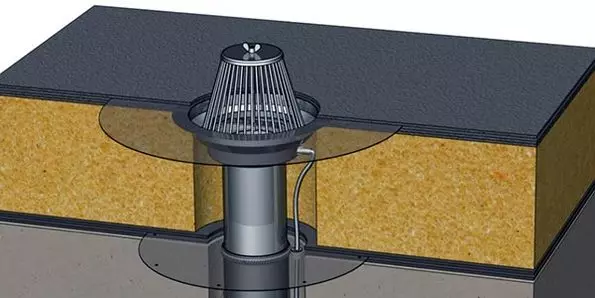
Flat roof inner drain
Outdoor systems More common, since the installation of drainage for the roof with your own hands in this case is much easier.
The main elements of the outer drain are:
- collecting funnels
- gutter
- pipes
- Elements of fasteners.
Materials for manufacture
For the manufacture of drainage, various materials are used:
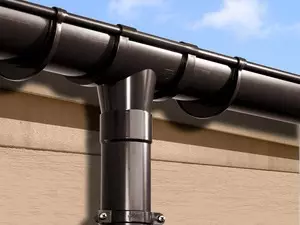
- Plastic systems more and more popularity. They are considered optimal for roofs coated with soft tiles. Stone crumb that is present on such roofing can disrupt the coating of metal drainage, which, in turn, will cause corrosion. Along with this, it should be remembered that the roofs for the roof are easier to mount and produce from a material that is simple to strip and not causing difficulties with transportation and lifting to height due to the small weight of the products. As minus plastic, it is necessary to note its fragility at low temperatures, so the installation of drainage gutters from this material It is recommended to carry out with the installation of the cable for their heating.

Outdoor plastic water system
- Cink Steel It is inexpensive material with decent. If you decide how to make waterproofs for the roof with your own hands for many years, pay attention to galvanized steel, which is distinguished by durability and is not corrosion with constant contact with water.
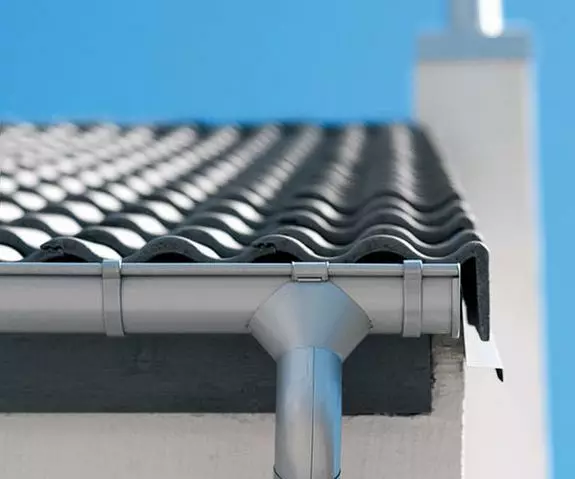
Metal zinc drainage
- Stained steel (Polymer coating) is characterized by aesthetic attractiveness and has excellent operational qualities. Unfortunately, watering from the roof with their own hands from the painted steel will not work, since the installation work at home will inevitably lead to damage to the coating, which performs not only decorative, but also a protective function. Thus, the quality of the system elements will be noticeably reduced.
- There are also a gutter from copper and titanium zinc But they are much less popular due to the high price.
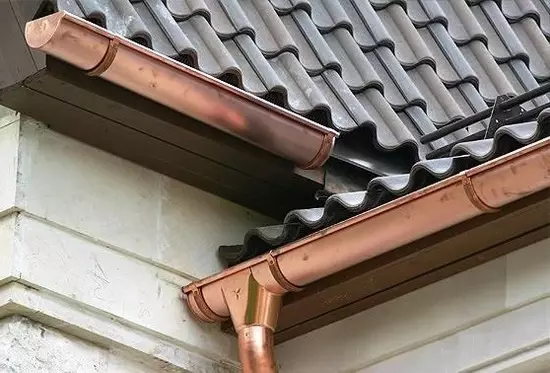
Drain of water from the roof of copper
Tools and components
The choice of tools when installing systems from metal and plastic is somewhat different.For independent creation of waterproof systems, you should cook:
- "Bulgarian" (the type of cutter is selected depending on the type of material),
- Welding machine (for working with metal pipes or when using iron elements of fasteners),
- screwdriver
- Drill (for installation of fasteners),
- Gun for applying adhesive compositions,
- a hammer,
- Cord and Waterpas for installing elements in exact accordance with the requirements for system geometry (in particular, to ensure the necessary angle of inclination),
- Rollers (if metal elements are used).
System calculation
To begin to start assessing the drainage from the roof with your own hands, careful calculations should be made, design the system.
The diameter of the pipes and the cross section of the grooves are selected depending on the roof area. Specialists are advised to take into account certain and proven laws:
- For the roof area of up to 70 square meters. m. Children with a diameter of 70-115 mm and pipes with a diameter of 50-75 mm are selected.
- With a roof area of 70-100 square meters. m. The diameters of pipes and gutters should be 75-100 and 115-130 mm, respectively.
- For the roofs of more than 100 square meters. m. Pipes are chosen with a diameter of 90-160 mm and a gutter with a cross section from 140 to 200 mm.
When calculating the required amount of materials, experts recommend that determining the criterion to choose the reliability of the system, which directly depends on the number of joints of its elements. You can calculate the required length of waterproof and purchase gutter with a small margin After performing joints where it will need.
Nevertheless, before making the roofs on the roof, with their own hands, it is better to draw it to the reliability of the system schematically and plan the location of the gutters in such a way as to minimize the number of joints. To do this, it should be previously found the length of the segments of the gutters (usually they are sold at 3-4 meters).
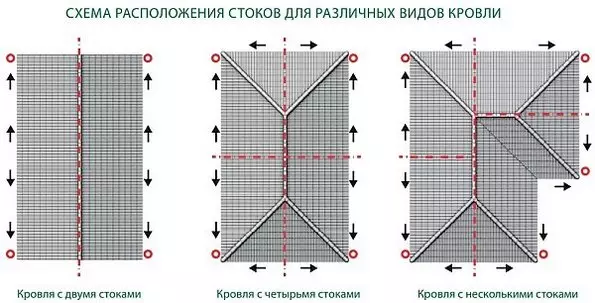
The location of the drains depending on the type of roof
The total length of the drainage tubes is calculated on the basis of the number of funnels and the height of the house. The distance from the end of the pipe to the surface of the Earth should be about 20 cm.
In addition to pipes and gutters, swivel elements will be required:
- For gutters, their number is determined by the shape of the roof,
- For pipes, it is usually enough three swivel elements for each vertical section - the very Earth has a turn in the direction of the house, if it is not formed to direct wastewater into a watering capacity, and two taps are used on top from the funnel, which allow you to arrange the pipe closer to the wall for it subsequent fastening.
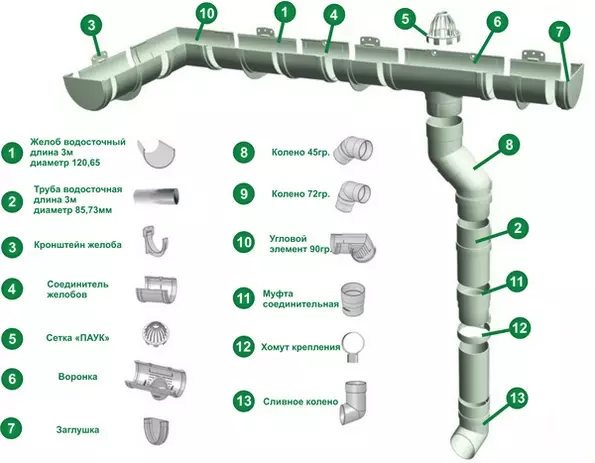
On the photo elements of the drain system
Fastening elements - clamps and brackets are installed one by each meter and 60 cm of a highway, respectively. To accurately determine the quantity, it is better to apply the installation location on the scheme.
Installation of drainage
Optimally, if the installation of the drain is performed at the construction stage of the house.
Works are performed in a specific sequence:
- The first step is to install hooks or brackets for chute holders. The optimal distance between them is 50-60 cm. It is best if the step of the rafter will be the same, it will facilitate the installation of fasteners. Otherwise, intermediate fixtors will have to be installed on the crate.
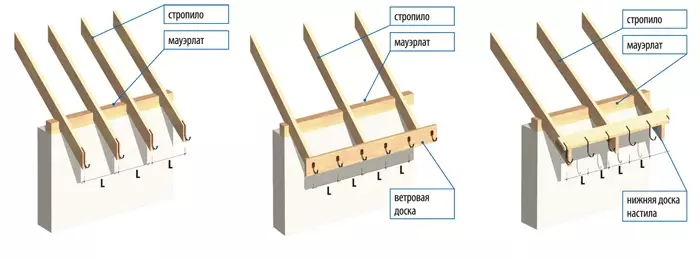
Possible places for fastening brackets for drains
Installation of hooks is performed with a slope of about 5 cm for every 10 meters of length to ensure the drain of water by gravity. First, the topmost bracket is installed, then the lowest, then in between them the dashing rope is fixed, which will help you install the remaining brackets, withstanding the desired angle of the slope. For walls with a large length (20 meters or more), two vertical plums can be performed and, accordingly, the double slope of the lines of hooks (to each plum separately).
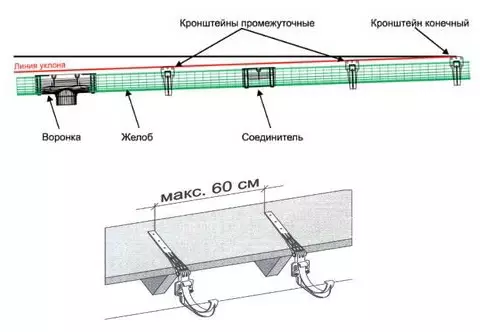
Installing brackets under a slope
- Installation of the funnel is preceded by drinking holes for mounting them. The size of such a hole must correspond to the width of the roar of the funnel. If it is less - the water will not have time to pass through it, with too much diameter, the water hole will flow past a funnel.
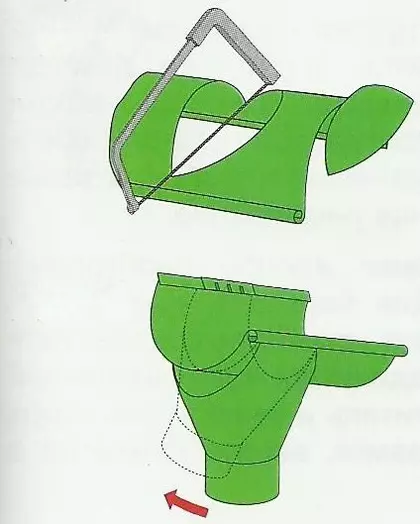
Installation of the funnel for drainage
- The gutter with the help of the grooves available on them are installed on the brackets and after laying are fixed by special devices.
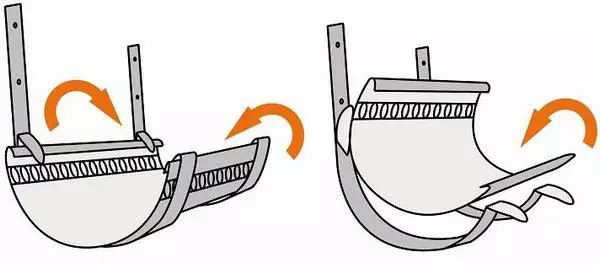
Fastening the drainage gutter with their own hands
- Face parts of the gutters are closed with rubber sealing caps. It is important to ensure the strength of fastening and tightness of the joints.
- The segments of the gutters are joined by special connectors having rubber seals. Typically, the connecting elements have locks that allow the assembly quickly and reliably. First, the connector is installed a chute from the side that does not have a lock, then with the opposite. After that, the castle snaps up.
- The knee of waste is put on the funnel, then another swivel knees for correcting the position of the vertical highway.
- Waste pipes are connected to the knees and are attached to the wall of the clamps.
- At the lower ends of the vertical pipes, plums are installed (one more knee), after which we can assume that it is made from the roof with your own hands.
Water heating
The installation of treads to the roof with her heated hands will require additional effort and accurate safety regulations, however, such labor costs are quite justified by improving the efficiency and security of the system. The drains in this case are protected from the formation of the naked, freezing, the formation of traffic jams.
Two water heating schemes are possible:
- Internal heated It assumes the gasket of the heating cable along the bottom of the grooves.
- Outdoor scheme - This is the installation of the heater at the bottom of the roof rope.
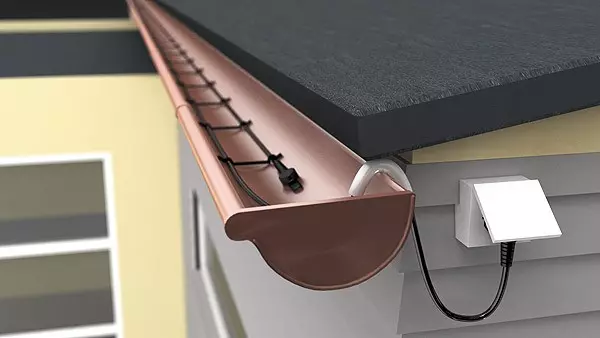
Internal heating of drainage gutters
It is obvious that only special cables in the waterproof version are used to heat the drainage.
Watertenance service
The timely and proper maintenance of the drain will increase the efficiency of the system and will allow us to do without expensive rehabilitation at an accident.
One of the risk factors is to clog the system with garbage, including those who falling leaves. To prevent them from entering the gutter, it is recommended to install the upper protective grilles.

Lattices protect the drains from garbage
IMPORTANT: Nevertheless, twice a year, in the fall and in spring, it is recommended to conduct capital purification of the drainage system, since the system of drainwater drainage from the roof can be clightened due to the fall of particles with small sizes.
It is easiest to clean communications using water pressure. At home, this can be done using the usual flexible hose. After the flushing is performed, it is necessary to collect trash and dirt from the lattice.
Even when the dirt sticks adhered to the surface, you cannot apply sharp items to remove it, scorch the stains and education. In this case, the likelihood of damage to the coating (polymeric or galvanized), which will inevitably lead to corrosion of the site.
Special attention in cleaning requires problem areas (joints, places of turns, jet connections with funnels, etc.). In these places the flow rate changes, which increases the risk of cork formation. Contribute to its increase and irregularities of the surface on the seams.
If the installation of the roof drainage is performed with his own hands, the diagram is accurately calculated, and during operation, the owners of the house do not neglect the need to conduct preventive measures, the durability of the system will be maximum. At the same time, the drain will be effectively working throughout the service life, practically not requiring repairs.
And the good condition and performance of the drainage system is able to significantly affect the technical condition and the durability of the building itself.
Video
How the installation of the drains is carried out with their own hands video will demonstrate visually.
Article on the topic: Whether panels are suitable on the wall instead of wallpaper: 11 replacement options