
Paper is now one of the most affordable materials for the manufacture of some crafts. It is needlework with paper that is gaining large revolutions, as it is not expensive and affordable. Going to any office store or needlework, you can find a large number of diverse paper, for every taste and in different price categories. Therefore, such a technique of working with paper as origami is currently gaining. There are a lot of master classes, there are circles for children and adults. The main and first themes of such events are handicapped origami with their own hands for beginners. It can be very light crafts that will take a maximum of a couple of minutes of your time, but if you intend to do it and you will like it, then you will definitely attend such places.
In the world of innovative technologies, a person is very hard to surprise something. Now, if you have money, you can buy anything. And if it concerns gifts, and now, now it is impossible to surprise anyone in any purchased gift. When you are going for a birthday, you want to congratulate someone from March 8, a Happy New Year, Happy Valentine's Day, a wedding day or some other holiday, you often think about how beautiful and originally present your gift what kind of highlight to make it into it. And here you can help Origami. It is with the help of this art technique you can make a postcard, a gift box, a bunch of flowers, or even the original origami itself can become an independent gift. And, as you know, a gift made by your own hands is valued much more than the one you buy in the store. Today we will teach you how to make beautiful origami for your birthday, and not only, there will still be other, no less interesting crafts.
Birthday gift
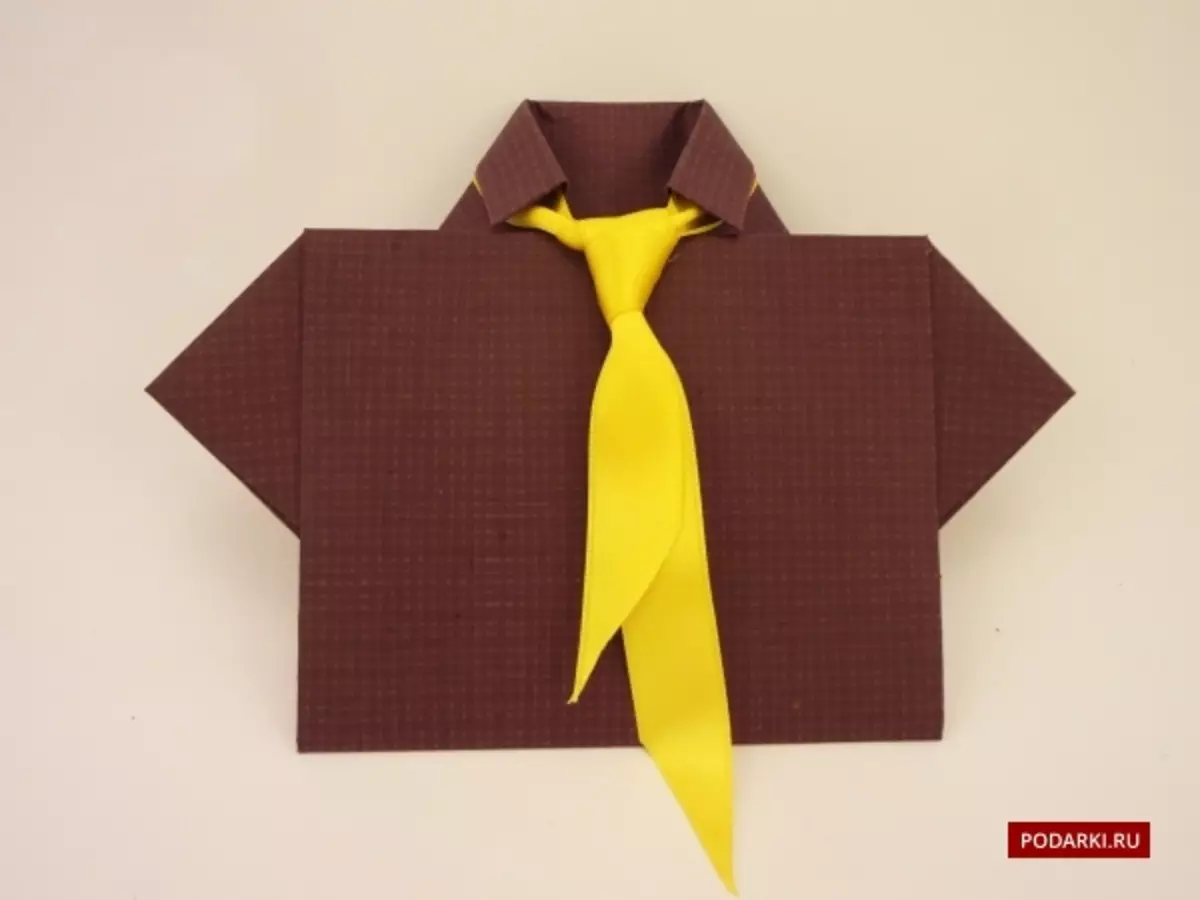
It is very hard to come up with a birthday gift for a man. It almost always happens so that either he has everything, or it does not need anything to him, well, or even it is difficult for him to please him with a gift. Therefore, we suggest you make a gift with your own hands, it will be a postcard in the form of a shirt with a tie. You can give it just as a postcard, signing on the back, or it can be like an envelope for money. Just you and please with a gift, a man will buy herself that he wants, and refine, since such a "shirt" can be put on your desktop, and the man will always remember you, looking at this craft.
Article on the topic: Openwork Summer Pullover
Make this craft is very simple and time will leave not much, well, a maximum of ten minutes.
To do this, take cardboard or durable A4 format paper of the color that is most suitable in your opinion for a man. And some bright ribbon, with which we will make a tie, best take satin, it will look more spectacular.
We now turn to the collection of crafts.
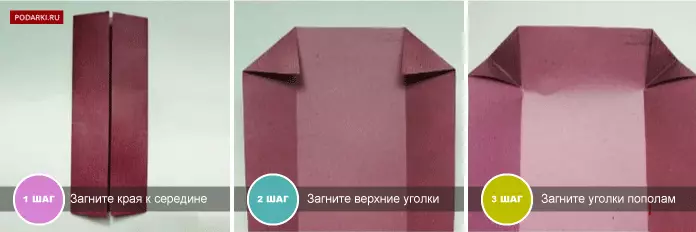
1) We take the paper and put it on the front side down. We drive both edges to the center.
2) Widget back, and then bend the upper corners inside the fold line.
3) Then these corners are putting inside in half.
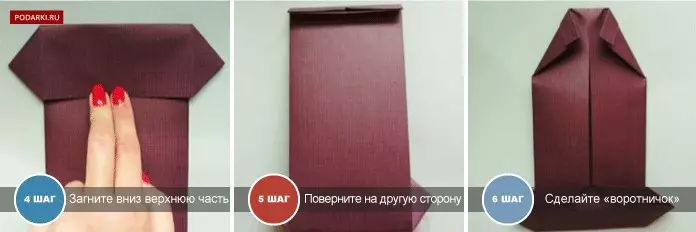
4) Bend again the upper part of the paper. Those triangles that turned around the edges will be the sleeves of the future shirt.
5) turn over our workpiece so that the sleeves are down. And now we will drive down the strip down, its width should be, as we take the tie tape.
6) Then we turn over the paper in the other direction, we will make the collar, for this you need to bent the upper corners in the middle.
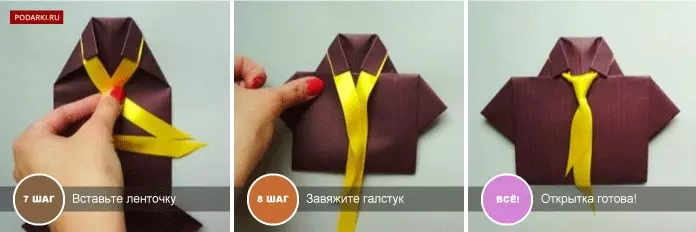
7) Now you need to deploy the collar, insert the tape and fold it back.
8) The lower part with the sleeves should be bandy under the collar. It remains only to tie a tie, and the postcard is ready.
Instead of a tie, you can cut a butterfly from paper and glue, and you can do it from the same tape, it depends on your imagination. The main thing is that the original present is now you can do for any celebration, there would be a desire.
Paper greeting card
From paper, you can still do other postcards that will be no less beautiful and original. Today we will make a postcard with a bouquet of flowers. If you do not want a postcard, you can make a bunch with these colors, tie a beautiful ribbon and donate as an independent gift. Especially such a gift will be pleasant for mom, grandmother, sisters or girlfriend for birthday or March 8. This craft can be done with the child. For him, it will be very interesting and exciting, and most importantly - free, the child can present a gift for a loved one. Yes, it will also develop a fantasy and fine motility of hands.
For such a craft, we need dense colored paper, the more colors, the better, scissors and glue.
First, we need to make buds, leaves and stems for our colors. We use the scheme shown below.
Article on the topic: Appliques of fabric on clothes for boys: Schemes with patterns
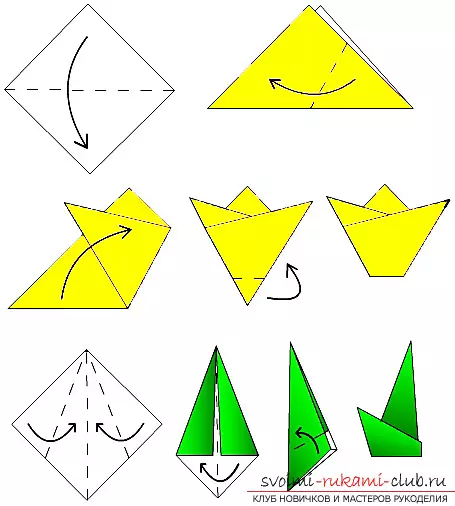
1) For the bud, take a square sheet of paper and fold it diagonally.
2) There should be a triangle. Now bend the edges of the triangle to the top.
3) Lower edge we turn back. This is such a bud. They do as much as you want to see on a postcard or in a bouquet. Best if the buds are different colors.
4) Now make the leaves for our colors using the scheme above. We take a square sheet of paper green and fold it diagonally.
5) Widget back, we fold the edges of the paper to the center.
6) Then bend it in half.
7) Lower angle fold up. Leaf ready. They do as much as the floweries did.
8) The flower stem is very simple, also using green paper. We make either a thin rectangle, or twist our sheet into the tube. Just consider that the length of the stem should be less than the postcard itself, since we will still need to attach a bud.
9) That's all the details for the bouquet and ready, it remains to make the basis for the postcard itself. But you can glue all the details of the colors and make a bouquet, tie it with a beautiful ribbon, you can attach some kind of brew or butterfly purchased in the store fittings, or a small card and a beautiful bouquet ready. And if you want to use them for a postcard, then take a tight colored A4 paper, fold it in half and stick to it flowers. Card edges can make openwork, so it will be even more beautiful. A gift made by your own hands is ready.
Bookmark and box in the technique
Also today we will teach you how it is easy to make a bookmark in a book or notepad in the Origami technique.
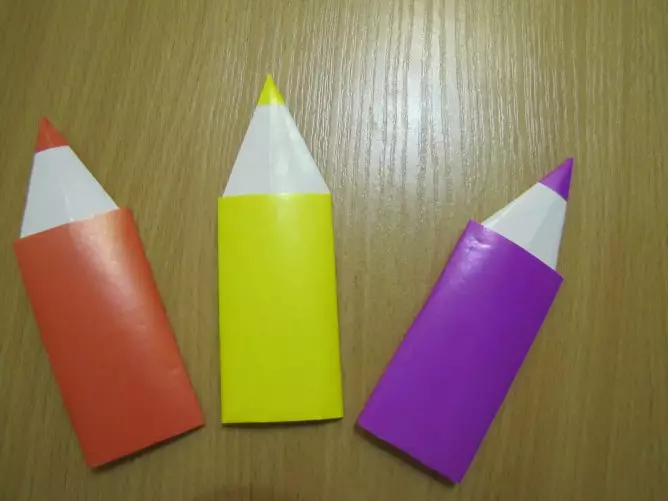
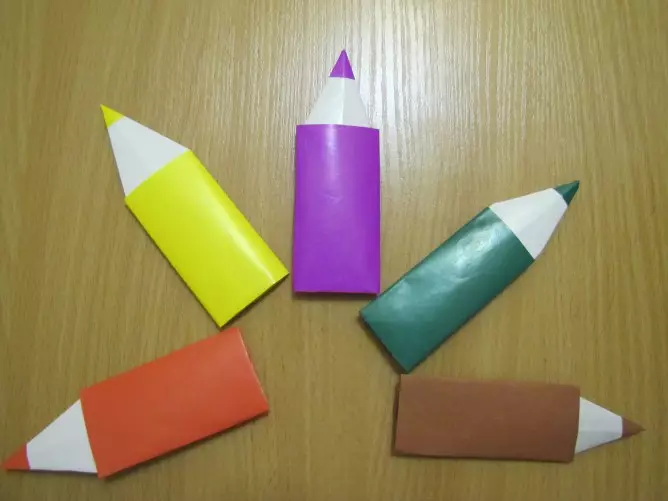
Bookmarks are of different shapes, lengths and widths. We will make a bookmark in the form of a pencil.
Article on the topic: Hot batik: execution technique, master class with photos and videos
1) For such a bookmark, we will need color cardboard or dense paper, which will be painted only on one side.
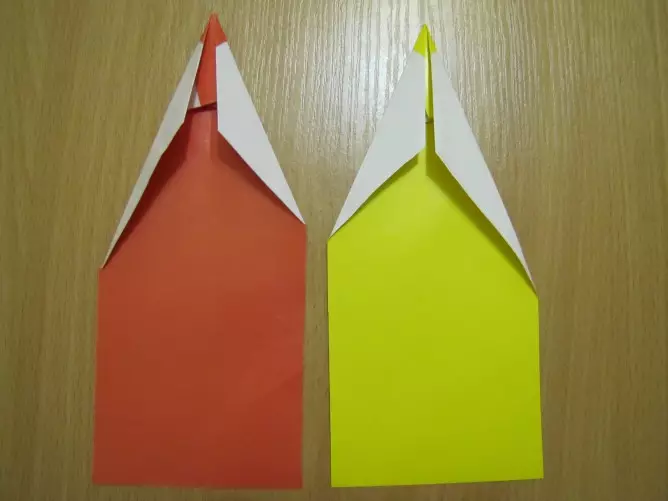
2) We put our paper with color side. And turn on the end thin strip.

3) This strip is slightly folded in half, by elaborating this central line.
4) Now turn over our paper with color side and bend to the central line, small triangles on both sides.
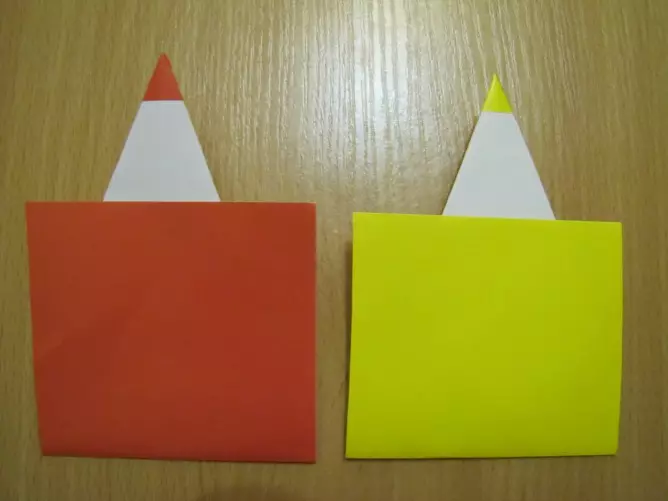
5) Now you need to move triangles again to the central line, but they already have longer and already.
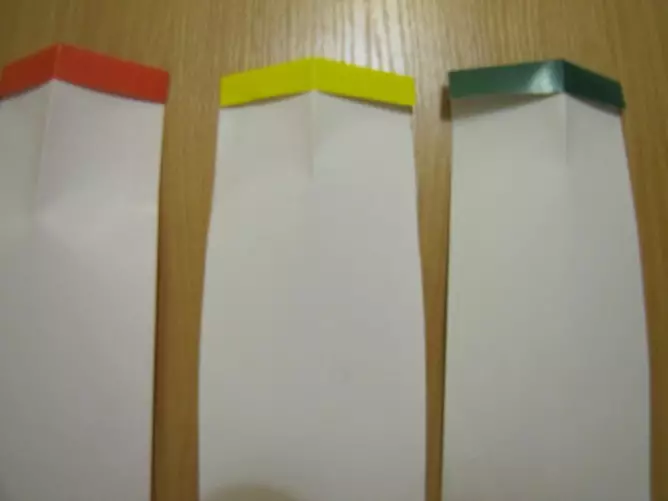
6) turn over the workpiece back the color side. Going now it is up to turn out from above the rod from our future pencil. And stroke well the bend line.
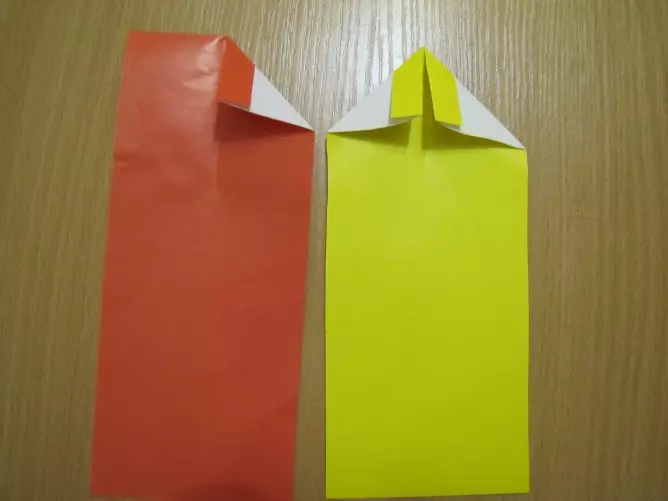
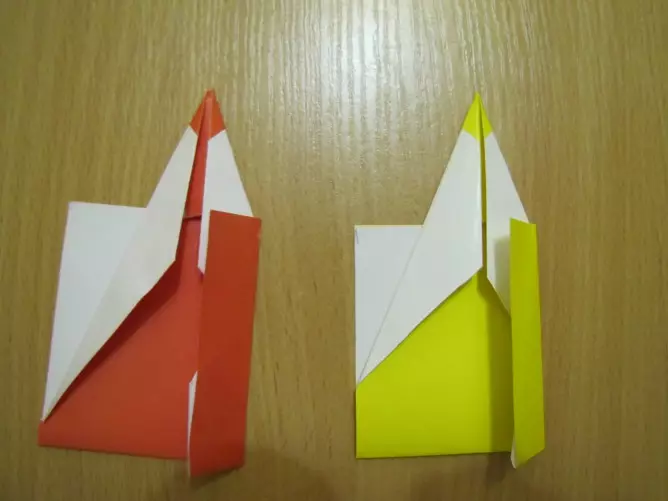
7) We again turn the workpiece and fold to the center of the edge of the paper, so that the pencil is as a result.
8) We lay each strip in pockets so that they do not unfold. And the top is sick.
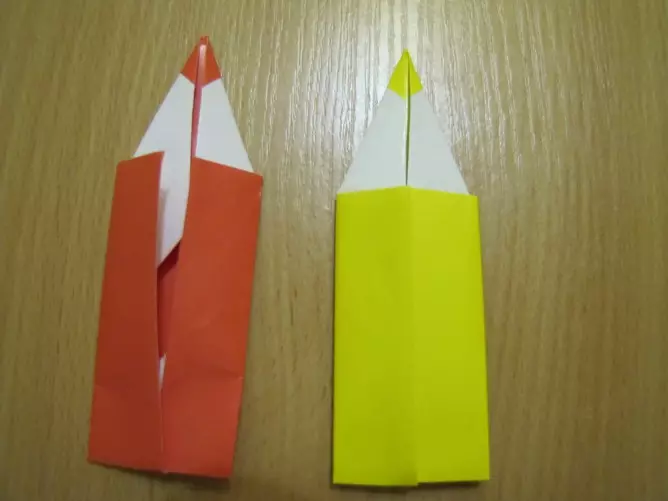
9) Well, here are our bookmarks and are ready!
The boxes are very good when you just get acquainted with Origami technique. They are easy to perform and do not occupy a lot of time and effort. And also for them it is easy to find application. They can serve as a gift box, you can store your hairpins, rubber bands or small baubles. They are of different shapes and a different size, but today we will learn to make a box in the form of a pyramid. To do this, we need 2 sheets of square shape of the same size, better if the paper is one color and some glue. You can watch the process of making boxes on the video.
Video on the topic
We also offer you to reconsider the selection of videos, which can be made of paper with your own hands.