Photo
What you need to know when warming up the loggia
Unfortunately, the rare owner of the apartment is pleased with its living space. In such cases, redevelopment comes to the rescue: walls that do not carry overhauls are removed, the doors are cleaned, the storage rooms are used, the kitchens and living rooms are connected. Pretty frequent changes are subject to the existing loggia. The insulation of the loggia can really "give" residents to 15% of the useful space. Here it will be possible to place a small office, an extra sofa, a winter garden and much more.

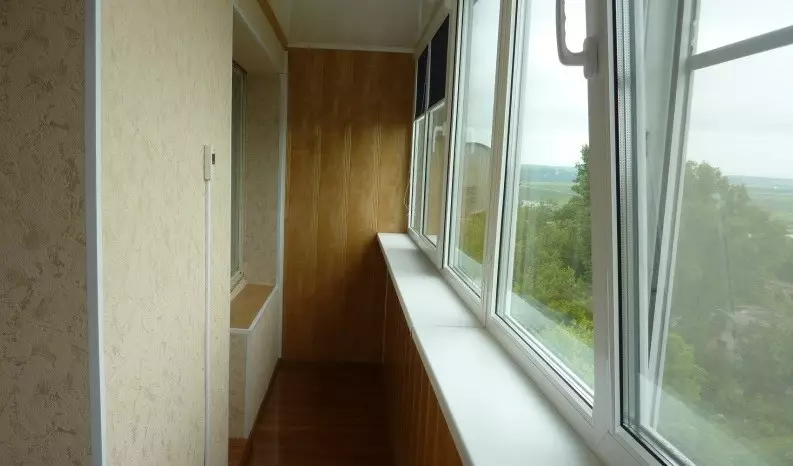
Glazed and insulated loggia can be used as a winter garden, or a study room, or a boudoir ...
We offer ways how to insulate the loggia yourself.
Although, perhaps, at some stages of work, you will need professional assistance (installation of windows), tips, how to insulate the floor on loggias, walls and ceiling, help work without any help. So, when the insulation of this room will be required, first, to carry out glazing, secondly, insulate the walls, ceiling and floor. All this will protect the room from the penetration of cold air from the street, will prevent heat leakage. Remember, the insulation of the balcony or loggia will entail changes to the deposit of the dwelling.
Glazing loggia
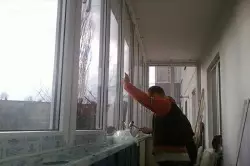
Glazing is the very first and one of the main steps when the loggia is insulation.
There are various options like glazed the loggia. In any case, you need to choose the one that provides minimal heat loss. The most optimal choice in this case are plastic windows. Heating the loggia, dismantle the old windows. Next, a major task - you will need to decide what will serve as a basis for installing new windows. It can be a wooden design, assembled from bars and closed plywood shields, which will also need to be inspired. If there is already a metal fence, you can reconstruct it, welding the corner and a flat platform for installing window frames.
Some offer such ways: lay part of the wall with bricks (only if the technical characteristics of the house are allowed, since this is an impressive load), and in the middle of the wall obtained the windows. Either lay only lateral parts, and on the rest of the space to carry out glazing, which will ensure a larger influx of light into the room. Given that the length of the loggia is, as a rule, 6 m, insulate the loggia - think carefully configuration of future windows, pride the size of the frames and their transportability. Some owners think only about beauty, forgetting about other points, and then a ready-made order accounted for a crane to raise on the upper floors, as the frames are simply not included in the elevator and do not unfold on the staircase march.
Article on the topic: Firewall: Making your own hands
So, preliminary work was carried out. Now install new windows. Even if you wanted to insulate the loggia with your own hands, not by profession not by the builder, do not care for installing windows yourself. There are many nuances (for example, the level of walls), without complying with which it is possible to significantly reduce the deadlines for the operation of products, and it is not at all to solve the main task - we warm the loggia we are very high quality.
Another little advice that has saved many time: do not rush to skip the factory film that protects against accidental damage, which are possible during the installation process with new frames. This needs to be done when the windows are already installed.
In line - walls

For insulation of the walls now there are quite a lot of options, the choice depends only on the specific needs of the consumer.
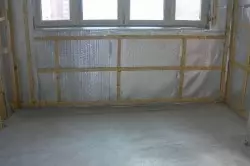
The insulation of loggias and balconies is unthinkable without insulation of the walls. To do this, they will need their thermal insulation, sealing of seams and other "weaknesses" through which the penetration of cold air is possible.
Heat the loggia - choose a high-quality insulation that can cope with a difficult task and prevent the accumulation of condensate on the surface, called the "crying effect of crying walls" and leading to the occurrence of fungus and destructive processes. To prevent such a phenomenon, we use polyethylene film with a foil side or foamed polyethylene, which will serve vaporizolation.
The thermal insulation is carried out, as a rule, from the inside of the walls, with an outdoor it entails a lot of problems, such as violation of the appearance of a residential building, discontent of neighbors, the impossibility of performing data of work.
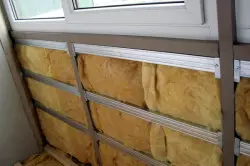
Warming up the loggia, use the proven insulation: mineral wool, polystyrene foam, foam. The best of the listed for the walls is the polystyrene foam, the least absorbing moisture and extremely lightweight in the installation (cutting by any hacksaw).
Loggia, the insulation of which is impossible, does not exist in reality. The insulation of the walls is the simplest stage, which is holding on the shoulder of any person. First you need to lay thermal insulation. Paul, ceiling and walls, as well as parapet, should be reliably "bitten". Material acquired for insulation is attached or plastic dowels or glue. Warring the loggia, be sure to close all intervals between materials by the mounting foam, which in its composition should be approached to perform such work (see the manufacturer's information located on the package). Do not be lazy to remove an excess foam speaking at the joints. To the insulation, lay the vaporizolation materials, while the foil side should be on top, and not vice versa. The seams obtained must be closed by a special tape (tape). Now the surface of the wall is ready to carry out final finishing works.
Article on the topic: How to decorate the steps of the stairs in the house and in the country (33 photos)
Warm floor and ceiling

Before insulating the loggia, examine all the walls on the subject of small cracks and close them. The moisture coming through them will reduce all the insulation activities.
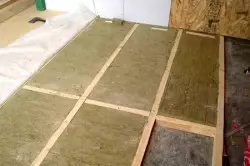
An important stage of the insulation of loggias and balconies is a warm-alone and ceiling device. Comfortable walking with barefoot legs, perhaps, will be the best proof that the insulation of the loggia or balcony is carried out properly. There are various ways of floor insulation. For example, there are options for the device of a wooden surface that are then required from the owners post-parasta for electricity. The tree in itself is warm, it is nice to walk. To mount the coating, first make a frame from bars, between which lay foam, the gaps fill in foam, then take the floorboards having grooves and ridges, extremely simplifying the process of self-laying. As mentioned, warming up the loggia, do not forget to lay between the insulation and the coating layer of vaporizolation, preventing the floor from the deformation under the influence of moisture.
For those who are not afraid of additional costs, it is suitable for the campaigning options at the expense of electric heating elements placed in the cement screed laid on the ceramisite layer, also well maintaining heat. Heating the loggia, you can use an infrared film that, subject to certain conditions, apply on any surfaces: for floor insulation, walls, ceiling. It should only be noted that work related to electricity must be trusted exclusively by professionals, and with the presence of special tolerances. Now you know how to insulate the floor on the loggia.
Now about the ceilings: they also need to be insulated, because there are inter-storey overlaps, through which the warm air does not premind the premises. Warming start with waterproofing, for example, PVC film. Then mount the shade from the tree and fill it with the insulation, put another insulating layer. For facing work, the ways are diverse: the PVC panels are attached to the crate or the ceiling of plasterboard - who likes what.
Article on the topic: Interior design of medical institutions: features and techniques
All these tips are appropriate if insulation is carried out on the middle floors of a residential building. If the floor is the top, then it is not necessary to do without additional calculations and the help of specialists.
Warm Loggia: Once again about the materials and tools
Waterproofing is always placed on a warm side, otherwise there will be a moisture between it and the insulation will be condensed.
When conducting independent work, carefully attribute to the selection of materials you use. Remember: Warring a loggia in order to acquire additional living space, pay attention to the most important parameters of materials, such as environmental friendliness, strength characteristics, moisture resistance. For example, a plywood sheet, resistant to moisture, contains a greater amount dangerous for human health formaldehyde, respectively, where the moisture resistance is not applicable, use the usual fane.
For the crate device on the floor or ceiling, take the wooden bars with dimensions 50 by 40 mm or 40 by 30 mm. As thermal insulation - Polystripolol and Penofol.
Heating the loggia, prepare the following tools and "consumables", you will need:
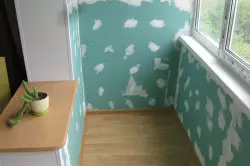
Plasterboard - practical and relatively not expensive material that will make it possible to issue a loggia in any style.
- A small battery in size, working from the battery (it will save considerably your time, strength, and nerves, repeating any materials, anywhere and at any height);
- Metal construction kit;
- unnecessary level (control the correctness of the lines);
- Pistol regulating assembly foam;
- various fasteners and dowels;
- mounting foam and glue;
- Electrode, perforator, screwdriver;
- drills for metal and concrete;
- Scotch for sealing seams; Building stapler for fastening insulating materials; Simple manual tools (scissors, knife, hammer, pliers, roulette and others).
Do not forget that insulate the loggia not only for comfort, but also to expand the living space. Before approaching the practical implementation of this task, it should examine its technology in detail so that the result obtained pleased for many years.