
Fast-based houses are attractive in that when finished foundation, put the house itself very quickly. For example, the construction of a frame house with their own hands, forces of two people, is possible for a month without a rush. And this is - if inexperienced employees are involved in construction, which only know how to keep the hammer in their hands. All because the assembly occurs step by step: regular repetition of simple action. It is just important to know how to collect each node properly. Having instructions, understanding the construction principle, the frame house can independently assemble any.
No less attractive framework for the fact that it is possible to do with minimal costs. How much it will be necessary to make money on a construction site depends on the size of the house, from the materials used (the type and variety of wood, finishing materials). But in any case it is one of the cheapest techniques. (About the construction technologies at home read here)
Wooden frame houses are not the only one. There are regions in which wood is luxury. There are metal frames. Despite the fact that the metal today is not cheap, it turns out relatively inexpensive.
Approximate estimates on the frame house 12 * 9 meters, prices are 2019. You can estimate the current cost of components in your region.
Another point. Many are interested, whether it is possible to leave an unfinished frame house, and if possible, at what stages. The answer is - it is possible, and the first stage is known to all: leave to winter the finished foundation. Even possible wintering options in the following form:
- Foundation + frame + roof (without floor);
- Foundation + frame + roof + Outdoor OSP + windproof;
- Foundation + Frame + Roof + Outdoor OSP + windproof + mounted and insulated floor and ceiling + partitions.
With windows and doors to leave for wintering unattended dangerous. In the other options, the completion of construction completion is even good: wood will dry. In winter, as a rule, low humidity and drying is actively. At the same time, reveal all the shoals in the already mounted part.

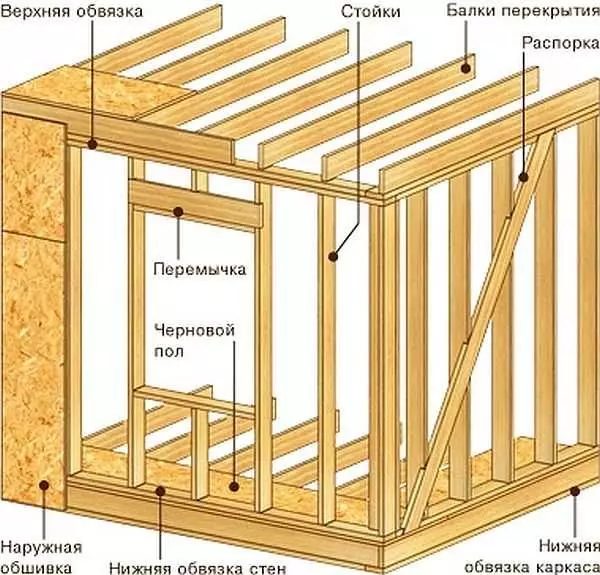
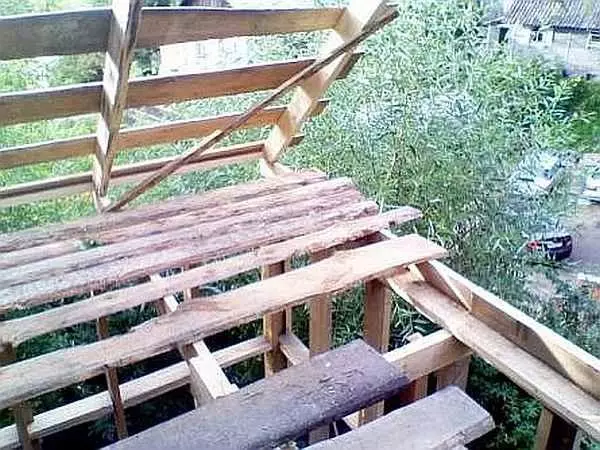
Skeleton of a skeleton house with a nursery floor (in the context)
In general, you need to say that it lives well in a frame house, in which all the nodes are made correctly. Errors This technology does not forgive. Even minor. If you want to get acquainted with the construction regulations, find the SP 31-105-2002, which is called "Design and construction of energy-efficient single-quality houses with a wooden frame." There are all descriptions and requirements.
Step-by-step construction instructions with photos
There are several different technologies of frame house-building, but the classic way of construction is Canadian. It is also called the platform method, as the floor of the frame house first is going, and then on it, as on the platform, the skeleton of the walls are collected. Tell me how to build a house for this technique. With the rest, it will be easy to understand: only a sequence of actions differs.Step 1: Foundation for a skeleton house
The choice of foundation is a separate complex and volumetric topic. The geological picture is taken into account on the site, the height of the groundwater, the weight of the building and seasonality of residence in it, the region in which construction, snow and wind loads occurs. But in general, the skewers make most often pile, pile, painted or tape foundations.
In our country, the palm of championship in the frame house-building belongs to its own hands belongs to the pile-painting foundation. It is quickly built, requires small material investments, correctly calculated and built, it is reliable. Combining the advantages and pile and tape, it evenly transmits the load to all supports.
More reliable in the construction of pile or pile-woodwaste foundation are piles tees. Due to the extended heel, they have a greater carrying capacity and better resist the powers forces.
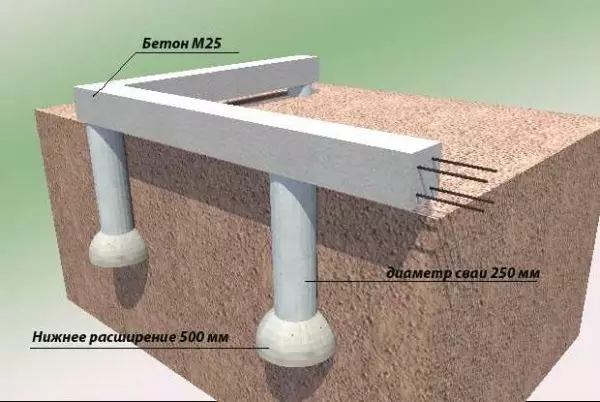
The welded device with pile of tees
Drop the wells for piles can be a manual brown or motorized. As a scheduling, rubberoid rolled into the pipes are used in the pipes (at least three layers), fixed with the help of a tape. Other options are asbestos-cement or PVC pipes of a suitable diameter. Inside piles, three or four reinforcement rods are installed, interconnected in the form of a triangle or square. Pruts of reinforcement are cut so that no less than 0.7-0.8 meters be broken over the surface of the pile. All the concrete of the brand is not lower than M25 (about brands of concrete, read here).
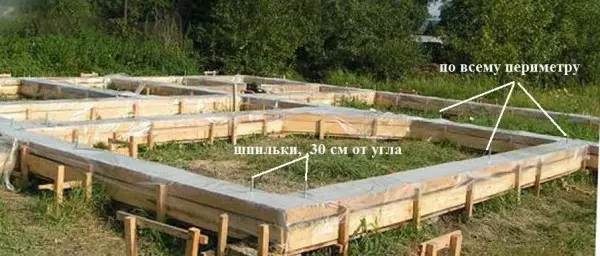
After the pill is filling, the formwork is installed for the ribbon (frame), fittings fit and fit. Longitudinal rods are connected with curved fittings from piles. At this stage, the tape leave holes for the supply of communications and ventilation (insert the segments of plastic pipes across the tape).
Ribbon will subsequently be attached to the foundation. For its mounting in the tape pinned studs. They are installed in 1-2 meters increments. From each angle in both directions, 30 cm are receded by 30 cm. Here the studs are required, the rest depending on the size of the house, but not less than 2 meters. Note that it is the hairpins that bind a frame of a house with a foundation. Therefore, it is better to put more often. And yet: whatever short wall, the studs should be at least two.
When everything is ready, concrete is poured.
Split Scarlet. Foundation for a frame house with your own hands ready
After the fill of the concrete, so that he does not cool, but gained the fortress, it is better to hide it with polyethylene (see pictures). If the temperature after the fill of the foundation holds within + 20 ° C, in about 3-5 days, construction can be continued. During this time, under such conditions, concrete will give more than 50% of its strength. With it you can work freely. With a decrease in temperature, the term increases significantly. So at + 17 ° C, it is necessary to wait for about 10 days.
Article on the topic: Use in the interior of raspberry wallpaper
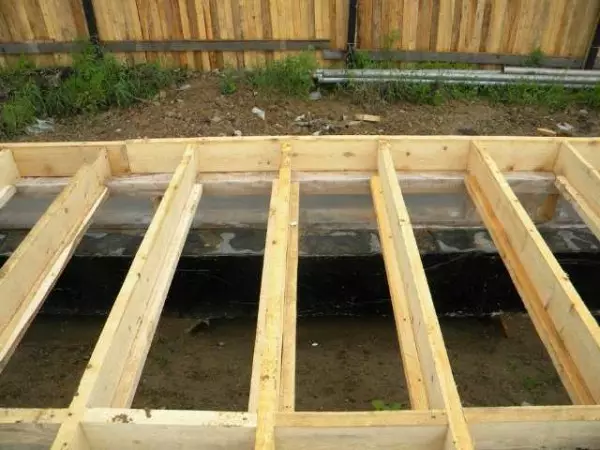
Step 2: Lower strapping and gender
So that the wood frame does not pull moisture from concrete, the cut-off waterproofing of the foundation is necessary. It is more reliable to make bitumen mastic. And better - in two layers. You can also use rolled waterproofing. Cheaper runneroid, but it breaks off over time. More reliable hydroizelet or other similar modern material.
It is possible to wipe aside as a mastic, and to roll the waterproof from above. Another option for shut-off waterproofing under the frame house is two layers of waterproof, wrapped by mastic: the closer the groundwater is, the more thorough waterproofing should be.
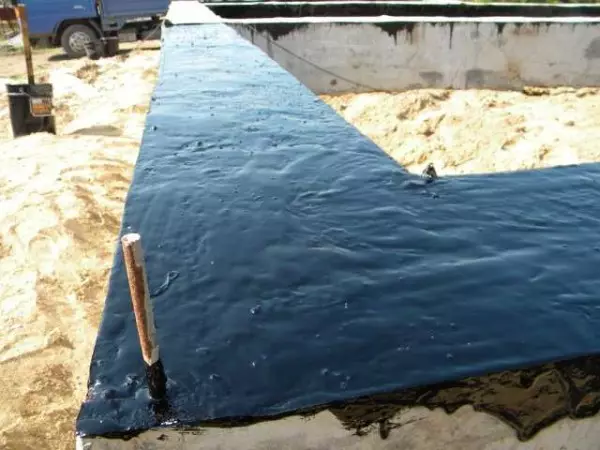
The first layer is liquid waterproofing until it dried, you can glue a layer of roll
Then they are stacked - the boards of 150 * 50 mm. They should be dry, impregnated bioprotective and antipyrene compositions. The edge of the Lenzny is aligned with the outer edge of the foundation. In the necessary places under the studs, the holes are drilled (the diameter of the opening by 2-3 mm larger the diameter of the stud). Then the second board is stacked. It is put so as to overlap the first row butt. It turns out the castle.
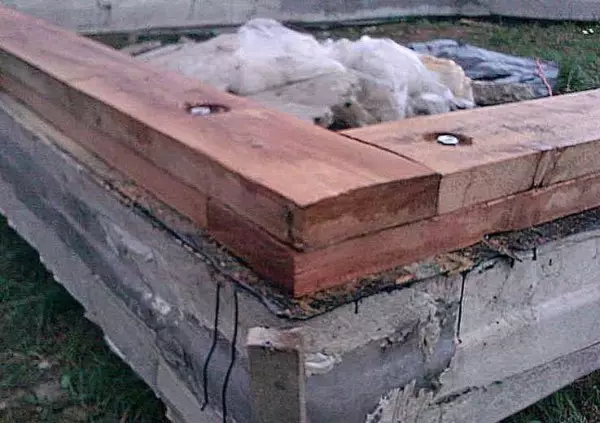
The second board is stacked so that the joints overlap
In general, you can put one bar 100-150 cm, but the price is much higher than two boards, which in the amount give the same thickness, and properly bonded two boards have a greater carrying capacity, the truth on their laying is more time. So that they work as a single bar, they are knocked down with nails in a step of 20 cm in a checkerboard order.
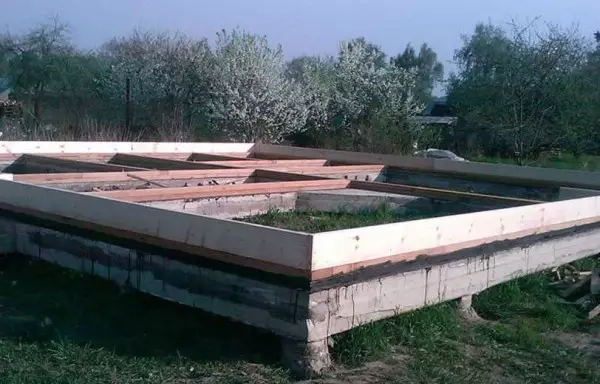
Put the strapping and lags
Next to the chips attached the board of the strapping. Its sizes are also 150-50 mm, but it is put on the edge. It is leveled along the outer edge of the foundation, is nailed with long nails (9 cm) to a larger every 40 cm.
Installing the strapping: According to the instructions, the assembly of the frame house continues the installation of the strapping to which. lags floor will be relying
The next stage is the installation and installation of the lag. These are the same boards 150 * 50 mm, delivered on the edge. They are attached to two oblique nails (9 cm) in the end to the strapping board, two nails on the right and left to the bed. So every lag on both sides.
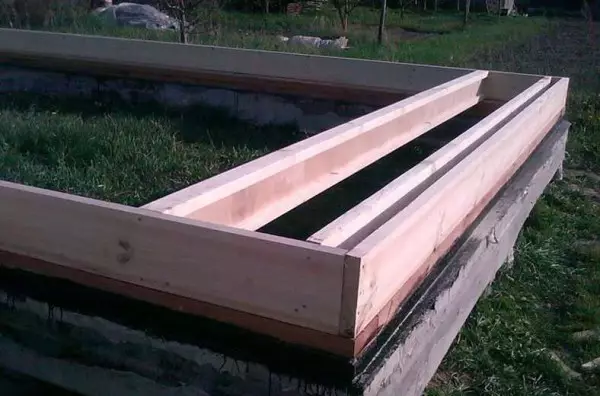
Example Installation Floor Lag
The photo shows that the first lag is installed close to the second - the load on the foundation is so better. It is installed on the second edge of Lenzny. Installation step - 40-60 cm. Depends on the length of the span and section of the saw used: the larger the length, the less step.
Laid and fixed floor lags
If lags are long, and there is a transverse beam, as in the photo above, so that the lags do not "go" over the transverse beam jumper. They are equal in length to the step of the installation of the lag minus the double thickness of the board: if the step is 55 cm, the thickness of the board is 5 cm, then the jumper will be 45 cm long.
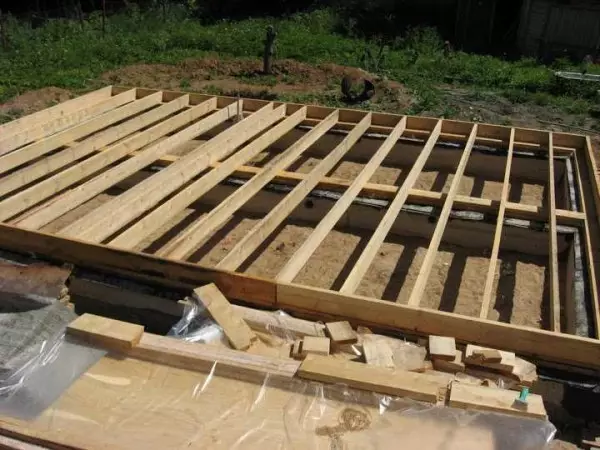
Warming and flooring
After the base under flooring is mounted, time is coming for floor insulation. It can be done in different ways with different materials. We show the economy - with polystyrene plates with a density of 15 kg / m3 (can be more, less - no). It is, of course, non-environmental, but the only one is not afraid of moisture and can be mounted without a draft floor. The calculated thickness of the insulation - 150 mm, two layers are stacked: one 10 cm, the second 5 cm. The seams of the second layer should not coincide with the seams of the first (shifted).
To begin with, the cranial bar of 50 * 50 mm is stuffed along the lower edge of the lag. He will hold foam.
Below is a frame from a cranial bar that will not give to fall out expanded polystyrene
Polyfoam is cut by ordinary hacksaw. The canvas can be taken on the tree - it cuts faster, but it turns out a torn edge or for metal - it goes slower, but the edge is even more. The sliced plates are stacked in two layers, the seams overlap. Then the sealant is sampled around the perimeter - to ensure waterproofing.
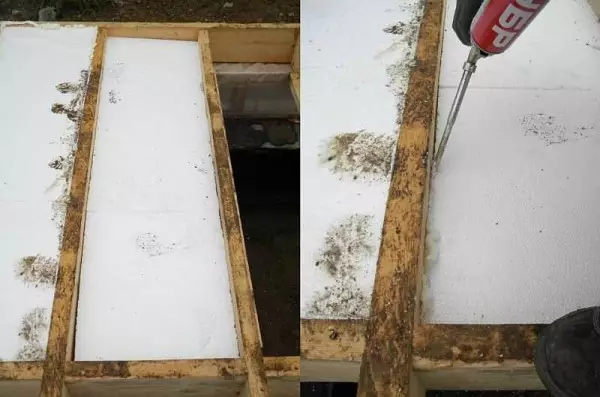
Laying foaming
Next, it is to wall from the boards, to align it and on top of the Phaneru (better FSF 5-6 mm). In order for the draft flooring from the board did not overflow, lay the boards mondings the direction of the wave. If you look at the transverse cut of the board, the annual rings go a semicircle. So, you need the arc that look up, then down (see photo).
How to put flooring from the boards
You can do without flooring from the board. Then the plywood thickness should be at least 15 mm. Consider more profitable in your area and choose.
In any case, the sheets should be laid in disintegration - seams should not coincide (as in brickwork). Still should not forget between the sheets of plywood to leave a gap of 3-5 mm to compensate for the change in the size when moisture change.
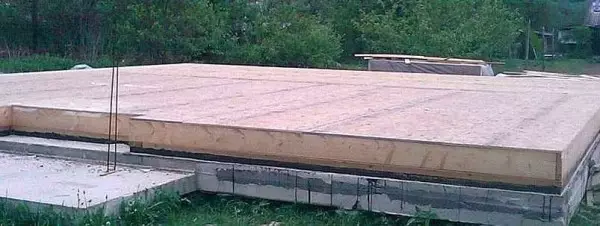
Completed the second stage of building a frame house: the floor
Plywood is attached to a screw of 35 mm long (better white - less marriage) around the perimeter with a step of 12 cm, inside in a checkerboard in 40 cm increments.
An example of using framework technology for the construction of a wooden barn is described here.
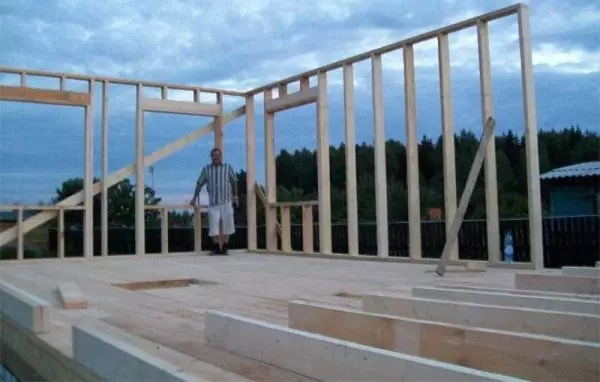
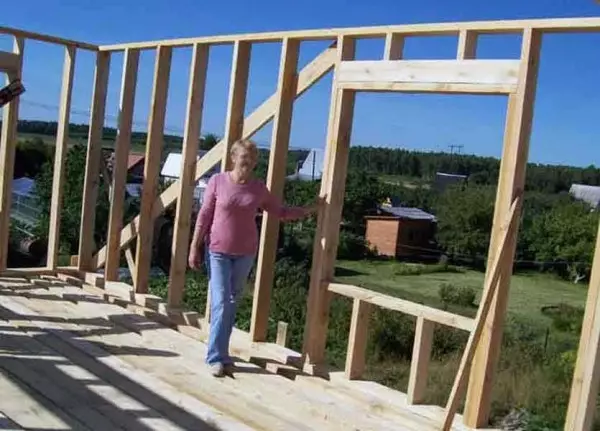
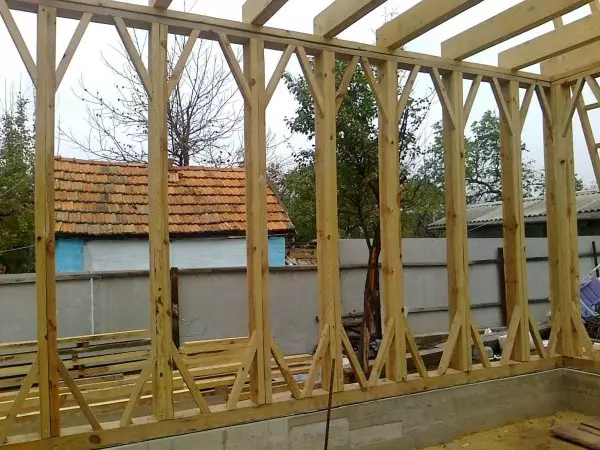
Step 3: Frame Walls
There are two ways: the frame frame is collected (all or part - depends on the size) on the floor, then rises, is set and fixed. Sometimes with this method directly on the floor fasten OSB, GVL, Phaneur from the outside of the frame: rigidity is obtained more. This technology is called a frame-panel or "platform". For this principle, the plants are mainly working: they build ready-made shields on the project in the workshop, bring to the site and there are only mounted. But the carcass-panel house-building is possible and with their own hands.
Article on the topic: How to put tulle with the help of a ribbon with your own hands
One of the embodiments of the frame wall, the names of the elements
The second way: I am going to all gradually, at the place. The bottom strapping bar is nailed, angular racks are exhibited, then intermediate, upper strapping, etc. This is the technology called "frame house-building" or "Balloon".
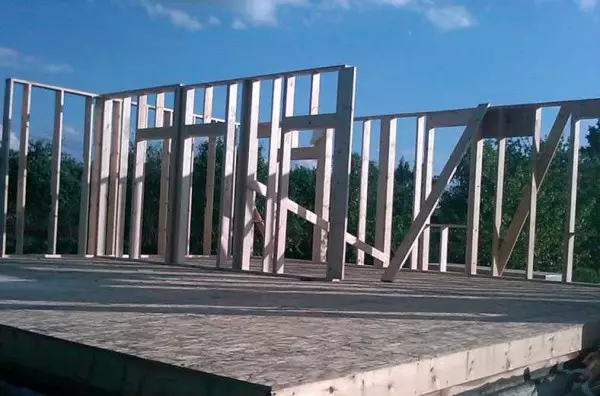
Assembly of wall frames with their own hands can be carried out gradually (technology Bullin) or blocks (technology platform)
Which one is more convenient? It depends on how many people work and is it possible, at least periodically, attract assistants. On the floor work faster and more convenient than jumping the inclusive number of times up / down on the lap. But if the section is assembled large, it will even be hard to raise it. Exit - or call assistants, or break the wall frame into small segments.
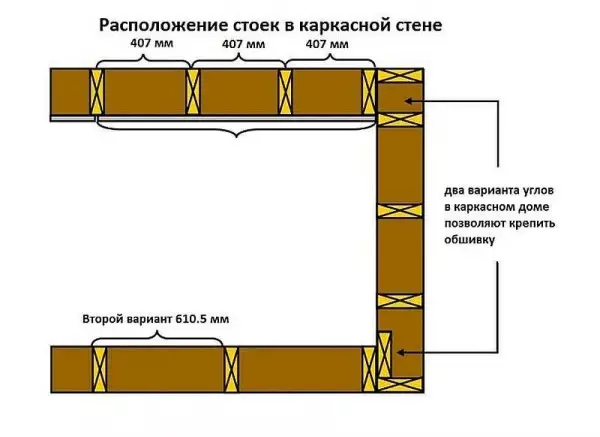
Installation step and cross section
Corner racks must be 150 * 150 mm or 100 * 100 mm depending on the load and the desired width of the insulation. For a single-storey skeleton house, it is enough 100 mm, for a two-story - at least 150 mm. Intermediate racks in depth are the same as angular, and their thickness is at least 50 mm.
The setting step is selected taking into account the load, but it is really often selected based on the width of the insulation. If you warm the mineral wool in rolls or mats, first find out the real width of the material. The lumen between the racks should be 2-3 cm less than the width of the insulation. Then the waste will almost not, the gaps and gaps, through which will leave will be warm - too. The density of the insulation installation in the skewers is the main point, because only it will serve as protection from the cold. The slightest violation will lead to the fact that the house will be cold. Because it is necessary to take full attention to the selection of insulation and its installation.
Options for a gradual assembly of a frame of the house: an angular racks are exhibited and fixed, the upper block is immediately mounted, then the vertical racks with the selected step
Fastening racks is possible in several ways: wooden brass, with wrinkle or corner. Word into the board of the lower strapping should be no more than 50% of its depth. Corners are mounted on both sides. The fastening of the anticipation is the old technology, but the complex in version: it is grown up long brazening, the niggles through the rack and the bottom strapping bar are drilled, the wooden spike is driven into it, the excess of which is trimmed. It works well if the wood is used dry. If not, the drying and loss of fastening rigidity is possible. Installation on reinforced corners is much easier.
According to Canadian technology beams, to which windows and doors are attached, make double. Loads here more, therefore, the support should be more powerful.
Strengthened racks near the windows and doors - the need. Just so the frame house built with your own hands will be reliable
How to make a gazebo from a tree (also on frame technology) read here.
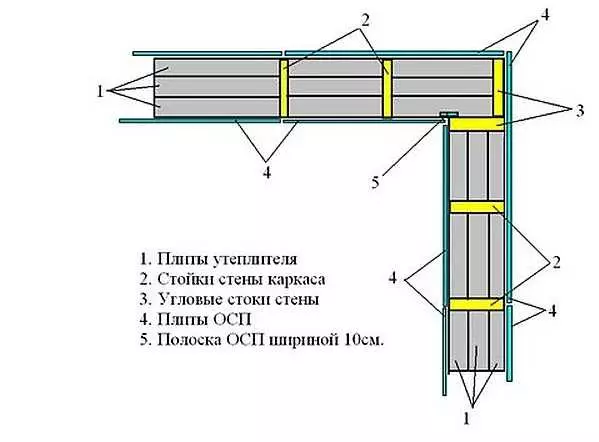
Ukos or Otlock
If the outer covering is planned from the slant material of the vocabulary - OSP, GVL, GVK, plywood - covers put temporary and inside the room. They are needed for leveling and maintaining geometry until the outer skin is attached. The strength of this material is enough to create the desired stiffness of the structure.
If the trim is planned to be set - out of the lining, etc. Installation of permanent shrewing is required. And the best option is not those that put on several racks, but four small pieces each: two above and two below (as in the photo below).
Such discolutions will give sufficient rigidity to the walls of the frame house
Please note that the photo above the racks are prefabricated: two boards are shot down together with nails all over in a checker order. Such racks have even greater carrying ability than solid, are less. This is a real way to reduce construction costs without loss of quality. But the time of construction increases: nails have to score a lot.
Corners of a frame house
Most questions arise in the construction of the corners. If you put a bar in the corner, then no difficulties seems to be no, except that the angle is cold. In regions with a short and soft winter, this is not a problem, but in the middle of Russia requires some solution.
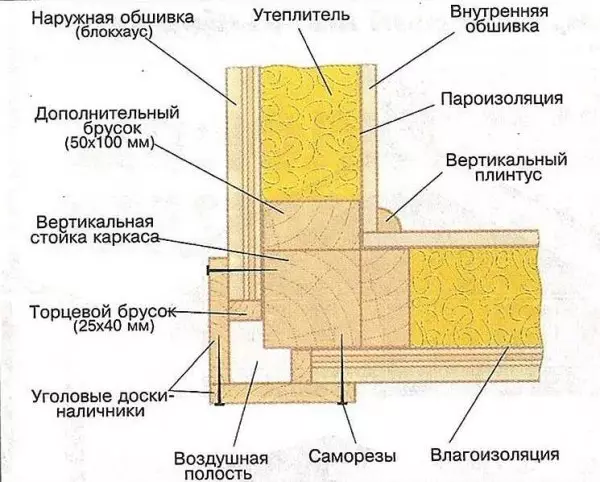
Even with this option, the angle will be colder
There are several ways to make the corner of the frame house warm. All of them are shown in the schemes, so clearer.
When building a single-storey frame house can be done so
With a residential second floor, angles make one of these ways
After assembling the carcass, it is most often outside of it, plywood, plywood or other similar material.
The construction of the Wrong is described in this article.
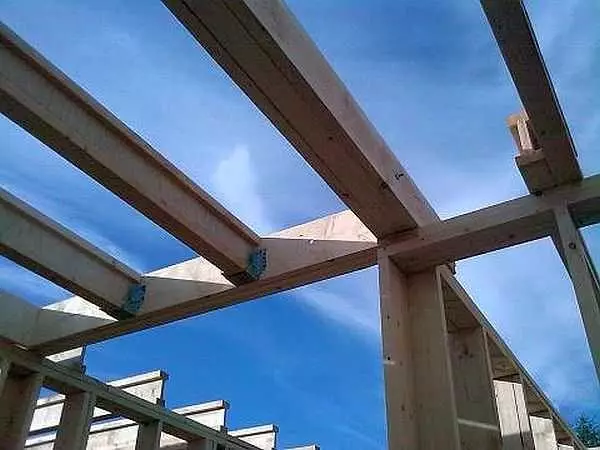
Step 4: Overlapping
Overlapping beams are based on the upper strapping bar. There are several ways to mount:
- on the support steel brackets;
- on corners;
- with inserting;
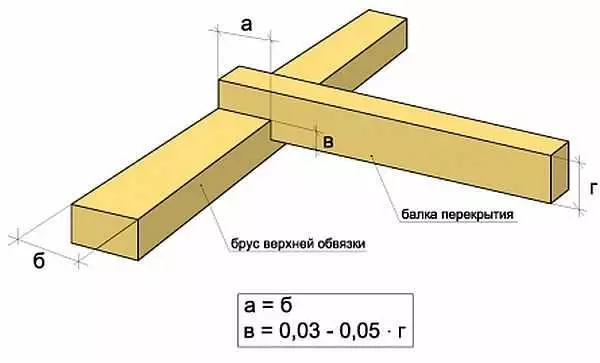
Wide - the depth of the cut should not exceed 50% of the thickness of the left strapping bar. From above is clogged with two nails, which should enter the strapping at least 10 cm
Article on the topic: Dust pliers: how to get rid of upholstered furniture by folk remedies
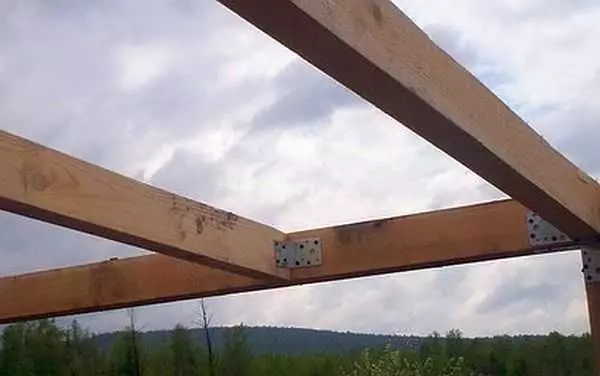
Corners - the usual method. You can use reinforced but not necessarily
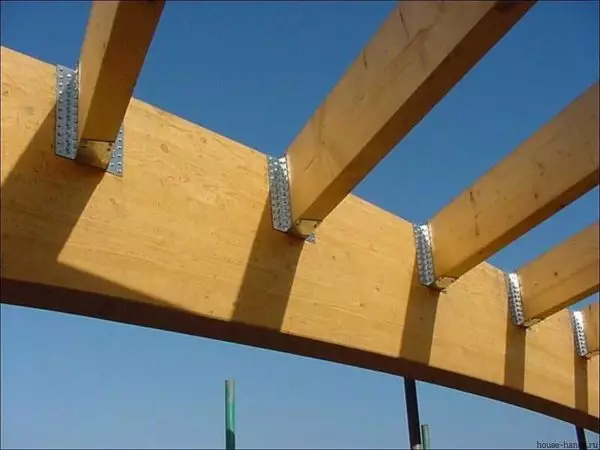
Perforated brackets - a form can be different
Mounting ceiling overlap beams with metal brackets
The size of the beams, the step of their installation depends on what will be top. If the second residential floor or the attic, the cross section takes more, the step is less: that the floor does not be fed. If only the roof and the attic is supposed to be non-residential - it is completely different calculations and sizes.
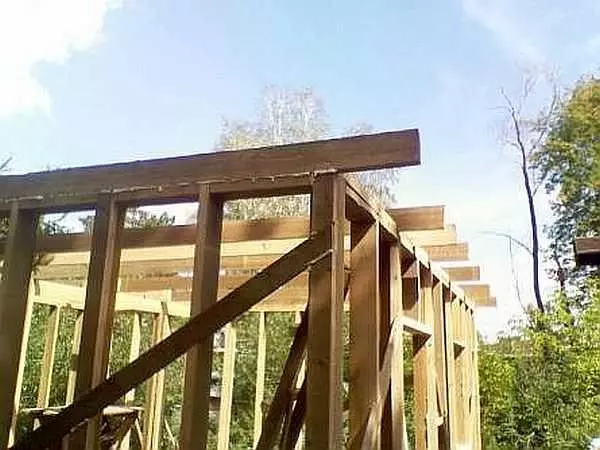
In this one-storey skeleton house, the overlap beams are simultaneously supporting for rafters. Because they are released by 30 cm per perimeter of walls
If the second floor is completed, the overlap is cured with a black floor of the second floor. So work on creating the second floor of a frame house will be easier. His assembly is no different from the construction of the first. Unless the fact that all lumber have to drain on the second floor.
Step 5: Stropyl system and roofing material
When developing a project for a framework technology, a double or attic roof is the most popular. Their device is no different. All the same principles and calculations. The only limitation relates to the weight of roofing: it should be lightweight material, the load from which wooden beams and overlaps can withstand.
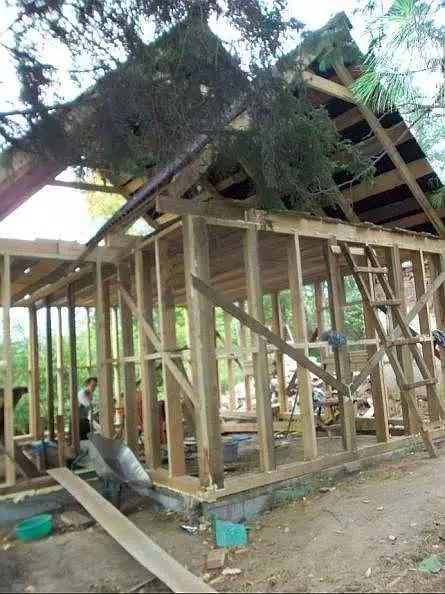
It looks like a frame to the trim. If the walls do not hesitate, when working on the rafter system, small oscillations are felt. Outdoor casing makes a frame much tougher
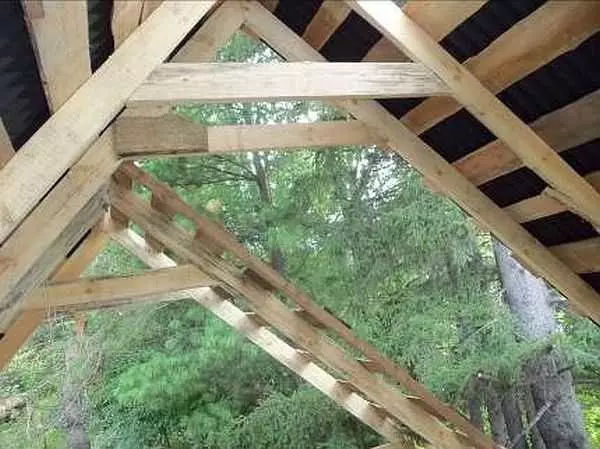
A duplex roof with raised tightening was selected.
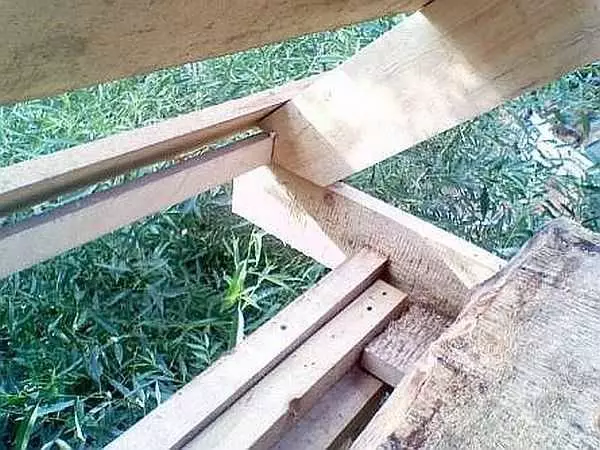
For the convenience of fastening the rafter feet on the edge of the floor beams, a bar 50 * 50 mm was brought. In the rafters under him was made. When installing, they first simply rested in the bar, then attached
To fix rafters in a given position before you have bent the crate, temporary ships were used
Another relatively inexpensive construction technology of the house of aerated concrete is described here.
Step 6: Warming
Warming the frame house can be any of the materials available in the market with the corresponding characteristics. All of them are imperfect, but all problems have standard solutions.
The most popular insulation for frame walls is basalt wool. It is produced in the form of rolls or mats of different density. It is more convenient to install mats into the walls: they are more dense and well they themselves due to the cutting force. For this, as they said above, their dimensions must be 2-3 cm more than the distance between the frame racks. Mats, of course, are additionally fixed with special fasteners, but it is more convenient to work than with a soft roll.
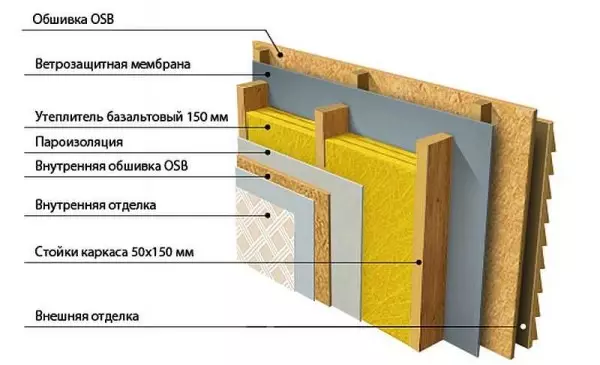
The most common skeleton wall insulation pie
Mineral wool has high thermal insulation characteristics, good sound insulation. But there is a solid drawback: it is afraid of wetting and it is necessary to protect it from all sides not only from moisture (rain), but also from the penetration of steam. Therefore, on the side of the room, it closes a layer of vaporizolation membrane, which does not allow pairs to penetrate inside.
From the side of the street, thermal insulation from mineral wool is closed by another membrane, but another type with other characteristics: hydroplated vapor-permeable membrane. She is not blocked, from the side of the street does not let moisture in a liquid and gaseous state, and from the insulation, the pair can come out: the vapor permeability is one-sided. After installing the insulation, only finishing works remain. Actually, everything, the construction is over.
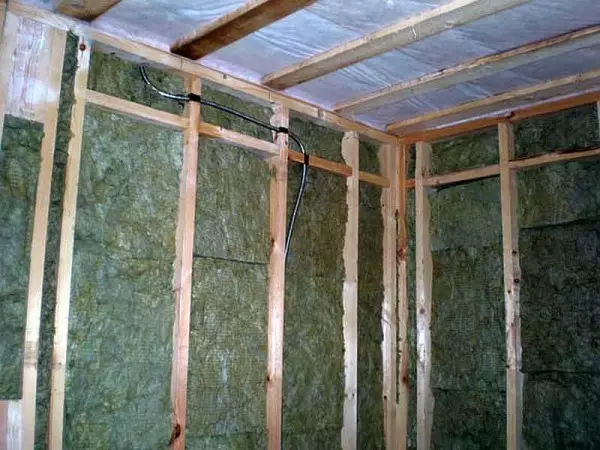
This looks like a basalt mat installed between racks
Now you know how to build a frame house. The details of some processes are far from complete, but you have a common sequence of assembly. Perhaps you will be helped by another video from a professional carpenter, which decades are engaged in the construction of frame houses (see below).
Video instructions for mounting frame houses
These are three videos of an excellent carpenter Larry Hon. Each of them duration for more than an hour. The technology of the construction of a frame house on the finished foundation is painted very detailed.
According to this instruction, the independent erection is possible without any questions: commented and explain all the stages of construction of a frame house and trivia, up to which nails, how long, how many pieces with what step, score in each node. Basic problems that may arise and their correction methods may also occur. If you decide to build a frame house with your own hands, do not regret the time - look at the movie. Much will become clearer.
The first part is the lower strapping and the floor.
The second part of the video is the device and assembly of frame walls.
The third part is to build a roof of a frame house.
If you still doubt whether it is worth building a frame house, it is probably because they heard that it is a bad technology that it does not work. There is such an opinion. But it is based on the fact that in Canadian and American frame houses put out of dry forest, humidity. no more than 20-22%. In our conditions, the sawmill is brought with wood of almost natural humidity, and this is up to 60%. Therefore, at home leads and turns, they become cold.
But if the house you have gathered to build with your own hands, what will prevent you from using dry wood? Chamber drying is expensive, the difference per cube is very decent - almost twice. But folding the wood on the plot into the ventilated stacks for the year you can dry up to the same 20-22%. Soak or not before drying bioprotection you decide. Dry wood does not rot and is not damaged by fungi, but it is desirable to impregnate it with bioprotection from insects.
An example of this opinion in the video. With an explanation, why the technology is bad ...