
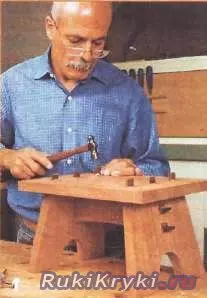
To reach the upper shelf, always lacks several centimeters, which means you need to carry a stepladder from the storage room or the garage. But if you make a neat little bench, she will "add" to you growth and at the same time will be so small that it can be hidden under the table or in the corner. The bench is useful and the child - she will help him reach the shelf or to a washbasin.
Such a small bench is simple in design and work on it will take only a couple of weekends. It can be collected from short cutting boards or carve 250 × 1250 mm from one board. The bench consists of four details, two of which are the same. Only one type of connection is used for its assembly. Even newcomer will be able to make a bench, although the master will be interested in working with through spikes at an angle.
The height of the benches is about 225 mm, that is, less than the height of the usual step of the stairs, under which it can be stored. But she has a rather large lid, on which both legs of an adult. The bevelled legs increase the stability of the bench.
Through joints of groove spikes, like "swallow tails", look very expressive. Here, the powerful squares of the end fibers contrast with the longitudinal fiber on the surface of the tree. But since such a connection is striking, it must be done pure and gently.
Unlike a single groove and spike, where a poorly fitted compound can be shifted to 1.5 mm in any direction to be done "tightly". The gaps are chosen by crushing, but only in one direction. The compound is complicated and the collapse of the legs at an angle of 10 °. However, there are some techniques and devices that will make it easier for work.
Step 1. Creating a drawing
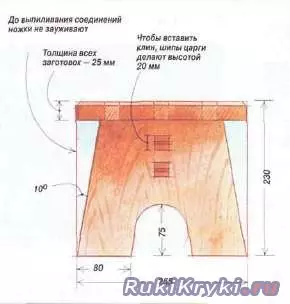
Start work from making drawing of benches on 1: 1 scale. Putting out parts on paper, you can check the dimensions and angles of each part and the position of the grooves.
Step 2. Preparation of blanks
Having machined the thickness of the thickness, they are cut down in length and width, leaving the allowance of 1.5 mm to equalize the legs and fit the through spikes.
Step 3. Marking: Grooves and spikes
The key to the successful manufacture of compounds in this bench is a very accurate markup. According to the drawing, the thickness of the grooves the lid passes. So that the spikes can be later exposed, the grooves must be 1.5 mm more than the thickness of the threads of the legs.
Article on the topic: How to sew a New Year's hat of Santa Claus or Santa Claus Cap
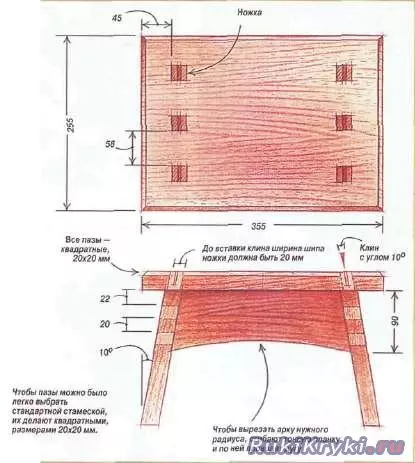
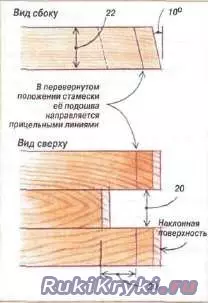
For horizontal markup, the grooves make a marking bar, which mark the width of the grooves and the distance between the grooves and spikes. From the drawing of the bench on a scale of 1: 1 tolerate marks to the bar and all the grooves are placed on it - in the lid and spikes - on the legs. In order for the markup to be accurate, it is made by a marking knife or a 20 mm chisel, since the grooves should be a little more than 20 mm.
Accurate grooves at an angle. In this bench, the grooves and spikes are tilted at an angle of 10 ° and they need to be adjusted so that the spikes entered into the grooves without cracks. The work starts from the top side of the workpiece, since here the grooves must be done more precisely than from the bottom side, where 3-mm spike shoulders will hide small slots.
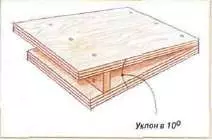
Inclined fixture from plywood. Collect it on self-drawing for dry plaster. The insertion is adjusted for the transport so that the slope is equal to 10 °.
Step 4. Drilling the grooves
To facilitate the work of the chisel, most of the wood from the groove is selected on a drilling machine with a cork drill 20 mm using a device with an angle of inclination at 10 °. Another cunning accuracy of the sampling of grooves-station works on a guide. This simple adaptation three surfaces have a tilt at 10 °. The average section corresponding to the width of the grooves in 20 mm is shifted back of approximately 25 mm. The resulting pocket guides the chisel at an angle of 10 ° and determines the width of the groove. Two advanced side sections are used to aim the soles of the chisels under the same angle when working on the opposite wall of the groove.
The drilled holes are hidden by several chisels: the corners, 12-mm, 12-mm are cut into the guide tool - the groove itself, and the walls are cleaned with a 20-mm chisel. To make it easier, expand holes to the bottom of the groove. When scrolling the grooves so that there are no chips at the outlet, press the item to trim the board.
Article on the topic: Schemes of bead harnesses: Easy master class weaving Turkish bracelet with photos and video
At the same time choose the grooves in the legs. Again use inclined and guide devices. It does not need a marking plank, because because of the place for wedges, the distance between dual grooves and spikes is not critical.
Step 5. Put spikes
Spike legs. The next step in the attachment of the legs to the lid is the markup and sawing spikes on the legs. They are made a little longer, so that the spikes can be cut off the flush. While the legs are rectangular, peel 3-mm cereals at an angle of 10 °. Then exhibit a circular saw disc vertically, put the board on the end and drink outward brushes. After that, the width and position of each spike are placed on the marking bar, and the inner brushes are cut on the belt saw.
The excess wood is cut by a jigsaw, and then the eyes are cut by her shoulders and brushes. Control the work, applying the cover to the spikes of the legs, and via the grooves estimate the readiness of the spikes that should be exactly adjacent to the width of the grooves, but the thickness leaves the place to be crushing.
Step 6. Production of the Tsargi Bembets for Legs
In accordance with the drawing, plunder is placed. They dug upside down the ends at an angle of 10 °. Now everything is ready for sampling grooves in the legs. Screw the thugs of thorns in the same way and with the same adaptations as before.
Guide for the chisel. Take a wooden bar, which has one end to the alarm at an angle of 10 °, then longitudinally saw it into 3 parts and glue them so that it turns out to be a stepped design.
But here, the pixels are tilted in different directions from the disconnection of the leg / cover. And again leave in the grooves place for crushing.
On the disk saw cut out external blowers and spike brushes. But before working on, the legs into the lid are inserted into the lid and for checking fittings are placed between the Tsargi's camp. Drinking the shoulders and sewed the spikes, on the bottom edge of the kings on the ribbon saw poured the arch. It can be cleaned with a drum grinder or a row and cycles.
Step 7. Tolage and drinking legs bench under legs
The side sides of the legs are also tilted at an angle of 10 °. Remove the angle and sizes from the drawing of the bench scale 1: 1 and fill the parts on the ribbon saw. Manual or electrolake sticks the edges.
Article on the topic: How to sew penal pencils with your own hands: Pattern and master class
So that the bench was beautiful and better stood on the uneven floor, cutouts are made in the legs. Circle draws circle and spend tangent direct, parallel to the side edges of the legs. First, the contour on the ribbon saw is riveted, and then clean it with drumming grinding or rashpils, files and sandpaper.
Step 8. Assembling bench for feet
Building the bench is a rather complicated operation, since all the details must be collected simultaneously. First, for checking fit, they collect different parts and place under buildings in the drawing against each other. After conducting the necessary improvements, dryly collect benches.
Then carefully disassemble the bench. Using clamps, slowly tighten all the details. Listen to the screenshots, cracklers, do not allow the appearance of chips. If the leading edge of the spike begins to climb the top edge of the groove, through the cutting of the board, it is born this place in the image or trimmed spike.
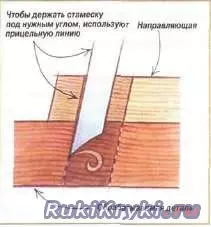
The guide for the chisel helps to cut the opposite inclined wall of the groove. On the wall of the guide spend a line parallel to its front edge
Step 9. Dutches in spikes for wedges
Before the gluing in the end of each spike, they make rods for wedges, which will be spread and drove them in place, closing small slots. It is easier, of course, cuts a depth of about 20 mm to make a hacksaw. Wedges in spikes should always be located across the surrounding spike fibers. Otherwise, when clinging wedges, a detail with grooves can be split.
Greased spikes with plow glue, completely tighten all the details. They give the bench to stand 15 minutes, remove clamps and blocks. Then, smearing the ends of the wedges with glue, clog them into place so that the slits around the spikes disappear.
Step 10. Finishing bench for feet
So that the wedges glued, the benches are withstanding at least 12 hours. After that, they cut off and cut the wedges flush.
The last operation to stripping and finishing is the removal of the champers on the lid. First spend lines at a distance of 5 mm from the roother of the cover and, holding a handbank at an angle of 45 °, stacks up to them.