
During the construction of a brick house there is a lot of difficulties, but they all simply overcome. The most popular complication is the attachment of the rafted to the brick wall, because This surface requires the most sensitive relationship.
The assembly angle of the rafter system depends on the liner of the roofing slope.
Maurylalat and Montage Methods
Tools and materials:
- roulette;
- Bar 100 * 100;
- Perforator;
- waterproofing;
- Studs, steel rods or wooden wedges.
The entire design of the construction can be seen in Fig. one:

Figure 1. Schem fastening rafted to a brick wall: 1 - strapping; 2 - Mauerlat; 3 - waterproofing; 4 - rafters; 5 - wire; 6 - fixing anchor.
- Bind. This method of attachment is most often carried out, but there are exceptions for the stud.
- Maurylalat.
- Waterproofing.
- Rafters.
- Wire.
- Fixing anchor.
At the very beginning you need to install Mauerlat, because The design begins with it. Before installing it, a cut brick is laid from the front side to close it later. Some masters put a brick after the end of work, which is also effective, but take a little longer. It is better to use the penetrating options as waterproofing, but if there is no possibility or the price is not available, it is possible to get along the ruberoid. After the runner rolled out on the site of its deployment, it is necessary to cover it with a gas burner.
There are 3 ways of mounting Mauerlat:
- Hairpin. This method is the easiest, because It is necessary to make a vertical hole in the wall to the depth of 1/2 of the stud, to pour a slightly unconditional mastic to the bottom and immerse the metal rod there. From above the bar is installed with the holes done in the right places. The mounting step is usually 30-40 cm, because The increase will affect the strength indicators.
- Wooden wedges. Everything is much simpler, because When laying bricks, special gaps are left, where the wedges of the desired length will be installed. It will be easy to make holes in the bar and make them together in the selected places. Wedges should be made of coniferous wood or more expensive varieties, in order to last as long as possible.
- Steel rods. The step of their installation is 30-40 cm, and the method is identical to wooden analogues. Such rods are much cheaper than wood, and their installation is easier. The only minus is the need to make the shower on the 3rd row of masonry so that the roof cracks do not go from the side pressure on the house (work with lightweight materials does not require such precautions, but it is better to progress).
Article on the topic: Couple Couple do it yourself: drawings, instructions
Some craftsmen warm up to a viscous state of waterproofing before paving Maurylalat, thanks to which the hitch is improved. Such a stroke is impossible when using mastic, because For them, it is extremely destroyed.
Major Installation Works
Tools and materials:

Double roof design: 1 - rafal; 2 - screed; 3 -
Maurylalat; 4 - skating beam.
- Bar 80 * 200;
- steel corner;
- roulette;
- a circular saw;
- Pencil and cardboard;
- wire;
- Anchors;
- Perforator.
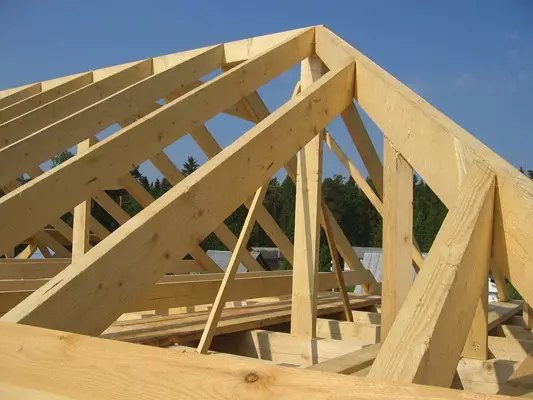
Now the installation of rafters on the wall begins. The rafter system depends on the type of the selected roof, but is most often used to be used:
- Rafters.
- Screed.
- Maurylalat.
- Skating beam.
This option is quite easy to install, besides, it will not be necessary to make additional partitions under the roof. At the very beginning, the tie beams are installed in increments of 0.8-1.2 m, depending on the mass of roofing materials (for ondulin or a cantome of 1.2 m, enough for his eyes, whereas for a slate - 0.8 m and no more). Mounting to Mauerlat is carried out with the help of special corners of galvanized steel. Only now the wall is ready to start fastening the rafter.
The length of them is calculated in such a way that the wall does not limit their length, and the beam went 50 cm beyond its limits. On the place of the joint and walls, you need to cut triangles, clearly repeating the contours of the angle, with which the joint is coming. It is best to make a cardboard layout, from which the measure is removed, and with the help of the circular, it is cutting.
At the very beginning there are 3 beams among themselves, with 2 guides, and 1 skating. No need the skate beam shake immediately rigidly so as not to strain the material. It is necessary to lift in such a way that the angles perfectly coincided. After 1 side was raised, you need to raise the opposite and only after that fix them tightly with steel corners.
Article on the topic: Wall panels for the kitchen for apron: PVC, photos, plastic, decorative, MDF, how to fix, video
Each raised beam is immediately wounded with galvanized wire, after which the wire is intertwined and falls down. At a distance of 5 rows of masonry you need to make a hole with a perforator, then drive the wire on the anchor and screw it up to full fixation.
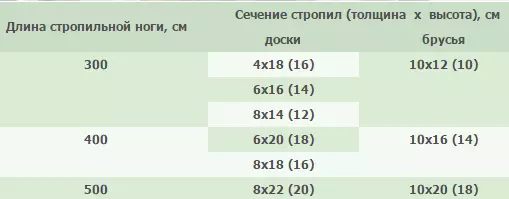
Dimensions of rafter feet.
Fastening rafters on this end, but you need to remember a number of factors:
- When working with the perforator, only drills and crowns with a diamond nozzle are used. Any other options with a large share of probability split the material.
- All metal is strictly galvanized. If it rafters on a simple steel, then over time she rusts, and together with it, a tree will come into disrepair.
- All wood is most thoroughly processed by an antiseptic against moisture and insects. Such a step will add up to 20 years of operational period.
Summarizing
Before attaching rafters with her own hands, you need to prepare the most carefully to prepare for this process. Wood selected mainly coniferous, galvanized metal, and the tool is reliable.
Usually, the attachment of the rafter on an area of 100 m² without helpers takes up to 1 week, so you need to view the weather forecast in advance in order not to get under the rain.
If rains are foreseen, and work should be performed early, then at the time of precipitation, work stops and closes with polyethylene, and immediately after their completion, you can continue the activity.