
Plastic panels are one of the ways quickly, beautiful and cheap to arrange the ceiling in various rooms with your own hands.
The ceiling panel is significantly lighter than plastic panels for walls. Do not confuse.
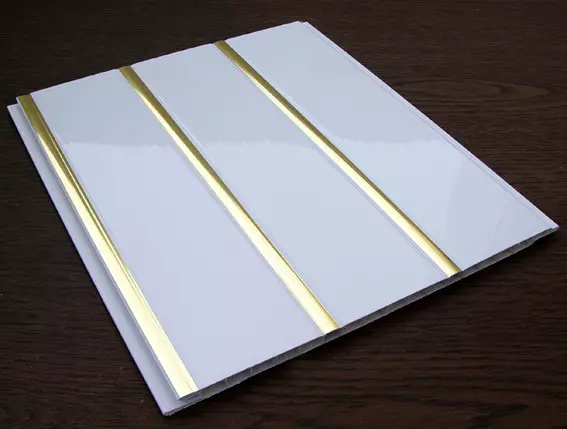
Typically, such panels are produced by a long 2.7 - 3 m and a width of 25 or 30 cm. On long sides there are special locks that provide good and durable bonding panels. Methods for mounting such a ceiling include the use of a wooden frame from bars or metal profiles used for mounting plasterboard ceilings. One of the advantages of installing such a ceiling is the low weight of the materials used. Panels inside the hollow, but numerous ribs of stiffness give them the necessary strength.
Preparation of materials and tools
Before purchasing the necessary materials, you need to consider the design of the ceiling: the direction of panels, the use of various plastic profiles, the design of the frame.Installation of plastic ceiling does not require the use of any complex tools. All you need is in every home:
To make a hole on the ceiling under the lamps, use a drill with a nozzle (so-called "crown").
- a hammer;
- sharp knife;
- hand-hacksaw;
- stubble for circumcision profiles;
- Drill or screwdriver;
- roulette;
- level.
To determine the required amount of materials you need to calculate the ceiling area. Further, based on the size of the selected PVC panels, they determine their quantity, not forgetting to add about 15% on trimming the material.
The frame for the suspended ceiling of plastic bands can be made of a wooden bar (20 x 40 mm) and a metal profile. Since this ceiling is made in most cases in kitchens, bathrooms, on balconies and loggias, that is, places with high humidity, the use of a metal profile will be more preferable. In dry rooms, it is possible to perform a fragment from the bar, previously treated with antiprem and antiseptic impregnation wood to improve refractory properties and protection against damage. In low rooms, with relatively smooth ceilings with a maximum drop to 5 mm, you can use aluminum and plastic profiles intended for the installation of PVC ceiling panels. In the center of such profiles there are grooves to secure clips that will hold the panels.
Article on the topic: Select interroom doors in Lerua Merlen
In the installation process, a dowel will be used to fix the frame to the ceiling and around the room perimeter, screws and screws, metal clips or screws with a press washer. Their approximate amount can be defined only when the framework of the framework is selected.
Back to the category
Preparatory work
Insert panels in the starting profile.
The ceiling of plastic panels will completely hide the main ceiling. Despite this, the foundation needs to be carefully cleansed from damaged plaster, putty between plates, old finishing materials, which can simply fall off over time. After that, the purified surface is ground.
Before building a frame, you must perform its markup. On the perimeter of the room outline the line, which will mean the level of the future suspended ceiling. Choosing the height of lowering the ceiling, you need to take into account the irregularities of the base, the presence of communications, existing wiring, plan the installation of the lighting devices. To lay the wiring, it is necessary to provide a gap, the minimum height of which should be at least 2 cm.
Measurements are made from the lowest point of the foundation. Putting the first mark, it is transferred with the help of a level on all walls. In order to get smooth lines throughout the perimeter, use the twine, grated a bright shallow. Stretching the twine on the labels along the wall, it is slightly delayed and released - it turns out a smooth, well-noticeable line.
Next, make the markup of the support elements of the frame on the ceiling. To avoid plastic sagging, the shap must be frequent. Profile or bars should be located 40 - 60 cm perpendicular to the direction of plastic panels.
Back to the category
Assembly of the carcass
Method of mounting the frame depends on the materials selected for it. Consider each of them:

Installation of PVC plates on the frame.
- Wooden shell timing attached to the ceiling by dowels with a step of 60 cm. To display one level along the bottom edge between the ceiling and the ram, wooden linings are inserted.
- When the plastic crate device is used by the P-shaped plastic profile (plinth), which is fixed around the perimeter of the room with a step 25 - 30 cm. At the same time, it is monitored that its lower edge passed on the previously marked on the walls of the line. For the joint of the profile in the corners, it is cut off with hacksaw using a stub - just so you can get a minimal neat gap.
- The frame of their metal profile is collected in the following sequence:
- around the perimeter on a dowel fasten a hard profile, following it to be located strictly horizontally;
- on the markup on the ceiling, the fastening of direct suspensions is performed using a dowel;
- If the lengths of direct standard suspensions are missing, it is necessary to use anchor suspensions instead of them having clamps;
- The distance between the suspensions should not exceed 60 cm;
- Metallic profile attach to suspension;
- Unlike plasterboard ceilings, the installation of plastic panels does not require the installation of a transverse profile;
- The installation of transverse profiles is only needed to enhance the location of the chandelier;
- The final stage of the installation of the frame - fixing on the guide profile of plastic cornice or starting profile (wide side up);
- For docking in the corners, the eaves are cut off using a stub, and the profile can be made on the corner of each other, to attach a sharp knife to make a diagonal cut.
Article on the topic: how to choose a bathroom curtains: design options
Back to the category
Laying plastic ceiling
Use acrylic silicone sealant to fill the cracks.
Installing plastic panels is performed only across the crate. The trimming is performed by a hand-hack or sharp construction knife. The length of the panels must be several millimeters less than the width of the room. Sometimes the manufacturer covers the panel with a protective film that you want to remove before laying.
The ceiling assembly is performed in such a sequence:
- The end of the covered panel is inserted into the starting profile;
- slightly arbuming the panel, insert the second end of the panel to the starting profile on the opposite wall;
- Gently move the panel to the wall so that the three sides are in the profile;
- The fourth, the free side of the panel is fixed to the frame of self-drawing with a press washer;
- The following panels are installed in the same way, following a reliable locking of locks;
- The last panel is cut down in length on the desired width;
- Insert the panel to one side until it stops into the angle;
- The second end of the strip is gradually inserted into the profile, slightly pulling the panel from the first angle;
- To snap the lock between the two last panels, you need to dock them, carefully moving and pulling up the last panel with your hands or with the help of strips of painting tape, pasted across the panel.
Holes for eye luminaires are cut with knife or crowns of the desired diameter. You can do this on both the finished ceiling, and before installing the panels. It should be remembered that all cables for the installation of lighting devices are packed during the installation of the frame. After installing plastic panels, only the connection of the lamps is performed.