Probably, each of us dreams of creating something unusual for home or cottage decoration. The store shelves are filled with a variety of figures and statuette, which many have no opportunity. In such cases, you can easily make crafts with your own hands. For such creativity, special skills are not required, only a desire and a little fantasy, and everything will turn out. In this article you will learn how to make crafts from gypsum with your own hands for giving.
To begin with, you need to examine all the places wherever you want to put figures from the plaster, and then choose the most suitable or on the basis of our MC to come up with something yourself. It can be just figurines for garden decorating, and can also be useful in using crafts.
Now you wonder: "How much plaster costs for crafts?". Let's figure it out. Gypsum is anhydrous calcium sulfate, when it is contact with water, rapid solidification occurs. It is used mainly in construction, and you can easily find where to buy plaster. Hypsum is cheap enough, its price depends on the mass and manufacturer.
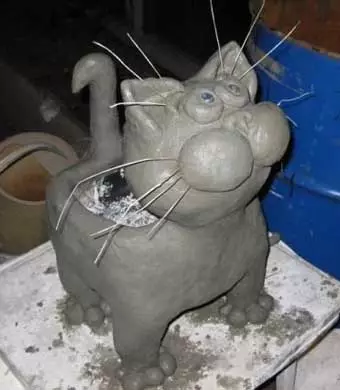
Cat-Klumba
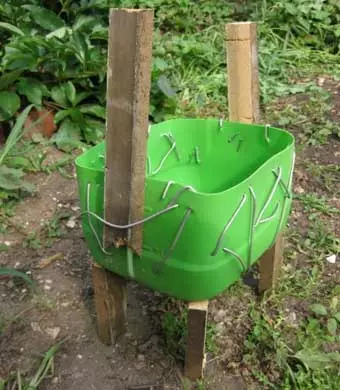
To create such figures, we need the following materials:- Plastic canister;
- Cement;
- Sand;
- Gypsum;
- Several wooden skulls;
- Wire;
- Water-emulsion paint or autocracy;
- Varnish;
- Latex gloves;
- Sandpaper;
- Water.
Step 1
First you need to cut the plastic canister as shown in the photo. From wooden tables, we wish the frame of the figure. Kanista wrap the wire for the strength of our craft.
Step 2.
Now the next step: how to breed the plaster. It is necessary to wear rubber gloves. We will interfere with the cement mortar in proportion of 1 part of the sand and 1 part of the cement, and the plaster will only be added to the portion, which in our hand.
Article on the topic: Kotoshapka Crochet with description and schemes: Master class with photos and video
Take a handful of the solution in your hand and add a spoonful of plaster into it, remember a little in your hands, roll the sausage and attach to the frame. We impose a portion for a portion, making the necessary convexities, smoothing the surface.
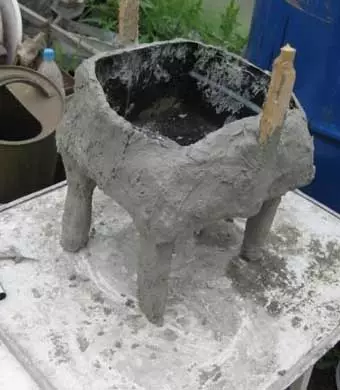
Step 3.
Lepim the cat's face. Your fantasy turns on here. Lepim small details separately.
Before gluing them to the main frame, you need to lubricate the surface with water for better clutch of the solution.
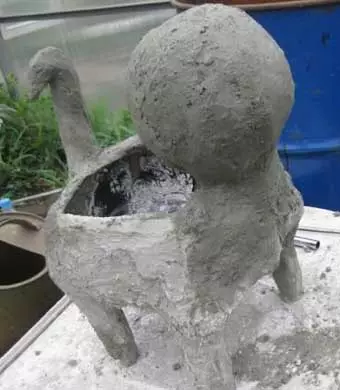
Step 4.
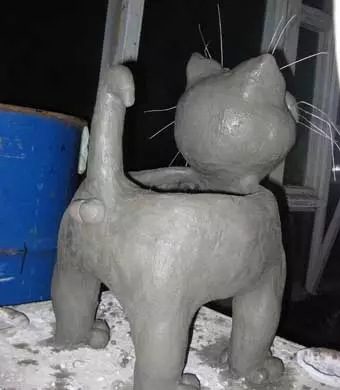
Lower your hand into the water and polishing our cat, smoothing the irregularities. Next, cover the cellophan for 4 days so that the figure is dried. The first day moisturize the surface of the crafts with water. After drying, sanding the surface with sandpaper.
Step 5.
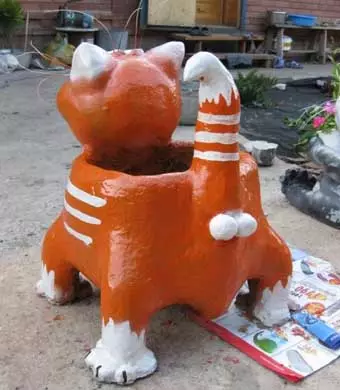
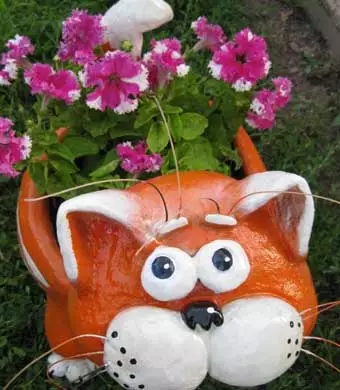
It remains very little. Krees a figurine with prepared materials, and then cover with varnish. You can leave the coloring process for children, let them imitate their fantasy, and thereby spend time together.
Here is such a wonderful figure for giving we turned out. Each winter, remove the cat from the street, otherwise the cement can crack.
Mushrooms, gnomes, various insects, butterflies and others are also very popular. If there are small figures of small size, you can use silicone forms for their manufacture. Before pouring into the form of a solution, it is necessary to lubricate it with silicone so that the finished product is easily removed from the mold.
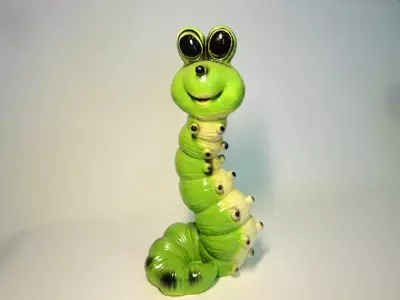
Simple caterpillar
We will need:
- Gypsum;
- Glue waterproof;
- Paint;
- Priming;
- Colorless varnish;
- Brush.
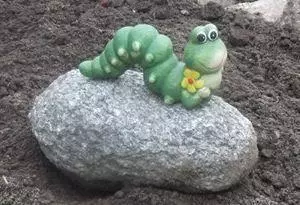
We will start work. It is necessary to make several drop-down balls of various sizes and forms (approximately 10 pieces). Next, 2 balls for the eyes are glad. They can be small or vice versa large - as you like more. We wait until all the elements are dried. With the help of glue, we attach all parts of the caterpillar, making any form of the body of our figurines. Glue eyes on the head.
We are covered with the soil our craft, we give time to dry (about 2 hours). Pray the caterpillar with bright colors, drying.
Article on the topic: Table of cable coil with their own hands
Using waterproof varnish, cover our craft to them, leave to dry. Bright, lively and a little fabulous figure for the garden is ready.
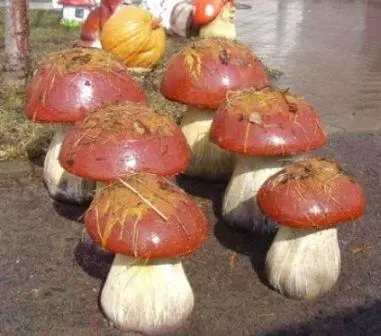
Mushroom made of plaster
Materials used:- Gypsum;
- PVA glue;
- Glue waterproof;
- Stationery knife;
- Compass;
- Pencil;
- Acrylic paints;
- Brush;
- Various small details (beads, flowers);
- Wood cutters;
- Food film;
- Water;
- Silicone;
- Plastic bottles and bowls.
Step 1
For the manufacture of features from plaster, you can use ready-made silicone or plastic molds, but we will tell you in this article, how to make plaster and such a form yourself.
Take a bottle and cut the neck from her - it will be the feet of the mushroom. Smart forming silicone. In the center of the future leg, we deliver another plastic bottle smaller. Thanks to this, the leg will be hollow.
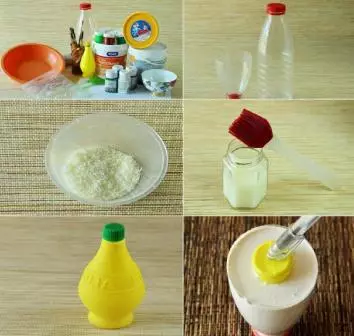
Step 2.
Investment gypsum with water to the consistency of liquid sour cream. Hill the mixture in the mold, strengthening a small bottle in the center of the feet of the mushroom with a heavy item.
We are waiting for gypsum. Carefully get ready to crawl using a stationery knife.

Step 3.
For a hat, we use a plastic bowl, lining it with silicone and hollow a mixture.
Tip: Prepare a mixture of gypsum in small portions, because You may not have time to use it, it hardly hards.
When the plaster snaps a little, insert the feet of fungus into the center of the future hat. Wait for a complete drying of the crafts.

Step 4.
We do the basis. Take a deep plate, greater in diameter than the mushroom hat.
This mold with lining silicone, hollow plaster. As soon as the mixture is grabbed, put the feet of the mushroom, wrapped in the food film, in the base of the crafts. Wait for complete drying. The fungus is ready!
Think out the drawing on the fungus, as well as its decorations (leaflets, caterpillars, butterflies). They can also be made of plaster. With the help of waterproof glue, we attach decorations on the fungus. Such a figurine again. Pencil apply a drawing on the fungus. We treat the mushroom with PVA glue, diluted with 1 to 2 in water. We are waiting for 2 hours to frozen soil. Now you can start painting our crafts.
Article on the topic: 3D Dragon from Beads with your own hands

Step 5.
After drying paints we apply 2 layers of varnish. Envy.
Now you can glue the feet of fungus to the base with moisture-resistant glue and install our product in the garden.