
The traditional completion of the repair of floors is the installation of a plinth. Wooden, plastic or planks from MDF are able to hide unattractive elements, communications and technological gaps. Before starting to fix them, it is necessary to determine the method of mounting the plinth. The choice of the most optimal method depends on the floor covering, the material from which the plinth is made, as well as from the preferred technology. There are two ways to mount - to the wall and floor.
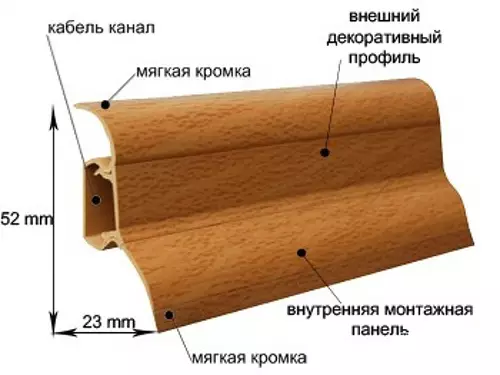
The device of standard wall plinth.
Types of plinths
To complete the floor finish, today you can buy not only wooden plinth, but also more economical and very easy to install the product from MDF and plastic.
- Wooden plinth;
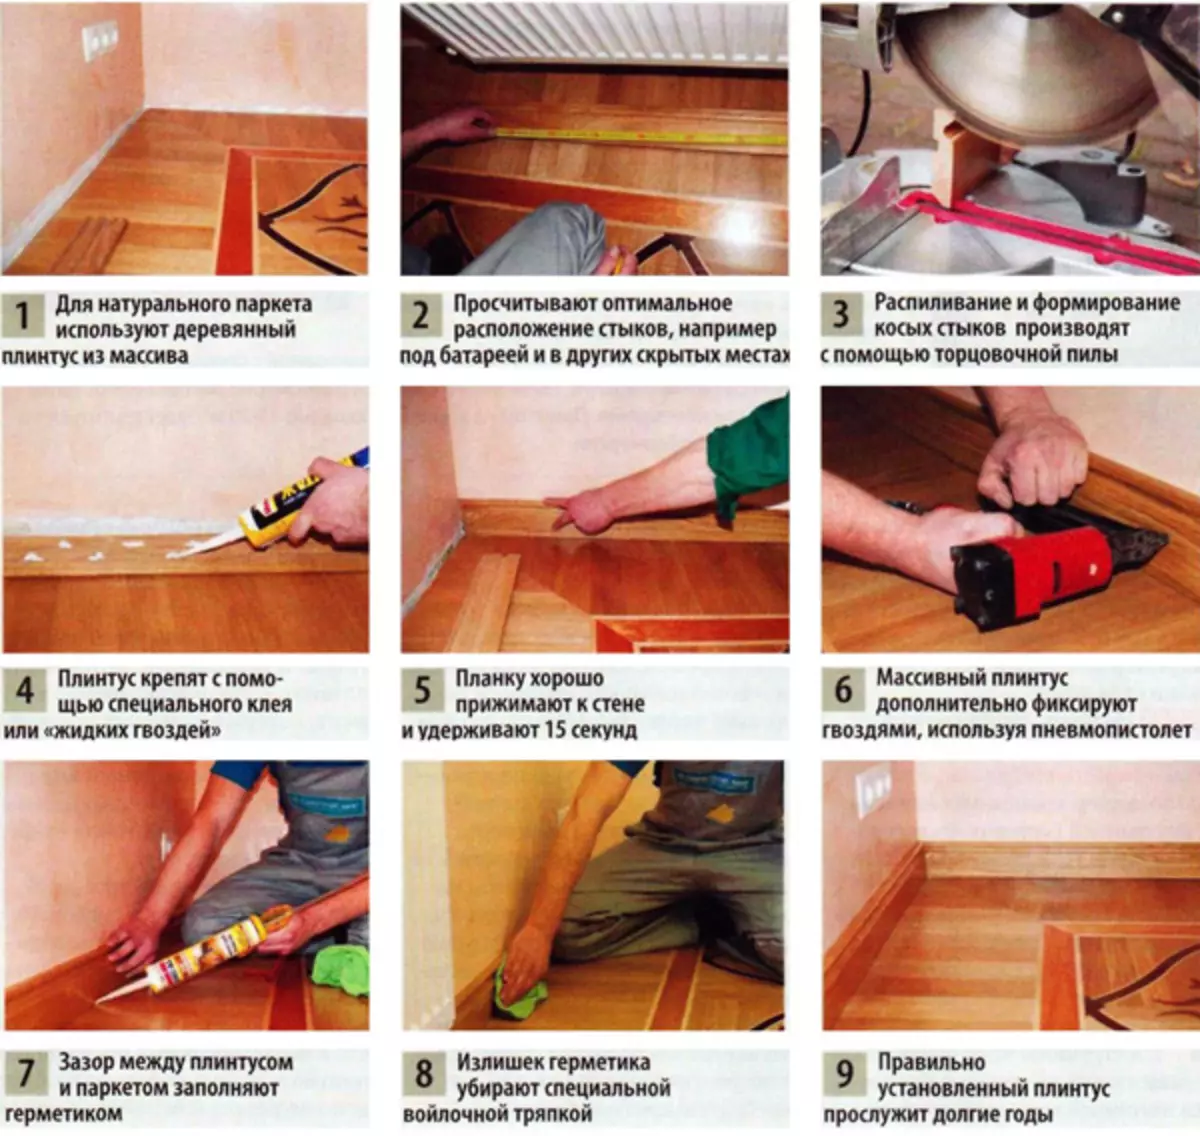
Wood is ideal for any type of coverage. But there are such products quite expensive. Therefore, the plinth of the natural massif is used extremely rarely, mainly for the finish finish of the parquet.
Wooden plinth is made from alder, larch and oak. There are a lot of products that are made in accordance with European standards, they are built into fixtures for mounting cable wiring. Such products can only be used if the wall surface is perfectly smooth.
Important! Before starting the attachment of such a plinth, the surface should be treated with decorative protective compositions, varnishes or oils.
To start mounting a plinth from a tree, it is carried out withdrawal of all elements in size to be very accurate.
- Plinth from MDF;
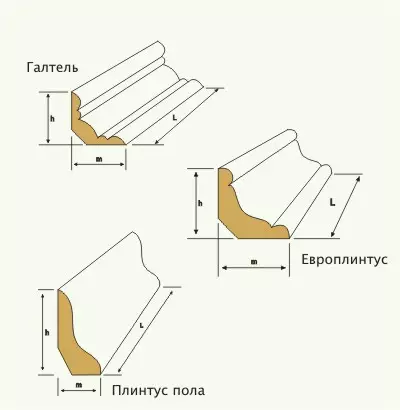
Types of plinths in shape.
These rails are covered with laminated film, veneer or foil. In appearance, they differ little from natural wood products. At the same time they cost much less.
MDF is a very fragile material that is very easy to spoil. Their mounting to the wall is carried out with the help of hook-like brackets, for which the planks are laid in the future.
- Plastic plinth.
Article on the topic: Linoleum is harmful to the apartment: how much
The planks, for the manufacture of which PVC was used, are highly resistant to the effects of temperature drops, wet cleaning, direct sunlight. Due to the fact that their appearance perfectly imitates a natural tree, such plinths can be used to finish the floor covered with laminate, linoleum and carpet. But they look too cheap with a more expensive coating, such as parquet.
Plastic plinths are fixed with the grooves that they are supplied at the production stage. Due to its lightness, they can be attached to building liquid nails, work with which does not require special labor costs.
Methods for fastening plinths: secrets and installation features
Since there are two perpendicular planes in the room, there are two ways to fix the floor baseline.In the houses, erected by timber and concrete floors, it is best to choose a fastening of the plinth to the wall. In the structure of foam concrete or bricks with wooden floor, it is optimal to choose the method of fastening the plank into the floor covering.
Installation of plinth
Before starting to mount plastic or wooden planks, it is necessary to prepare the necessary tools and materials:
- liquid Nails;
- Special self-tapping screws;
- dowels;
- hacksaw;
- screwdriver;
- Plinth.

Scheme of fastening a wooden plinth by self-drawing.
Getting Started, it is important to take into account that to plasterboard, plastered walls, surfaces, decorated with soft stone, as well as the Plumbing Plates, the plinth is fastened badly. Therefore, in these cases, it is best to choose fixation to the floor.
If for any reason the attachment of the plinth to the plasterboard is the only possible option, it is necessary to buy special self-tapping screws that are designed to work with this material. Instead, finish nails can be purchased, the coating of which is made of zinc.
At the same time, the attachment points of the plinth are best placed on metal frameworks, which is used when erecting a plasterboard facility.
Article on the topic: What is waterproof paint - its advantages and features
If an error is made when the framework of the GCC frame is made and an additional profile is not mounted for attaching the plinth, then for this option the following technology is provided.
The walls are drilled in the wall as in the usual embodiment of the plinth, but instead of a direct dowel in the hole inserted a special, so-called dowel-butterfly. When installing the plinth, self-taking, passing through such a dowel, squeezes it on the back of the sheet of plasterboard. This very much creates a strong durable plinth compounds with a wall.
Mounting with liquid nails
The order of attachment of the plinth of liquid carns.
It is possible to mount the strips with the help of glue, which is still referred to as liquid nails. This method is considered the most common today. Using this option, you do not need to drill anything, twist and pierce. It is enough to apply a certain amount of glue to the plinth from the inside and very tightly press it to the base for a few seconds.
The disadvantage of this method lies in the fact that it is tightly glued to the wall or semi when the need arises will be very difficult to dismantle without damage. Therefore, this method is ideal for those who decided to secure the bar once and for all.
Installation with mounting elements
Important! Manufacturers of both wooden and plastic planks are recommended to fix them with the help of specially designed fasteners.
You can buy them in an absolutely any construction store, in which the material itself is sold.
There are two methods for fastening the plinth with these elements:
- Fasteners need to be placed in such a way that the distance between them was from 30 to 50 cm. In addition, it is necessary to observe the next order. At first, the fasteners are fixed on the wall through self-tales, while equal intervals are observed. And only after that, the plinth itself is attached to them. As a result, you can get a very reliable and durable mount. The lack of such a method, as in the first case, is the impossibility of dismantling the planks if necessary. You can remove it, but the panel damage cannot be avoided. As a rule, such a plinth breaks in the places of its attachment, so it is not possible to reinstall it.
- The second method begins with the wall markup under the holes in which dowels will be inserted. After they are installed, the smelling of the plinth is carried out to know exactly where the screws will be inserted. This installation option has an indisputable advantage that lies in the absence of problems when dismantling. You can turn the screw at any time to turn the screwdriver at any time and spinning back in the same way.
Article on the topic: Stone wallpapers for wall decoration