
To date, lighting shields are considered one of the main elements of the electrical network. Therefore, the installation of the lighting shield must be accomplished responsibly. If you do not have enough knowledge, then the installation work needs to be trusted with specialized companies.
Installation of lighting shield
The performance of the entire power grid in your home will depend on this node. Therefore, if you damage or incorrectly install, the power supply of all consumers may stop. In this article, the site "vse-elektrichestvo.ru" has tried to consider in detail how to install the lighting shield with your own hands.
Location and size
Before starting the lighting flap mount, you need to perform a number of preparatory work. You also need to choose the size of the sizes.Location Scho
One of the main rules is the location. It must correspond to a number of rules with which we will get acquainted in detail. P.7.1.28 PUE indicates that the placement location should be convenient for service. In addition, the installation cannot be carried out in rooms, which are located under the shower, bath or bathrooms.
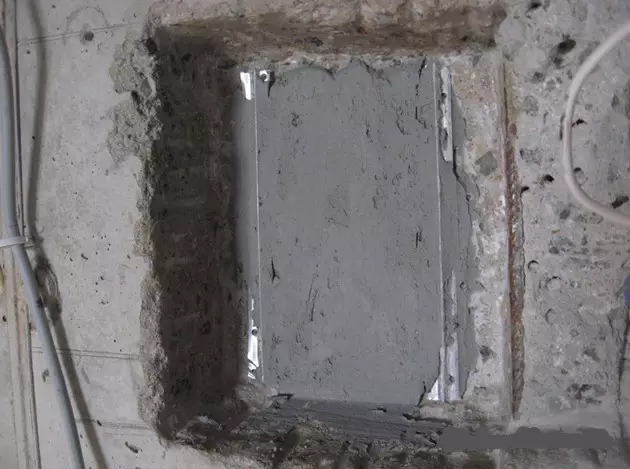
Niche in the wall for installing a shield
Here are additional rules that need to be guided by:
- The distance from the tubes of communications should be 1 meter. At the same time, it is necessary to completely eliminate the flooding option. The layout of the floor shield must be higher than the possible level of flooding.
- For the next stage, experts include the choice of design. Here you will need to decide on the installation site of the design. Installation option can be built-in and mounted. The first option is more appropriate, as it does not take up much space.
- If you decide to install yourself, then you need to pay attention to the material. In this matter, the shield installation will be fundamental.
- To install in the house it is better to choose plastic lighting shields. For the street, you can choose a metal design. To the second option also need to be grounded.
- The design of the structure should be carried out at a height of 20 cm from the floor. On the street, the design is better to mount at an altitude of 1 meter.
- If the measurement instruments will be installed in the street lighting shield, then it is necessary to organize it.
Article on the topic: Lubrication for shelves of washing machines
Gabarits.
Now it's time to decide on the size of the distribution shield. This factor in most cases depends on the number of equipment that you decide to connect. Therefore, before buying, you must first decide that it will be installed here.
Size Scho
To select the optimal size, pay attention to:
- Decide with an introductory machine. If they are already present on the storey shield, then the installation will be inappropriate.
- Experts recommend installing a separate introductory machine only if the electric sho is powered by a distribution panel with protection machines that have a greater rated current.
- If you plan to install fuses to protect group networks, then the installation of the introductory machine is mandatory.
- The presence of the counter. When installing the counter in the shield, structural elements must be present to seal the clamps from the introductory machine to the meter.
- If the meter is connected through transformers, then a separate compartment must be provided here, which can be locked if necessary.
- To properly choose the dimensions of the lighting shield you need to know the number of groups. Therefore, the calculation is best done in advance.
- Think about the additional equipment that you want to install. If you decide to install additional equipment, then you need to provide a place to further edit it.
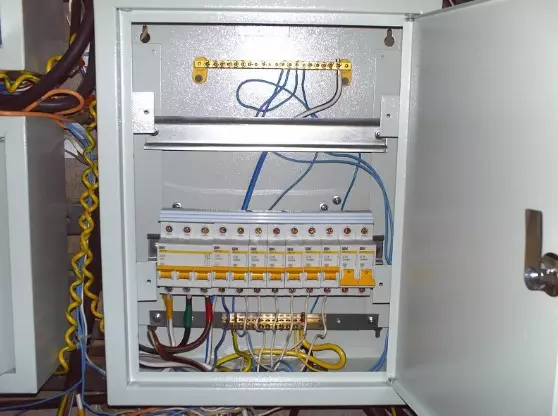
Installation of lighting shield
When preparatory work is fully completed, you can start directly to the installation. The installation process will depend on the number of phases.Single-phase lighting shields
To date, covers with single-phase consumers are most popular.
Connecting a single-phase lighting shield
The process of installing such flaps is as follows:
- Before starting the installation, you need to study and prepare a one-centered scheme. Some attach the scheme later on the electric shield door.
- The installation process starts with DIN-REKEK mounting. You can consolidate all modern switching devices. In some designs there are already DIN rails, but in most cases they will need to remake them.
- It is immediately desirable to install and tires for fastening wires. These tires can continue to be attached to the rail or to the drawer. It all depends on their design.
- Now you can start installing equipment on the rail. The mount is carried out at the expense of the spring mechanism.
- According to PUE standards, the power will always be left. Therefore, if you first open an electric flap, you can be sure that the introductory machine is located in the upper left corner. If there is a backup power machine, then it is usually placed on the right.
- If there is an introductory automatic in the design, then the phase wire is installed immediately below it. Terminals for zero wires can be located slightly lower. In some cases, they are also placed on the side walls of the cabinet.
- In the future, group machines are powered by a phase terminal bar. Therefore, they are located below the tires.
Article on the topic: Gray curtains in the interior of the living room: what can be combined with?
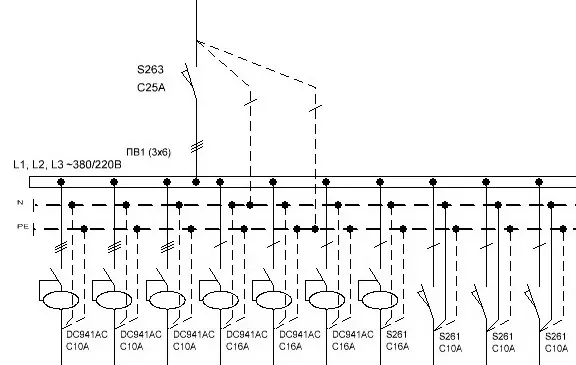
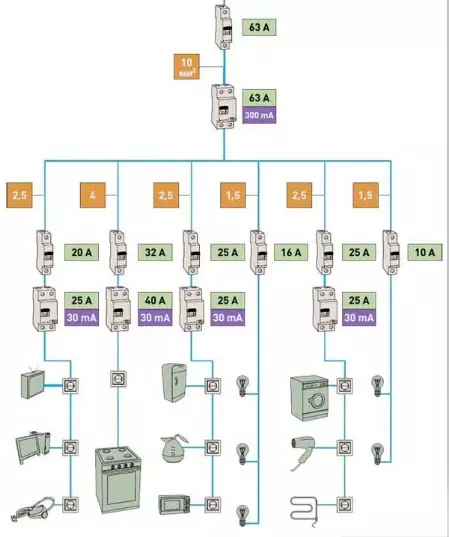
The photo presents a three-line distribution panel scheme
- If you decide to install the RCD, then they must be placed below group machines. In this row you can also place additional equipment.
- When power equipment is installed, it will be possible to start connecting it. To do this, you need a schematic diagram of lighting shield. It allows you to trace each wire.
- When the distribution panel is parsed inside it, it can be mounted on a permanent installation location.
Three phase sho
Installation, as well as the manufacture, which is performed in three-phase design, is practically no different, but there are certain nuances.
The photo shows a diagram of a three-phase disconnection of the lighting flap
Now let's consider the nuances with which you may encounter when installing:
- The main difference is the possibility of connecting three-phase and single-phase loads. Depending on the types of load, there is also an option when one-phase load will be powered from 2 or 3 different phases.
- The first possible option is power from an introductory machine of three-phase and single-phase loads. In this case, below the introductory automaton, you will need to place three tires of phase wires. Single-phase and three-phase loads can be powered by them. In another, the principle of building such a shield will be similar to one-phase.
- If only single-phase loads will be powered by a three-phase introductory machine, then in this case, below the introductory automaton should be installed three tires for phase conductors. From each of these tires, you can save individual groups.
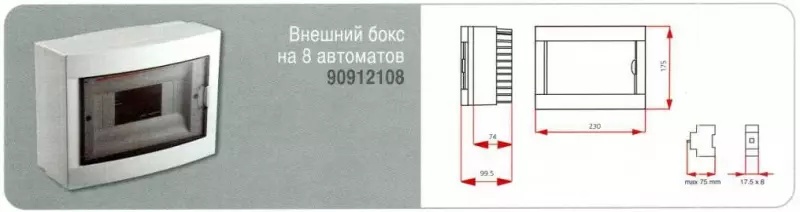
Ready to install lighting shields
On the market also presented and ready-made distribution panels of lighting. Their designs are already present all the necessary equipment that is enough to connect. There are many types of such shields, so it makes no sense to consider each.- Designation of the configuration and type of device will be applied at the top. The first character indicates the presence of an introductory machine. If there is a number "1", then this means that there is a switch without built-in protection. The "1A" character suggests that there is a switch with built-in defense. The "1D" symbol suggests that the design has a machine with built-in protective shutdown protection. Accordingly, the number "0" indicates that there is no introductory automaton in the device.
- The following numbers suggest a nominal current to which the lighting shield is calculated.
- After a fraction, the number of circuit breakers and machine guns is indicated.
Article on the topic: How to calculate the champs on the chart: Calculation of the formula
In addition, in the designation you can meet the following letters:
- "U" - denotes the need to embed a panel into a niche;
- "SC" - the presence in the design of the shield of the counter;
- "F" - the presence of additional instruments of control, as well as alarm.
conclusions
Lighting shield is the main element that must be present in any electrical network. Therefore, the choice is responsible. We hope that the information that is presented in this article helped figure out the installation. If you are sure that you will not be able to cope with the installation yourself, then consult professionals.
We recommend to explore: