
By transforming your kitchen, it is necessary to think about installing the cabinets under the sink. She will make the interior more stylish. In addition, it will become a useful element, because the bedside table can be used for storing soap means or other things. At the same time, it is absolutely not necessary to acquire such a product in the store and give a solid amount of money for it. Standard can be made with your own hands. Your attention is offered a step-by-step instruction, which will avoid mistakes in the course of such responsible work.
Cutter for washing with your own hands.
What will required for the manufacture of the couch?
Before starting to do the sink to the sink, the following materials and tools should be prepared:- Chipboard;
- glass thickness from 6 mm;
- loop for doors;
- Furniture corners;
- self-tapping screw;
- putty;
- primer;
- varnish;
- Double-sided tape.
- Electric jigsaw or hacksaw;
- screwdrivers;
- hexagon;
- sandpaper;
- A brush with a mild pile;
- putty knife;
- pencil;
- glass cutter;
- drill;
- Some sand;
- Rule and roulette;
- a small grinding circle;
- Mittens to protect hands while working with glass.
Step 1: Conducting Preparatory Works
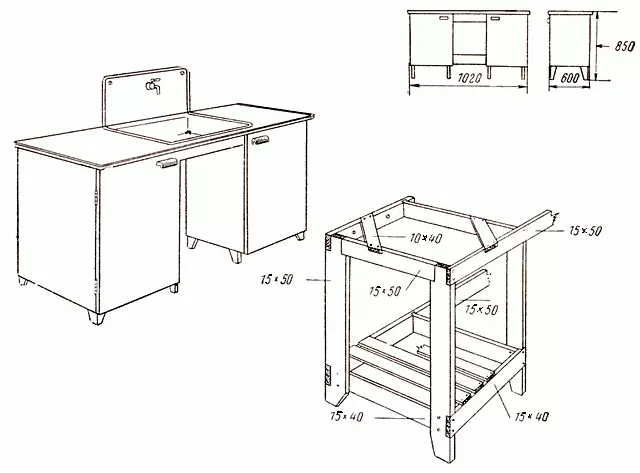
First of all, it will be necessary to determine the size of the sketch of the sink. Here you need to be guided by the parameters of the sink itself and the height of which it is installed, as well as kitchen dimensions.
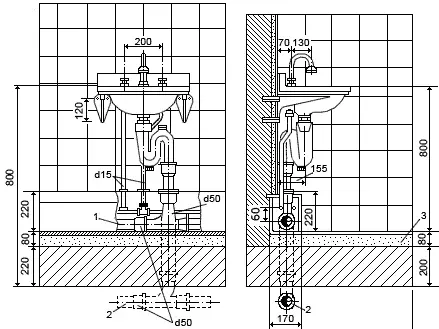
Scheme diagram of sink.
On the basis of them, be sure to draw a sketch, and specify in it, from which parts will be a stand. Be sure to specify in it, what sizes has a sink and at what height it is installed.
Then you need to take a chipboard and with the help of a pencil make marking. After that, you can proceed to cutting parts and their assembly. First, walls are connected and bottom using self-tapping screws. At the same time, it is important that the heads of the fastening elements do not protrude, so when screwing them, they will be used to "catch" in the chipboard. Then you need to put the collected design to the wall and make sure that it is exactly and not risen. Since due to the presence of a siphon sink, it will be impossible to make the rear wall, then furniture corners should be used to increase stiffness of the couch. It is necessary to mount them under the tabletop short screws.
Article on the topic: Repair of linoleum do it yourself: what to do?
Step 2: Timing Tubes
Making sure that the created design is suitable in size and is stable, and the washing in it is perfect, you can move to the shtlock. It is necessary to make the surface of the couch become smooth. Therefore, using a spatula, you should apply to the DSP details putty and immediately spark it. After that, it will be necessary to leave it to dry, and then you should definitely sand the sandpaper.
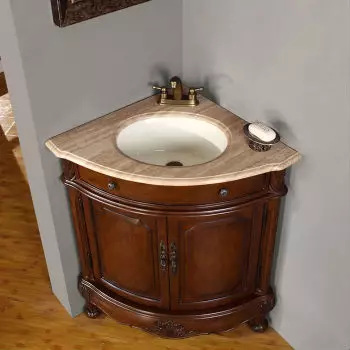
As a tumb for an angular sink, furniture from natural wood or moisture-resistant chipboard and MDF panels are used.
Then you will need to be primed the entire surface of the couch. Making this layer is necessary thin. It will be necessary to wait for it to dry completely. After that, you can proceed to painting works. Here is a fine lacquer. It needs to be applied with a brush with a natural pile. Cover the cabinet should be covered in several layers.
Now it will remain waiting when the product is completely dry and you can safely install it under the sink. The last thing that remains to do is create a door. It must be made of glass. Then the finished stand made by your own hands will have high aesthetic characteristics.
First, you will need to make the glass markup, and then give it the necessary form. Next you need to make the door matte. Sand is taken for this, poured on the carved part and is slightly moistened. Then the other glass is put up to top and the grinding is taking place. During such work, it will be necessary to add sand gradually. This will take it until the door becomes matte. You can speed up the process if you use a special grinding nozzle. In this case, it will be necessary to pour on the glass detail of the sand, and then start on small revolutions to carry it out.
After that, you can fasten the finished doors and perform it to adjust. On this, the creation of the bedside table will be completed.
Article on the topic: Interior of a private house 2019: Examples of modern country cottages (53 photos)
Another way to manufacture the couch

Washbasin installation circuit on the end.
It is not always suitable for mosses suitable courses made from chipboard and glass, especially if they are created for installation in country houses. Here the ideal option will be the manufacture of products from boards and rails. It will have excellent aesthetic properties and harmoniously fit into the kitchen interior. To make such an end to the sink with their own hands, the following will be required:
- screws;
- impregnation for wood;
- loops;
- manual frezer;
- hacksaw;
- drill;
- screwdriver;
- a hammer;
- varnish;
- brush with a pile;
- electrolovik;
- boards;
- roulette;
- marker;
- Rake.
First you need to decide on the width and height of the walls of the couch. In order to produce the correct measurements, use the roulette. Next, the dimensions of the doors are determined, the markup of parts is marked and their cutting is carried out.
Now you need to lay out with your own hands on a flat surface of the board for the 1st side wall, and then connect them to the rails using for this screw. After that, the same process is made from the 2nd side wall. Next is going to the door, which is also mounted using rails and screws. For it, it will be necessary to additionally make a tree handle. It is fastened with screws from the outside, after which all the details are collected in a single design.
In order for the cabinet to be made with her own hands, it turned out convenient, you should provide several shelves in it. They can be made wide. It is possible to install them on special struts that are cut out of wood, and then fixed to the inner walls of the couch with screws.
In order for the product under the shell had an attractive appearance and was served for a long time, it should be painted. But before this it will be necessary to handle a special impregnation. After you can cover it with varnish. Apply it in several layers. Give the design to dry, then it can be used by destination.
Article on the topic: Cold smoked smoking
Tips for making stands
Making a scene under the sink with their own hands, do not do without the following useful recommendations:
- In the manufacture of such a product, you can use not only the boards or chipboard, you can also take the Fiberboard or a thick phanener. And if you decide to make a tumb for a washbasin in the bathroom, it is better to use LDSP. Such a building material is covered with a special film, so at an elevated humidity level it will not be deformed. So, the cabinet will have a little over the years. In addition, it will not be necessary to paint or varnish, which will reduce the time of manufacture.
- For fastening parts, not only screws and screws can be used, but also nails. But it is better to take those that are made of galvanized steel.
- In order for the cabinet to have clear proportions, use the construction level when it creates it.
- Cover the finished product is not only varnish, but also paint. But you should not choose too bright, it is better to give preference to calm colors. At the same time, not only a brush can be used to apply paintwork material, but also a spray gun. With it, it will be possible to spend such work much faster, it will in no way affect the quality of the finished coating, it will be at the height.
Based on such step-by-step instructions, you can make an end to the sink with your own hands. Choose for yourself the most appropriate option and start making the product, but pre-prepare all the necessary tools and materials so as not to be distracted by this in the process. Using the recommendations given, you can create a high-quality and aesthetic tube, which will certainly transform the interior of your kitchen.