
Recently, it became fashionable to create design of the room using decorations on the ceiling. This is especially true if we are talking about a children's room or a teenager room. In order to make the ceiling beautiful, it is not necessary to be an artist. Some plots can be implemented on their own.
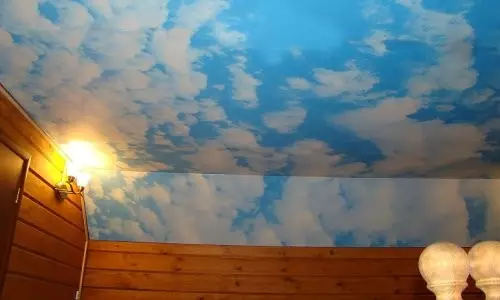
Clouds on the ceiling create harmony and comfort in the interior.
For example, on the ceiling with your own hands it is fairly easy to make a cloud that will become an excellent decoration of the children's room. Such a drawing will bring a calm and peaceful atmosphere in the house, and the child will be better to fall asleep, looking at him. But, except for the drawing, you can create mobile, and embossed clouds. Make them easily, and the result will be awesome. To have an idea of how such clouds look like, it is necessary to consider ways to make them.
How to draw a cloud?
In order to make a cloud on the ceiling, the following materials and tools will be required:
- Water dyes of blue and white colors;
- Kraspopult or brush;
- Shallow paint pallet;
- Porous sponge (not foam).
Decorating the ceiling is preferably desirable to decorate the ceiling only when the total style direction corresponds to this item. For example, if you draw clouds on the ceiling in a room with a sports subject, they will not look harmoniously, but they will successfully fit into the room with the presence of plant patterns.
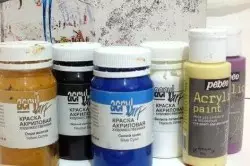
In order to draw clouds, you will need a brush, blue and white paint, paint dishes.
Before starting work, it is necessary to cover the interior items with polyethylene or take them out of the room. Then you need to prepare the surface of the ceiling floors. It must be completely released from stains, dust and dirt. After that, the entire ceiling with a sprayer or brush is covered with blue paint.
Article on the topic: Suspended beds do it yourself: Round, rectangular, Hammocks beds
When working, it is necessary to ensure that the paint falls uniformly. When the first layer is dry, the paint is required to apply one more time. After 24 hours, you can proceed to the process of creating a cloud on the ceiling. The drawing may consist of one large cloud or from a plurality of small. One big cloud to draw more difficult, here, most likely, artistic skills will be required.
The drawing is applied using white paint and an elastic porous sponge. It is advisable to use a natural sea sponge. A small paint volume must be poured into a shallow pallet, then the sponge rolled into the groove dipped into the dye and quick movements concerns the ceiling. The smears should be applied carefully and easy to give the clouds inherent airiness.
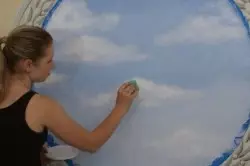
Clouds are drawn with a porous sponge and white paint.
Before work, you can draw the contours of clouds with chalk and apply paint according to them. In order for the clouds on the ceiling look more naturally, experts recommend more paint to apply to the center, and the smaller - along the edges, slightly decisive contours. It is desirable that objects on the ceiling have different sizes and shapes: so the drawing will have a more natural look.
If necessary, to make clouds in the future in white paint, you should add a bit of a pink or purple flavor. Also, this technique can be used when creating a night or morning sky, lit by the rising sun. The main thing here is not to overdo it. Although the process also implies the embodiment of creative ideas, the sky on the ceiling should look as natural as possible.
After painting, the room must be well to ventilate to get rid of the unpleasant odor. In addition, the open window will speed up the dye drying time.
Clouds, glued or suspended to the ceiling
Clouds can be not only drawn, but also glued. In order to create embossed clouds on the ceiling, the following materials and tools will be required:
- wool;
- Cleeter from starch;
- Tableware for Cleaster;
- scissors.
Article on the topic: Install the ceramic plinth in the bathroom
Wool clouds create a relief ceiling, which looks very beautiful.
First you need to cook aleas. This is done like this: 2 spoons of potato starch are divorced in the glass of cool water. Then water should be slowly warm, constantly stirring. The liquid must be touched to a boil, but it is impossible to boil, otherwise the adhesive substance will lose its properties. Use the hub is preferably in a warm state.
Then it is necessary to make clouds. How to make clouds on the ceiling of cotton? Very simple: cotton must be divided into lumps of different sizes and stretch to impart the necessary form. After that, the cotton wool is dipped into warm holter. The adhesive substance must be distributed over the entire surface of the future cloud.
Mixed lumps should be connected to one large object of the desired form. So you can make one cloud or several. Then the cotton should be dried at least a day. So that the item is good, it should be turned over every 2-3 hours.
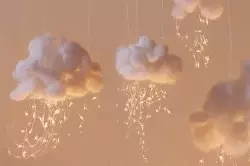
When the hubbell dry, the cloud must be slightly smashed to give it the fluffiness. Finished parts are glued to the ceiling or attach to it with white threads or transparent thin line. To make the decor naturally, it is better to use different lengths of the thread.
If it is necessary to make parts urgently, you can use a simpler way - sprinkle the surface of your hair with varnish hair. When the lacquer freezes, the cottage is slightly warm and attached to the ceiling.
Making mobile clouds from balloons
Aerial balls and papier-mache can serve as the basis for soaring under the ceiling of the clouds. To work will be required:
- several balloons;
- Thin white paper;
- wool;
- Glue plow or hubble.
First of all, you need to inflate balls. Better if they are pumped up helium.
Then several balls fold into the form of a large cloud and glued together with each other. After that, paper and glue should be prepared for papier-mache. This can be done as follows:
- PVA glue is divorced by a small amount of water and mixed. If the hubble is used, it is not necessary to breed it.
- The sheets of paper are lowered in glue and are so impregnated.
- Then the paper is evenly covered with balloons. To create a frame from Papier Masha, several layers of paper are required.
Article on the topic: Protective Blinds: What are you how to install and manage?
After the paper is dry, one large cloud is obtained, which heels independently under the ceiling and can move to any desired place. To give clouds a more natural look, it is wetted by cotton. If the cloud is not filled with helium, but by ordinary air, it is suspended to the ceiling on the thread.
Clouds on the ceiling is a great idea for decorating a children's room. A similar decor will not only look original, but also create a feeling of fairy tale in the room that all young children love. He will give joy and you, and your guests.