
Photo
Well-made ceilings came out of fashion, because modern materials allow us to create real masterpieces that will not only hide all the ceiling flaws, but also decorate the room. The most popular is the ceiling of plasterboard. With this material, you can realize the most unusual fantasies: multi-level ceilings, asymmetric and geometrically correct, with highlighting and without. Fashionable designers offer options with built-in lighting, giving smooth light around the room. Some consider such an option difficult performed. But actually mount the plasterboard ceiling with its own hands with highlighting really even beginners.
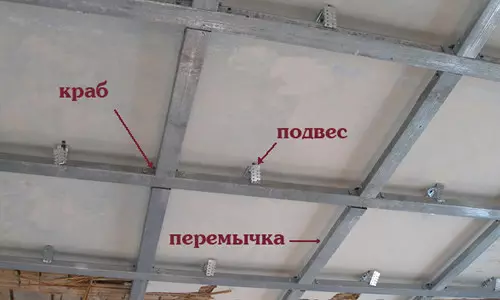
Suspended design elements for mounting plasterboard ceiling.
If you doubt your abilities, take the simplest - rectangular two-level ceiling of plasterboard. Below you consider the option of creating a second tier with backlit. This means that the initial ceiling coating is already available (sheets of GVL or GKL). In any case, it will be worth reminding some of the features of working with GLC.
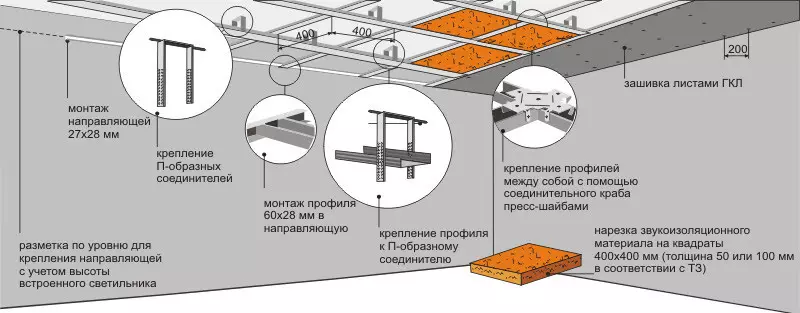
Ceiling circuit of plasterboard ceiling.
- If there is a need to adjust the size of the sheet, then it first suits on the one hand according to the rule, then turns over, is driving and cut off from the second side.
- To handle plasterboard with your own hands, you will need a special handbreaker on GWL (for creating square holes) and drill (to create round holes for lamps).
- Sheetsockarton sheets are attached so that the joints do not coincide.
- Screws need to screw in strictly perpendicular to the surface of the sheet in 15 cm increments.
- Related sheets are attached with offset.
- Between the sheets of sheets requires a gap of 1 mm.
Getting Started on the installation of the second level, it must be borne in mind that the margin of safety of plasterboard sheets is very limited, consequently, the fastening of the frame to the first level is unacceptable. Fastening pins should pass through the initial coverage and enter the guide of the first level. Such a device means that the guide of the first level coincide with the guides of the backlight box. From here it follows and one note: the creation of a second tier and the backlight is better to consider before the initial finish of the ceiling.
Article on the topic: Table manufacturing technology from boards with their own hands
Materials for work
You will need:
- suspension racks;
- corner;
- level;
- Metal screws;
- Illumination.
Do not be discouraged if only two guides were installed when installing the first level. Longitudinal profiles can be attached to them - this will be enough to create a conceived design.
So, you have already decided that you have done the ceiling of plasterboard. Now you can proceed to the installation of the second level and the backlight. To do this, you will need to perform several uncomplicated techniques:
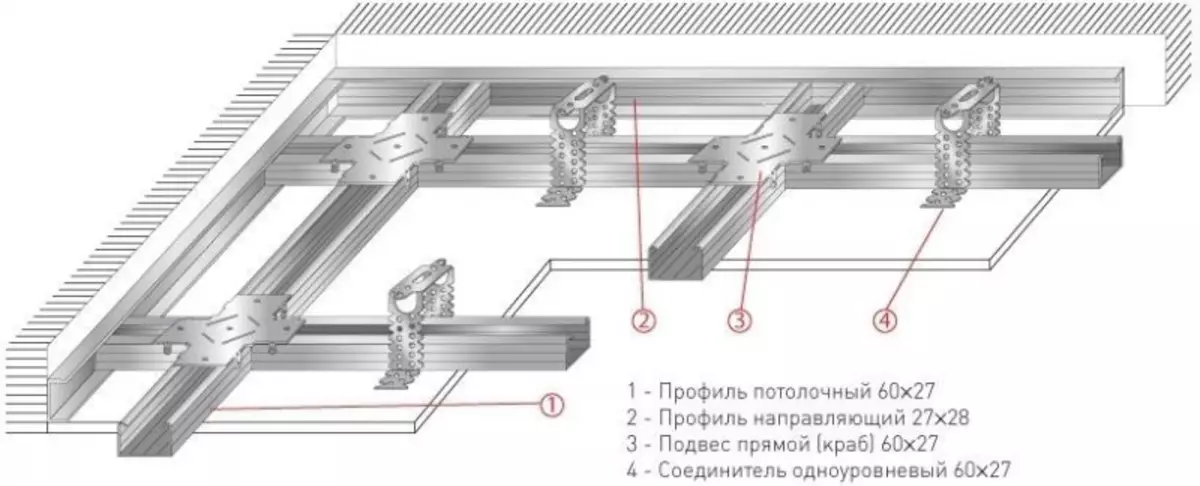
Frame scheme for ceiling of plasterboard.
- Apply markup on the walls, denoting the border (level) of the second tier.
- On the ceiling, draw the boundaries of the backlight. Even if you are confident in the evenness of your walls, use the corner so that the markup is even relative to walls and corners.
- To properly make a plasterboard ceiling, secure the guides on the wall and the ceiling. The profile is attached to a smooth face to the ceiling (wall). At the same time, you should not forget - the ceiling guides with fasteners are attached to the main coating profile.
- Attach the suspension racks to the ceiling box, the dimensions of which must be coincided with the intended height of the box. Such racks are made from the profile by cutting it into parts of the required length. In advance, assemble the number of necessary racks at the rate that they are attached at a distance of 50 cm from each other. Self-tapping screws are used for mounting.
- According to the number of suspension racks from the ceiling profile, blanks are cut, the length of which is equal to the length of the lower part of the box.
- The blanks are attached by one end to the wall profile, and the second to the suspension stands with the help of screws.
- Outcome - ready-made frame box. A guide profile is screwed to its protruding ends.
On this preparatory work for the installation of the ceiling of plasterboard are completed with their own hands.
Mounting backlighting for ceiling of plasterboard with your own hands: instruction
Before proceeding to further actions, stretch the wiring inside the frame, since after the cladding it will be difficult to do it. The vertical part of the box is trimmed first, then horizontal.
When the plasterboard ceiling is completely ready, you can start the mounting of the backlight.
Most often, the LED tape is used for this. It has a number of obvious advantages:
- energy efficiency (much higher than other light sources);
- Simple installation (as a rule, the LED tape is sold already on a self-adhesive basis);
- a remote control unit (allows you to adjust the backlight operation);
- Low cost.
Article on the topic: Bedroom interior with two types of wallpaper: how to punish, photo, combination, selection of colors, companions, examples for bedroom, design, how to salary, video
When the drywall device is carried out with their own hands, the following recommendations must be strictly observed:
- The coil of the LED tape has a length of 5 m. You can connect with no more than three sections.
- Illumination of more than 15 meters long is composed of parallel to the connected sections.
- The tape is connected to the control unit. Observe polarity.
- The power supply voltage should coincide with the tension voltage.
- Conduct a check. If it is completed successfully, fasten the ribbon to the desired place in the niche or the inner wall of the side.
- The power supply is attached at the output location and connects to the current distribution network.
Creating a ceiling of plasterboard with their own hands is completed.