
In order to save space in small bathrooms, shower cabins are installed. They are different configuration, depending on which is called a shower corner, a cabin or hydrobox. However, all manufacturers sin one: unfit instructions. It has a list of parts and general guidelines: Put the pallet, secure the walls ... and everything else is in the same vein. No details. Due to which the assembly of the shower cabin turns into a task from the category "DIY". There are many different models, it is impossible to describe all of them, but general problems and ways to solve them describe and demonstrate.
Types and species
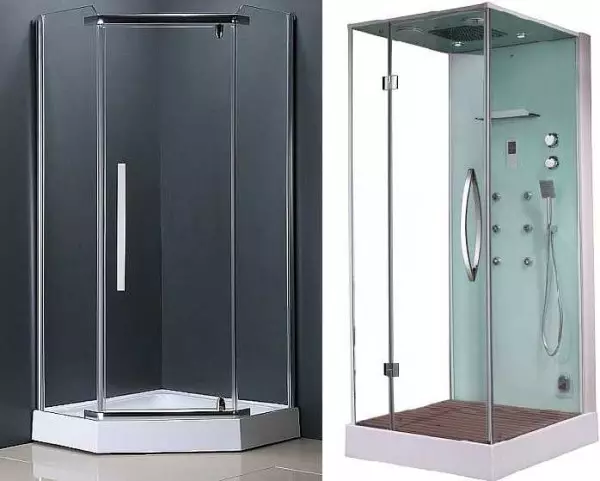
First of all, shower cabins are different in shape: angular and straight. In our country there are more angular, because they are easier to enter into small premises.

Direct shower
But the angular can be of different shapes. More common with a rounded face - in the form of a sector of a circle, but there is also a beveled and rectangular base.
The shape of the face wall may not only be rounded
Now actually about the configuration. On this basis, shower cabins are divided into closed and open. There are no top panels in the open, as well as side walls. In the closed they are. Open shower cabins are most often called the "shower angle" or corner. Its equipment can also be different - with a pallet or without.

Different equipment
Some closed shower cabins have many additional features - a different type inkjet massage, a shower - ordinary, tropical, etc., built-in sauna or steam generator for hammam. Such multifunctional devices are correct to call "hydromassage cabins", and simply - hydrobox.
It is clear that the quantity of the "filling", the more laborious, there will be an assembly. But hydromassage cabins are assembled at the very beginning, just like a shower corner with a pallet. If you understand how to assemble the main one - set the walls and the roof will be easier. The main thing as usual, the basis, and the assembly of the shower cabin of any complexity begins with the installation of the pallet and guides for the doors.
How to assemble a shower cabin - corner
Most often it is bought by a corner with a pallet. Without a pallet, it is necessary for a long time with a floor and drain. Put ready-made trough easier. Therefore, first of all we describe the order of installation of such a shower cabin. How to make a pallet for a shower cabin from tile read here.Immediately, let's say that the models with the bottom require a height of at least 15 cm: the bottom is the siphon and water removal hoses. So, for mounting the cab 215 cm, the height of the ceiling must be at least 230 cm, and then it will be difficult to work. If you have a low ceilings, you have to put the cabin without a pallet - only the walls, and drain the plum in the floor.
Setting the pallet
The pallet in modern shower cabins is made of plastic. It is enhanced by several layers of fiberglass that increases its strength, but still it is impossible to become normal to it without support. In the kit there are several metal pipes of the square section, which are collected in the design that supports the bottom.
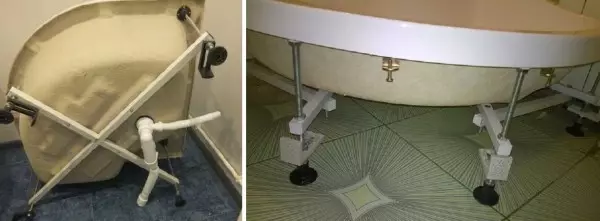
Design for pallet support
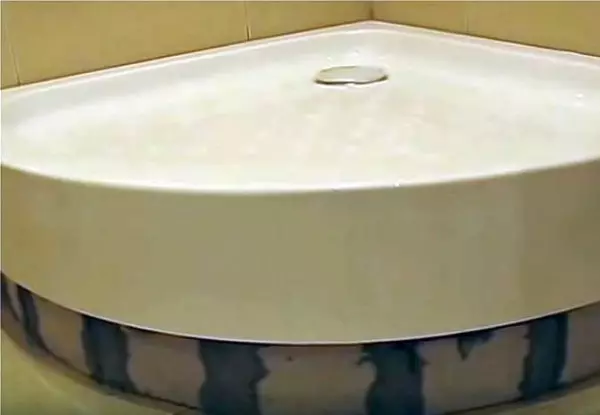
But not everyone is solved to establish a shower room into several glands. Some prefer to make the base of the brick or wooden bar.
Assembly of the shower on a metal frame
In some models, the first thing is necessary to attach a decorative protective casing to the pallet. It is simply inserted into the groove and fasten with metal plates. Next, the installation process is already continued. What is bad such a method? How if necessary, change or repair the drain? Casing Do not remove - it is attached from the inside. The only way is to pre-make the door yourself, and then put the modified panel to place.
Article on the topic: Original design of doorways with photos
The order of assembling the shower of the shower cabin such:
- Studs are screwed into the existing sockets. In some designs, nests are smaller than reference rays. Then the kit has short studs. They are just inserted and held on bolts, redistributing part of the load.
- Nuts, which will keep the metal reference frame, not allowing it to rest in the pallet.
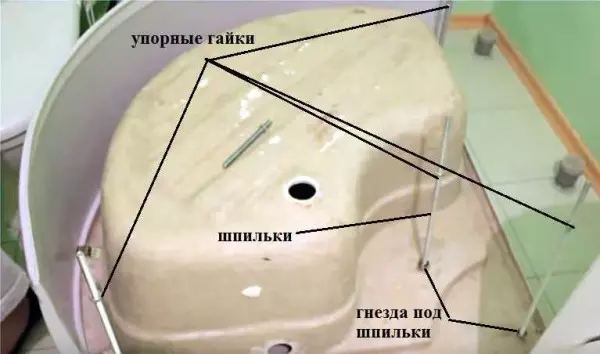
Beginning of the assembly of the shower cabin pallet
- Frames are put on the studs with nuts, the holes are laughed in it.
- On the protruding ends of the studs are screwed up yet nuts, only now they are on the other side of the pipe.
On both sides there are lock nuts
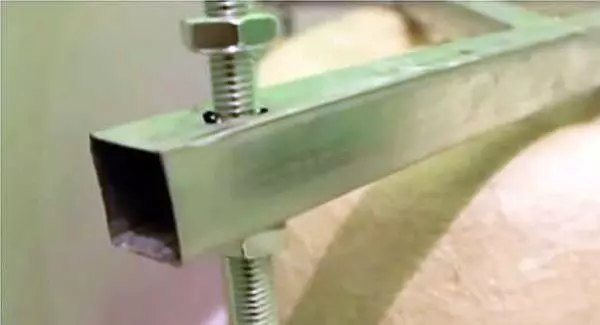
- In the supporting design there are holes, they twist the bolts that come in the kit. In theory, they should get into the appropriate holes on the pallet. Under these holes there is a strengthening, otherwise the screw is simply swinging plastic.
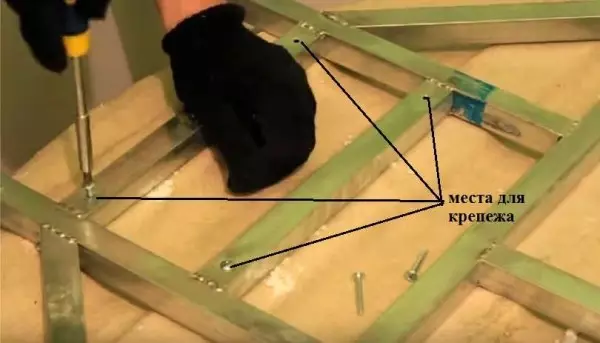
Krepim metal frame to pallet
- After checking how exactly the framework is lying, and adjusting, if necessary, pull up all the double stiletto bolts. It turns out quite tough fixation (it used to go all).
- We proceed to assembling legs.
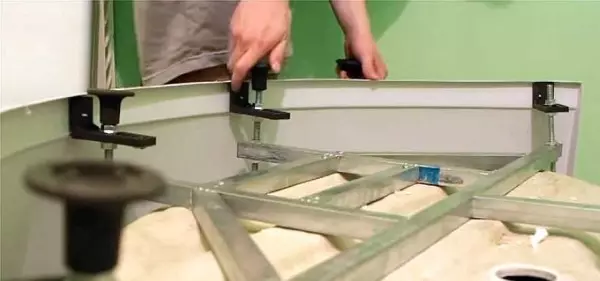
- Install the stops. They are also put on two nuts.
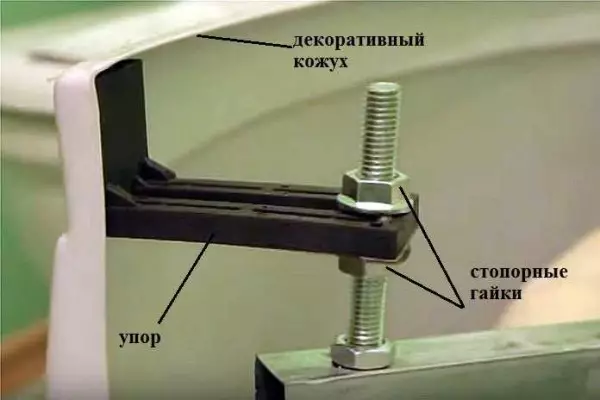
Install the stops
- Correcting the shape of the face surface of the decorative casing, screw the stops. For this there are screws with washers. On the washers wear decorative lining.
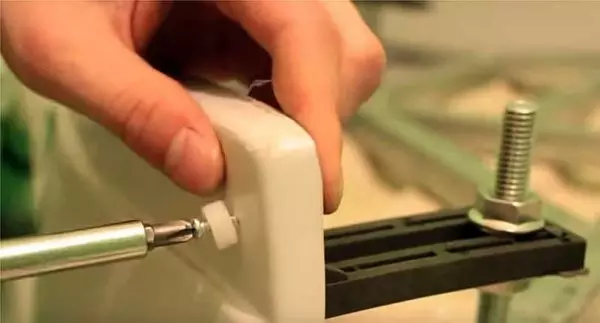
Screw the stops to the casing
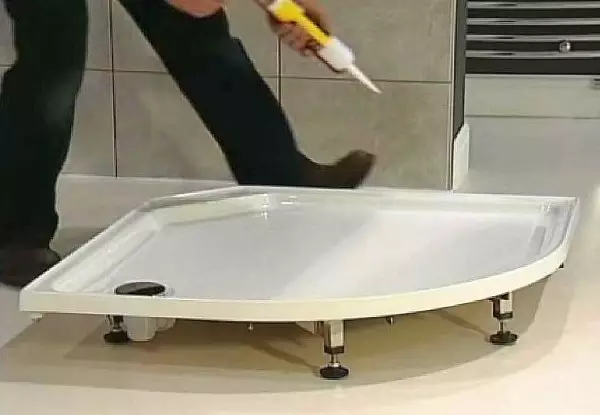
- Hour legs. It remains to align the legs. There are two ways. If the pallet is small and shallow, it is easier to turn it out, put it in place and controlling the plane in the level of putting tapping the legs. If the pallet is massive and deep, and there is still a decorative casing, getting to all legs unreal. In this case, the legs twist expose them for one height. Check how exactly they are exhibited using an ordinary construction level - laying it in pairs of different legs, or with the help of a laser plane builder (as you can use here).
Setting legs
- Install the stops. They are also put on two nuts.
- Turn over the pallet. If all the legs are exhibited smoothly and the floor is even, the pallet should stand smoothly and tight.
The assembly of the shower cabin is made half. It remains to collect doors.
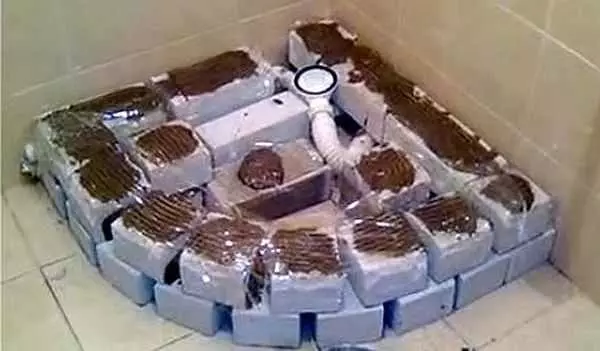
Assembling a pallet based on brick or foam blocks
Everything is incomparably easier, although largely depends on the form of the pallet. Most often the foundation is made of bricks or foam blocks. It is more convenient to work with high density foam blocks. They have enough carrying ability to withstand the required weight, but at the same time it is easy to cut the saw, they are easy to give the required form.
First, the whole design is dry, without a solution or adhesive for foam blocks. Just at the same time do not forget that the solution / glue is raining a little design. And this is the second plus of foam blocks: for their installation, a layer of glue into a couple of millimeters is sufficient, and for bricks requires at least 6-8 mm.
An example of a shower tray mounted on bricks
Tense in advance, as the shower pallet becomes, it is possible to glue or a solution: suddenly it was not enough somewhere. For this, the solution is laying out, more or less aligned with celma, closed with a film, and the pallet is already put on the film. After removing it, you will absolutely see if there is enough glue everywhere.
By laying if a solution is needed, put the pallet into place. Align his work of technology: take the construction level, and focusing on his testimony, tapping in different places. Note! You can install a shower tray to the film without removing it from the solution. In this embodiment, disassembly without destruction is possible.
Brick base close the film
Folding the brick base, do not forget that the place is required to install the drain, pipes from it. It is also necessary to envisage the possibility of replacing the siphon. For this make one of the sides of the window, providing access to the desired parts. It can then be closed with a decorative door or lid.
Drain is connected before the final installation of the pallet. For those who at least once put the sink or bath, this is not a problem. In more detail about this in the following video. One moment: when installing a siphon, do not forget to wash the hole under the sinking sealant. There, of course, there is an elastic band, but with a sealant will be more reliable.
How to make a soul pallet from the tile can be read here and the shower cabin to it.
Sealing pallet
After the pallet is put in place, the joke is required to sealed. Usually use transparent sealant. Just note that acrylic sealants turn yellow (after a couple of months), therefore it is better to look for silicone.
Pallet need to be well sealing
Good fill out all the slots and gaps, you can twice. In order not to work on the eye, you can attach the pallet, put the mark with a marker, then move away and a couple of millimeters below the mark of one or two solid stripes of sealant. Move the pallet into place, press well. Fill existing emptiness.
There is a second way. He is more aesthetic. Close the junction with a plumbing corner. He himself has a sealing gum, but you can also wash it with a sealant. You can close this corner a small slot that is formed if the angle in the bathroom is not exactly 90 °.
The organization of ventilation in the bathroom is described here.
Installation of guides for doors
Next, the assembly of the shower cabin continues by mounting the guides for the doors. Even if the cabin without side panels, you first need to assemble the guide frame for the door, install it on the pallet, and then place the installation locations of the fastener. Collect the frame - it is to bore the side racks and two rounded guides. To give stiffness of the structure, fixed glass sidewalls can be installed.
Why can't you immediately mount racks for the door to the wall? Because the walls in the bathroom are rare perfectly smooth. Attaching so racks, you will get thinned doors that will be badly closed / open. To understand the entire difference, you can post strictly vertically, as it should be putting out the side guides vertically. Then collect the carrying frame, put it in place and look at the deviations. In 99%, they are available, and significant.
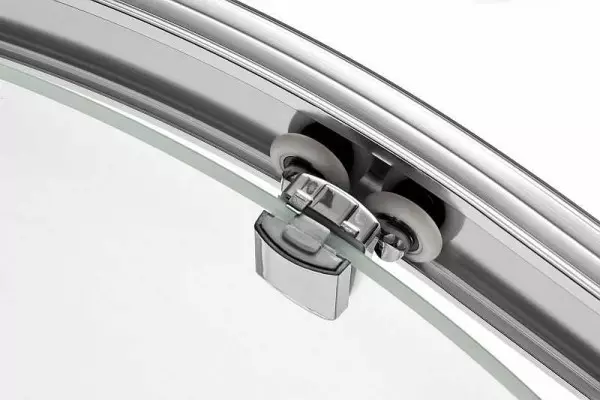
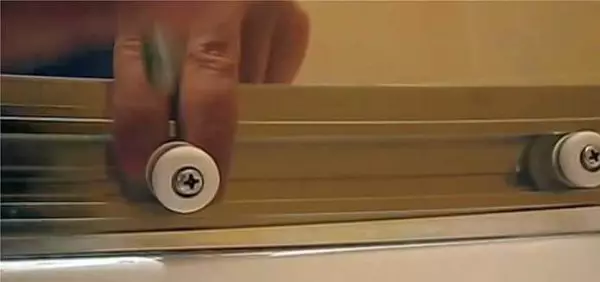
One of the design rollers for shower
When assembling the frame of the shower, there can be no discrepancies. There are two arcs, there are two racks. We combine grooves and holes, tighten the screws. Then install the sidewols from the glass. They are fixed with staps brackets. After that, do not forget to install rollers for the shower. They can have a different design, but most often, for their installation, it is required to remove the side stopper from the guides, drive into the profile from two sides by two rollers, put a stopper into place.
In some models, it is necessary to install not only the rollers, but also hang the glass, otherwise you will not be transferred. But it is better to work together. One is difficult.
Putting the collected frame on the pallet and checking whether it became correctly, they marked the marker of the fastener installation. After removing the cockpit, drill holes, install a dowel.
Loss places to adjoin the frame to the walls of the sealant. Apply the band should be generously - it is better to wipe the surplus. Then they put the guides and fasten to the bolts. The remaining gaps are replenished with a sealant. Installation of a shower corner is almost completed: It remains to hang the doors and install seals.
Assembly of the shower cabin: hanging doors
If the doors were not installed, they are hung. Start from above. In most models in the door of the door there are holes: from above and below. This is the attachment sites of the rollers. In some shower cabins, two two, in some four. Their quantity depends on the design of the rollers.
Take a screw, you put on a plastic gasket (from the kit). By inserting the screw into the hole, put on the second gasket. Next: There is a carving inside the roller, and you need to get a screw, then keeping the roller with your fingers outside, inside the screw. Such an acrobatic element is repeated with all the rollers. Only until all screws are installed, you do not need to tighten them. Just push the door to keep and do not fall.
After the doors are naked, tighten all the mounts. The last moment remains: installing seals on the door. They are just snapped (presses with your finger) on the side edges of the two inserting halves of the door. In the same way, they are attached on the other hand - on the racks at the walls.
Details hanging the doors of the shower cabin in one of the models, see the video.
You can read about installing and connecting a boiler here.
Features of the mounting of the shower-hydrobox
In closed shower cabins and hydrobocks after installing the pallet, it is necessary to collect a panel covering the wall. It has mounting holes, which are pre-installed all the "rows" - nozzles, holders, soaps, seats, speakers, lamps, etc. Form and sizes at the bottom are different, so it is difficult to make a mistake. It is desirable for all "planting holes" to miss a sealant: it will later drip less.
Especially it is worth staying on installing nozzles. In addition to the installation of the sprayers themselves, they must be combined between the sections of the hose. It puts on the nozzles on the nozzles, is delayed by clamps. All this is collected by the scheme in the manual. Particular attention to the fact that the tips of the nozzles were integer and the clamps are well tightened. It will not be superfluous and here to embroider every seat with a sealant (and under the nozzle and under the hoses).

Connection of the nozzles of the shower cabin from the back
The wall with connected accessories put in a special groove. The connection site is also pre-labeled sealant. Cold, hot water connects, you can check the system performance.
After setting the walls, the lid is collected. There is usually a tropical shower, maybe lamp. When they are installed, you can also use the sealant - it is noteworthy where the water will fall ... a hose is put on the shower nozzle that is delayed by clamps. Conductors are connected to the lamp conclusions, the connection location is carefully insulated, you can several successively worm shrink tubes.
The assembled cover is installed on the wall. The junction place is again lubricated by a sealant. While the sealant is not frozen, the collected frame of the doors is installed. When the doors are installed - depends on the model. In some cases, they need to be installed before installation, in some - after. All joints are sealed.
In detail the assembly of the shower-hydrobox shower is shown in this video. There are no comments, but the sequence of actions is clear.
How to collect a shower cabin, hope, understandable. Models and modifications are very much, but the main problem nodes tried to describe. If you missed something, write in the comments - the article will add))
Article on the topic: Small-sized kitchens 4-5 square meters. m.