
Replacing doors may be needed both in the new and already equipped apartment. If the installation is made in the bathroom, it is desirable to use the doors made of moisture-resistant materials. The installation process is quite time consuming, but the instruction will help you install yourself. If there is a doorway of the standard size, then get ready-made doors.
Door installation scheme in the bathroom.
Features of replacement doors in bathrooms
The width of the door block at the entrance to the bathroom is slightly smaller than the width of the opening in the room, so it is impossible to install interroom doors. To avoid flooding an apartment when leakage of water in the bathroom, the thresholds in it should be high enough (from 5 cm). There should be a small (10 mm) gap to improve the ventilation indoor between the boiler and the door. If you plan to install a wooden structure, it is impregnated with antiseptic means.The width of the door box should correspond to the wall thickness indoors. When it is repaired in the bathroom, the installation of the doors occurs at its final stage, but the box is installed before the start of the walls. Folding doors should open out, this rule should be considered when installing. In the event of a lack of space, you can select the sliding method of opening the doors.
Installation of swing construction
The following tools are needed for work:
- electric drill;
- chisel and hacksaw;
- screwdriver;
- Roulette and construction level.
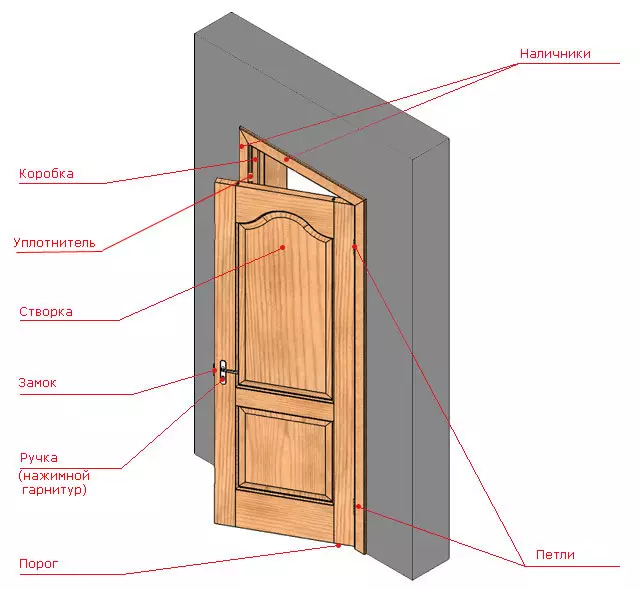
Parts and components of a swing door for the bathroom.
Materials:
- wedges for fixation;
- Anchor bolts and selflessness;
- Mounting foam.
Previously need to dismantle old doors, align the walls, perform measurements of the doorway. Work is performed in this order:
- Collect the door box and customize it to the size of the opening in the bathroom.
- The doorframe is installed in the opening, aligning in terms of the level and fixing it with wedges.
- On each side of the block, the hole is drilled (6-8), the block is fixed by anchors.
- Then the box is removed, and the holes are made in the wall of the brown, which coincide with the holes in the box, the dowels are installed in them.
- The box is installed finally and attached to the wall, spinning anchors by a screwdriver.
- The clearance of the wall is poured by foam, filling the space on 1/3. After a day, the door can be installed in the box.
- Applied to the hinge torch (retreating from above 20, and below 25 cm) and contours are reduced, then the grooves cut out the eyes.
- Screws screw the loops to the door.
- Similarly, the loops are cut into the box.
- The door canvas is installed, putting it on the loop. Self-plugs are fixed by platbands.
Article on the topic: Corner of plasterboard - do smooth and beautiful
The design should move freely in both directions.
Mounting Instructions Sliding Door
If there is little free space in the corridor, you can install snack doors.

Schema fastener sliding doors.
At the same time, the distance between adjacent openings should not be less than 120 cm. At a shorter distance, the installation of double guides used in the wardrobe can be installed. This installation significantly reduces the width of the corridor. All the necessary calculations, measurements, as well as the markup of the doorway, you need to produce in advance.
To work requires tools:
- screwdriver;
- electric drill;
- a hammer;
- chisel;
- Roulette and construction level.
Materials:
- door leaf;
- Metal guides with accessories;
- Saws.
Work is underway in the following order:

Mechanisms for interroom sliding doors.
- On the upper face of the doors attached to the Operation, conduct a line. Strictly horizontally (by level) from above, after 7 cm, the second line is carried out. It will be attached to the timber.
- The timber is attached to the wall with anchors so that its second half is placed over the side into which the design will be moved.
- Through the mounting holes, the upper guide is screwed to the brue, leaving a slight clearance at the wall.
- The rollers connected to the carriages are installed in the profile, the stoppers are put on the ends of the guide.
- On top to the door, screw the brackets and temporarily put it in place, connecting brackets and carriages.
- The extreme position of the doors is celebrated on the floor.
- The door is removed, the location of the tag is adjusted with a plumb fortified in the center of the guide.
- Using the chisel, choose a recess for a leash (guide element) in the bottom door face.
- The leash is screwed to the floor using self-tapping screws.
- The door is put on a groove on the leash, install it vertically, then connect the brackets and carriages.
- By level, the position of the door is leveling, adjusting the carriage bolts.
Complete installation of knobs, locks and platbands.
Bathrooms often have small sizes, water in the form of splashes can fall on the door. Therefore, the door canvas must be made of moisture and steamproof material. Ventilation or hood running in the bathroom will also help protect the material of the doors from dampness. The careful attitude towards new doors will help for a long time to save them in good condition.
Article on the topic: how to bring the stain from sweat under the mouses on color clothes