
Recently, plasterboard has become one of the most popular building materials for finishing. It is made of wall cladding, creating arches and niches and much more. Recently, this material began to be used for creating original ceilings (most often attached) in various premises. The ceiling of plasterboard can be made in various variations: a multi-level or monoloral ceiling, designer, etc. To accomplish intended, you need to know how such ceilings are mounted.
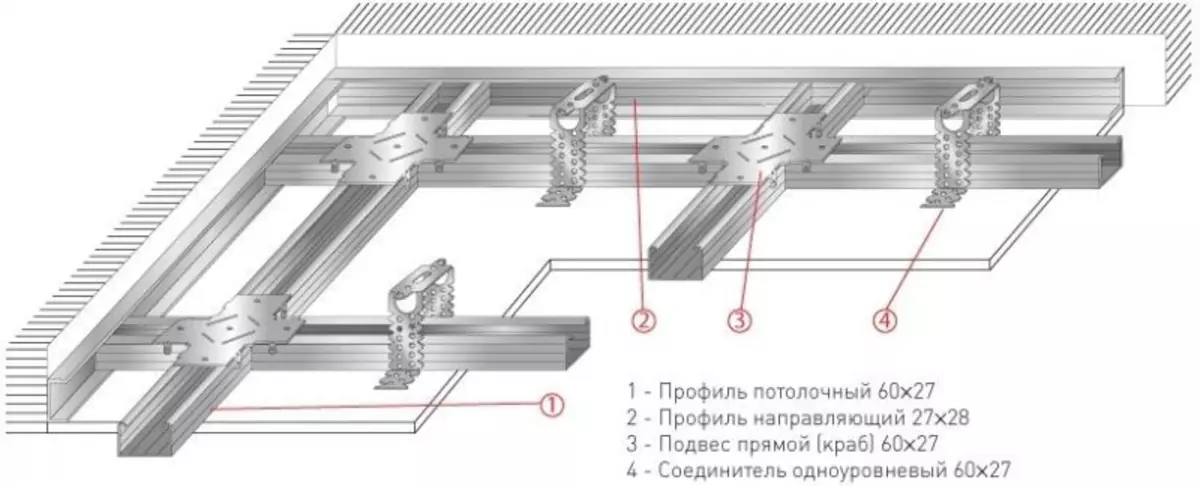
Scheme frame of plasterboard ceiling circle.
Learning to distinguish both kinds just enough: the usual GLC has a cardboard color (brown-gray), and moisture-resistant - greenish tint. As for standard sizes, the most often used sheets with a thickness of 9.5 mm. Nevertheless, many professional masters argue that it is desirable to take a thickness of 12.5 mm for greater reliability. For sealing sheets, a special self-adhesive tape is used made of polymer composition, which will provide greater density of seams.
Step-by-step instruction: marking and fixing guides
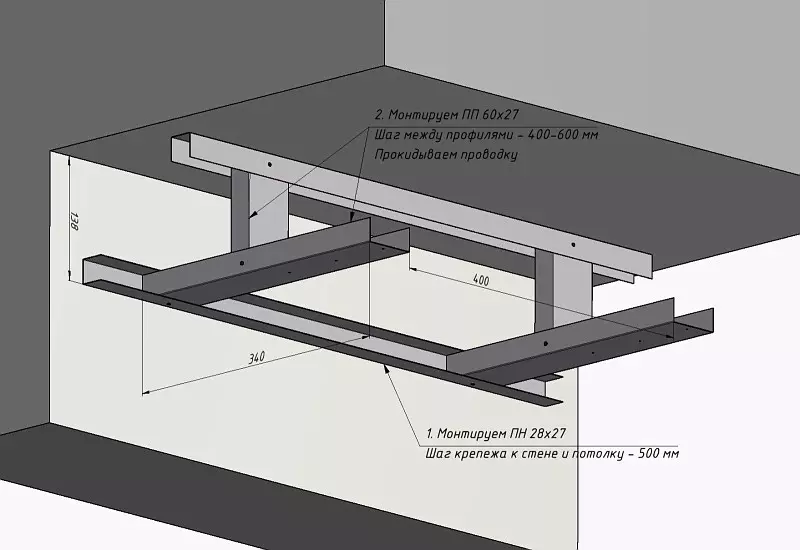
Installation of profiles on the wall and ceiling.
Any installation begins with the preparatory work, namely from the placement of the room for the future design. Installation of plasterboard ceiling with your own hands requires first of all the clarity in sizes. Therefore, it will be necessary first of all to perform the following measurements:
- The lowest angle of the room is determined - for this, the roulette is taken and the distance from the floor to the ceiling is measured in each of the four corners. For insurance, you can also make measurements in the center of the room.
- The mark of the lowest corner is put on the wall at a distance of 5 cm from the ceiling. About 8 cm should be left in case of installation of embedded lighting.
- Put the same marks in all other corners with the help of hydroevum.
- Connect all lines with a beat. To do this, use a special cord that needs to be pulled along with a partner along the line and then release it sharply. A red strip will remain, which will serve as a horizontal for the future frame.
Article on the topic: Wooden rack with your own hands: Drawings (photos and video)
The next step must be installed on the walls of the guides to which the framework will be mounted.
One profile takes for this and is applied by the lower end to the line. With the help of the marker on the wall there are holes through the profile. The profile is then temporarily postponed and the holes in the wall are drilled using a perforator.
After that, the profile is taken again, the sealing tape is glued on it, with the help of a dowel-nail, it is attached to the wall. At least 2-3 dowel-nails are used for each profile. Next is the markup for the main and carrier profiles. The main profiles are fastened with the help of suspensions, carrier are attached to the main. The width of each basic profile should be 1.2 m, and the profile pitch is 40 cm. The width of the carrier profile is 2.5 m, and the step is 50 cm.
It should be noted that this process is very long, so you need to drill a large number of holes. Nevertheless, it is necessary to approach it with a special responsibility, because The profiles hold the whole design.
Montage Karcasa
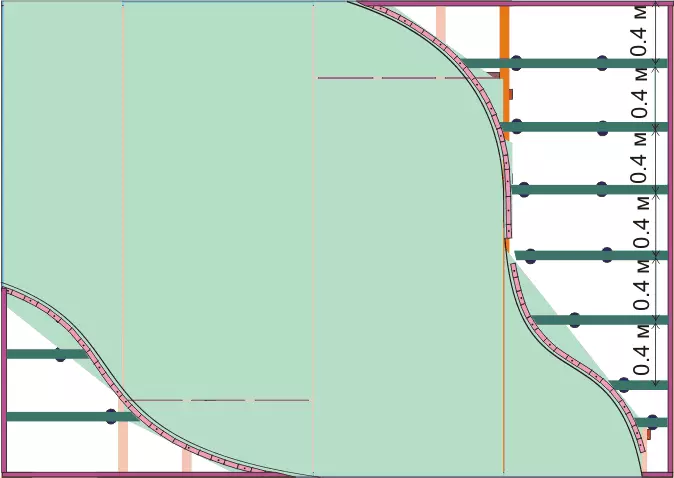
Installation scheme of the second level of suspended plasterboard ceiling with waves.
At this stage, you need to be very attentive and not damage your fingers, as it is necessary to work with the hands raised up at the height.
- After the dust from the drilled holes completely complains, you can start the framework of the frame. Previously, you need to fill your pockets anchor-wedges, after which you can fix the suspension ceiling.
- After fastening the suspensions, it is necessary to pull down the ends to the end, so that in the subsequent ceiling of the drywall is not provisted. We must not forget that to each suspension you need to glue the sealing tape.
- Next, it is necessary to establish the main profiles that are attached to the pre-installed suspension. Mounting profiles should always be started with corners. For this, one person must keep a profile on the guide, and the second is fixed to the suspension. It is important at the same time to mount 2 screws for each side of the profile for better mounting. This work is tedious, so it is desirable to change with a partner every 2 suspension. The mounting process is important to control using a level.
- Make the same thing from the opposite wall, consolidating 2 profiles. To adjust the motion of the profile, you can use a special construction cord that will adjust the parallelism of profiles.
- Stretch wiring, television cables and other communications under profiles.
- To establish, if necessary, heat and sound insulation by sheets with a thickness of 5-7 mm.
- Turn the crabs in the attachment of profiles and fix them with the help of 4 self-samples for each.
Article on the topic: We select flowers for the balcony: sunny side
Installation of plasterboard on frame
Before mounting, it is important to handle the edges of the GLC. For this, the chamfer is removed with a knife at an angle of 22 °.The fastening of the sheets from the angle is beginning, while the pitch of the self-samples is approximately 17 cm.
This will be enough for the reliability of the design.
The covering of drywall should occur, the gap is 2 mm. Do not forget to fix the GLC to the main profile that performs the support function. In addition, the bog from the angle should be at a distance of at least 10 cm from the wall. Otherwise, the cracks on the design will go.
Stood the seams between sheets
The final step is sealing seams. It is very important to observe all the subtleties of work, otherwise the seams will clearly stand out on the ceiling.
- Protect all seams. It is important to wait for a complete drying of the primer.
- Process seams by the first layer of putty. To do this, use a wide spatula.
- After processing, wipe with a sponge remnants of putty with GCL.
- Wait for the drying of the first layer (5-10 minutes).
- Treat the second layer of putty with a narrow spatula. It is important at this stage to handle the seams in the joints of the angles of the walls.
- Wait for drying.
Although the process of installing a suspended ceiling and is considered simple, but it is time consuming, requires patience and attentiveness. Under the observance of simple rules, everything will work out without any problems.