
One of the types of suspended ceilings is its distribution option. It is characterized by good strength, has a long service life, has a wide range of colors and suitable for premises of various purposes. Most often, the installation of the cutting ceiling is performed in the bathrooms, kitchens, pools, as well as in garage and office space.
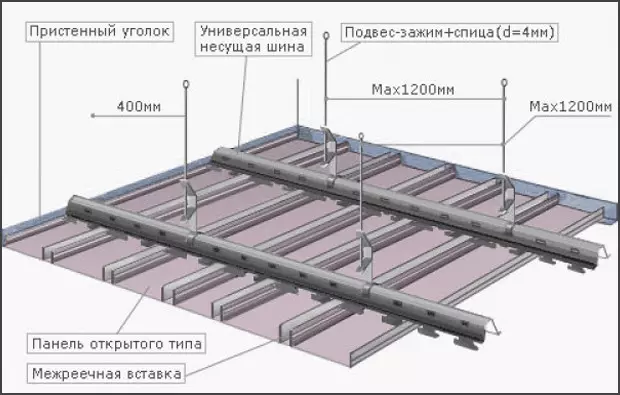
Raking ceiling mounting circuit.
The cam ceiling is used in one direction, which relates to open structures, such as terraces, verandas and gas stations. It is determined by the fact that this type of ceiling finishes has a high degree of resistance to the impact of a wet environment. What is the design of the suspended rush ceiling and how best to implement it? We will talk about it further.
Design features of the rush ceiling
As for the design of the rush ceiling, first of all we draw your attention to that it consists of individuals, or speaking differently, panels whose length can achieve size 6 meters. In addition to the rivers, its design includes a special suspension system.
Now a few words about materials from which they produce a cutting ceiling. Most often, its rails are made of aluminum or steel with a thickness, varying from 0.3 to 0.6 mm. Their outer side has a varnishing coating. The width of the rail can also be different: minimum - from 50 mm, maximum - up to 200 mm.
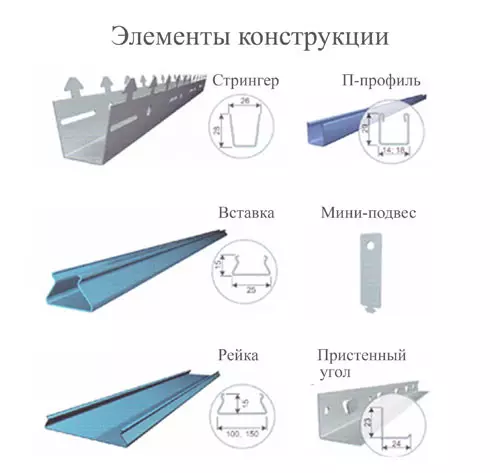
Typical shape and rack size for closed ceiling.
If you act according to the instructions, then at the first stage of work it is necessary to prepare the surface of the ceiling to finish. Make sure that the walls and directly the ceiling are in its pure form and were smooth enough. And do not forget to think about what exactly will be placed in the interporal space. This is important because the gap between the main ceiling and the suspension will depend on this. Lighting devices will also influence this indicator, depending on whether they are embedded or suspended.
Article on the topic: Load on the loggia and balcony
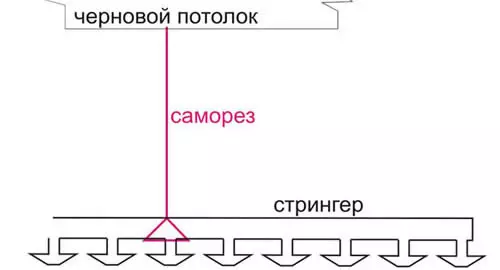
I would like to note that if you are the owner of the room with low ceilings, the height of which does not exceed 2.6 m, then in this case it is necessary to make every effort to make the gap between the base ceiling and the rack, the minimum possible. To do this, the attachment of the stringers is carried out directly to the surface of the overlap, and the alignment procedure is performed using the so-called linings. The most suitable luminaires in this case will be the appliances of the suspension. For this kind of premises, it is most advisable to use closed ceilings.
A brief list of tools that may be needed:
- roulette;
- Drill either perforator;
- screwdriver (better if there is a whole set);
- Passatia;
- For cutting elements of a metal suspended ceiling, we need scissors for metal;
- self-tapping screws, as well as dowels;
- shoe knife.
Mounting scheme of the suspended rush ceiling on the self-tapping screw.
Start the markup is always from the wall that is the most even of all.
For this, at a distance of approximately 300 mm, it is from the above wall with a parallel line. It will be needed at the time of installation of the Stringer.
From the opposite wall is made exactly the same markup. The marking step for stringers is not more than 1.2 m.
The next step will be the markup of future fasteners of the suspension. The first point from the wall should be located at a distance of no more than 400 mm.
Next, the markup is made to fasten the panels, it will be perpendicular to the existing lines for stringers.
If you plan to equip the cam ceiling with lamps, do not forget about drawing markup for them too. And on the surface of the walls you need to designate the desired height of the suspended ceiling.
Installation of the river ceiling
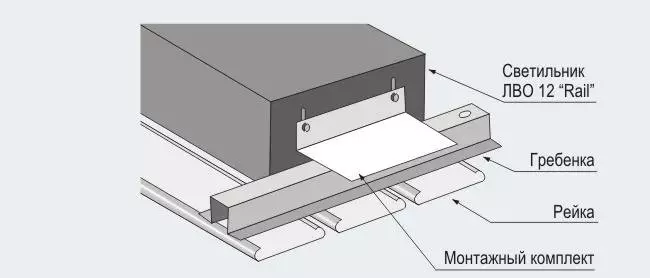
Mounting diagram of the lamp in the cam ceiling.
At the first stage of installation, make the installation of a comb or, as already mentioned above, Stringers.
The fastening of the suspensions can be made in one of the methods listed below. This is either using self-tapping and dowels, or with the help of anchors driven by pre-prepared holes.
Article on the topic: how to make the threshold of the entrance door: features
Do not forget that if your ceilings are not very high, the use of suspensions is impractical.
The installation of the rush ceiling, more precisely, the stringers ends with the horizontal leveling procedure. Adjust the position of the suspensions can be swissing and twisting.
The next stage provides installation of plinths. As already noted above, they are designed to close the joints.
The mount is carried out using self-samples, the distance between them is about 60 cm.
Next, you can proceed to the installation of panel installation. But before that, make sure that all preliminary work on the ceiling of communications and lighting is completely complete. The place to install the first panel is a wall, along which a rake will be located, not undergoing width. If you are still using inserts, then they are mounted too at this stage.