
Painting the ceiling with your own hands can qualitatively change your interior, as well as develop new creative abilities without extra effort. Decorate the room in this way it will be interesting, and the result will always be original. To avoid unnecessary difficulties in performing this task, it is necessary to observe a special technology designed for the ceiling painting, which is three stages - preparation, applying a point image and its final coating.
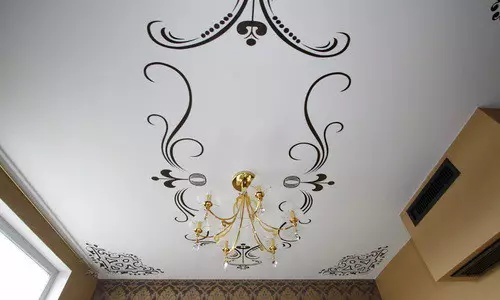
Pictures on the ceiling look very beautiful in any room and can perfectly add its interior.
Tools as well as required materials
In order to paint independently, you will need materials:
The painting with the help of a stencil will be able to fulfill not even a professional.
- bucket;
- water;
- Metal, different spatulas;
- brush (with mild pile);
- brush on an elongated handle;
- level (tool for calculating even horizontal);
- sandpaper (preferably fine-grained);
- putty (starting and necessarily finish);
- Acrylic primer.
Preparatory stage
First of all, prepare the ceiling to the primary application of the image. This stage needs to be performed qualitatively and with full responsibility, since it is from him that the type of completed work and difficulties in the further stages will depend. To do this, with the help of a large spatula, remove all the plaster from the ceiling. After that, wet the brush with a long handle in a bucket with water and rinse it. On the purified surface, apply a roller or a fluffy brush to the primer of deep penetration and let it dry. Drying time is indicated in the instructions or on the packaging. When the ceiling is completely dry, check the level how smooth it turned out. If at the same time you detected irregularities that have a drop of more than 1.5 cm, they need to be aligned with plaster. To do this, type the finished mixture with a small spatula, distribute it to a large spatula and apply to the surface at an angle. In the presence of small irregularities, they can be corrected by the base (start) putty. At the end of drying, the ceiling must be sanded using sandpaper.Article on the topic: Wall murals for kitchen near the table
After performing all these actions and complete surface drying, you can go to the application of the finishing putty, which is superimposed by a layer of no more than 2 mm. Thanks to her, the ceiling will become perfectly even and ready for painting. An acrylic primer is necessarily applied to the next finishing putty. After it dries, you can proceed to apply an image.
Where to take a sketch of design?

For ceilings, you can take acrylic paints that are used for painting glass and ceramics.
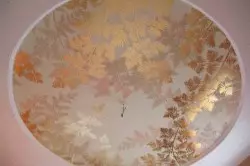
Pick the ceiling with your own hands it may seem like a task not from the lungs. After all, for this you need to have a special artistic talent. However, this is not quite true. To perform the painting you need to have a full-color sketch of what you are going to transfer the ceiling. Only so you can imagine what happens as a result. You can come up with a sketch yourself or look for his plot in modern design magazines. The pattern of the drawing must match the purpose of the room. Do not choose aggressive paintings for the bedroom, and dark - for the nursery. The selected image should open the functionality of the room in which it will be present. So, calm colors will help relax in the bedroom, and bright - develop creativity and accompany the games in the nursery. The solemn figure applied to the ceiling or the wall in the living room will give it a special atmosphere. You can easily use a bulk drawing, outgoing, which will significantly increase your space.
If you choose the desired drawing, you found that it does not suit you, it will not be a problem. It can easily be changed in size, simply transferred to paper and divide the squares to the same size. For convenience, you can also numbered them. Then take the paper of the desired size (from which you will transfer the image) and apply a grid with numbering on it. After that, you can transfer the end drawing element to each square. When the sketch design will be completed, you can proceed directly to the painting.
Article on the topic: How to assemble a log house for a bath?
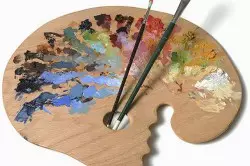
Palette is used for mixing paints.
For the next stage, prepare such materials and the necessary tools:
- water tank;
- palette;
- sponge;
- brushes made of natural bristles;
- stairs;
- pencil;
- acrylic paints.
The procedure and technology of performing work on drawing
Install the staircase on a flat surface and make sure that it does not stick. This will help you prevent the appearance of lubricated lines in the picture. For these purposes, you can easily use the staircase with a dumplings with which you can work lying. Now you need to transfer the image to the ceiling. This can be done in two ways. If you made a sketch in a real size, then stitching it with a soft pencil and attach this side to the ceiling. Then sell its lines with the same pencil or handle. With a reduced copy of the image, you need to use the diaper projector, and the contours of circulating with a pencil.
After all the drawing lines are transferred, you can proceed to coloring. Start with the background and larger elements. Mix in the paint palette before getting the desired shade and carefully apply them to the surface. You can remove extra lines using a wet sponge. After coloring the large elements, go to the design of smaller, until the whole drawing is ready.
Acrylic paint is considered to be moisture-resistant and promises to serve for many years.
But despite this, the best-complete drawing is covered with a protective layer. So it will still preserve its original view, color and strength.
Acrylic varnish, which is applied as a protective layer, gives an image of even greater brightness and clarity. It is necessary to apply it only after a complete drying of acrylic paint (after a day). For a uniform coating, varnish can be used as a sprayer and a soft brush. And after applying, distribute it with a dry brush. Due to the fact that dust and unpleasant odors in the first time after application can absorb dust and unpleasant odors, you should prevent smoke and excessive dust. Under these rules, you can admire your creation for a long time.
Article on the topic: Windover enhancement options
Having done everything on the above advice and recommendations, you can enjoy the final result of your work. And painted independently the ceiling will become the object of your pride and enthusiastic views of the guests.