
Hinged ceilings have long ceased to be luxury, you can see them in many homes.
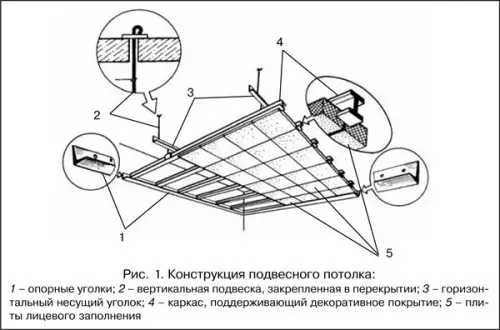
Suspended ceiling design scheme.
Installation of mounted ceilings can be carried out not only by specialists, everything can be done with their own hands.
Such ceilings make it perfectly hide all irregularities and communications. Installation of ceilings is pretty simple, it is possible to arrange a variety of lighting options, you can introduce sound and thermal insulation. Installing the ceiling with your own hands will not cause big difficulties.
To install mounted ceilings, you will need the following tools:
- building level;
- self-tapping screws;
- roulette;
- pliers;
- roulette;
- Drill screwdriver;
- Bulgarian.
How to develop installation of mounted ceiling
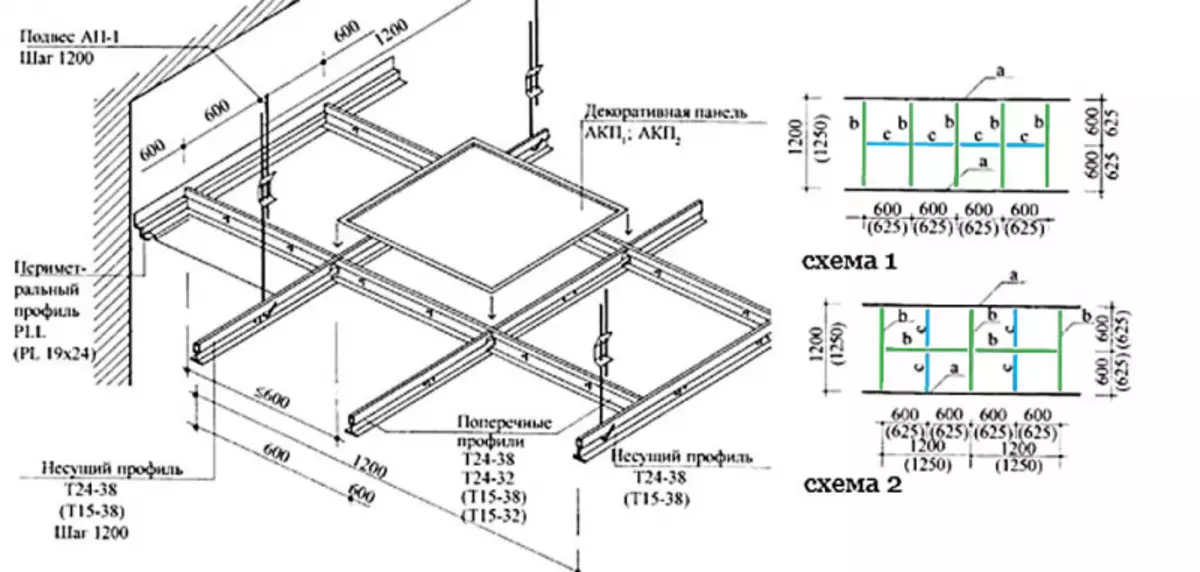
The scheme of the assembly of the mounted ceiling.
- It should be started with the fact that it is necessary to place the boundaries of the mounted ceiling. In order to be as accurate as possible, the alcohol or laser level should be applied. It should be carefully taken to work with such instruments, they imply the use of special glasses. As for the height of the ceiling, it all depends on the preferences and what pipes.
- Electrical wires should be tightly secured by special screeds, then they will not prevent work.
- Before strengthening profiles, you need to check the sensor if there is on the surface of the pipe and wires. If this is not done, everything can be destroyed with sharp screws.
- You should determine the angle from which the start of installation is planned. It is recommended to get up in the doorway and look at the look. That area that is visible most of all should be separated first. In most cases, the installation of such ceilings is done so that pieces of plates are above the doors in the most intimidated place.
- Now around the perimeter of the room should be strengthened with wall profiles, with the wall they are connected by 100-millimeter screws. If the wall is frame, then the screws can be screwed right in the rack. If the surface is made of concrete, then first of all the holes should be made for the dowels, then they are clogged into the base, and then screwed screws.
- Now it came to mount the frame of the framework, the brand profiles are used for this, they will need to fix the new ceiling panel.
Article on the topic: Wallpaper for walls with orchids, we use floral topics in the interior
Nuances setting a new ceiling
A diagram of a multi-level suspended ceiling.
- If plasterboard is planned, the profiles from 60 cm long and 120 cm should be used. Through the angular profiles on two reverse transactions, the distance is to be measured, which is equal to the length of the average profile (this is 120 cm). Marks should be set, and then roulette to refine the distance between them.
- The resulting distance is transferred to the transverse profile, which will remain, then simply spills with a grinder. Now you can install a transverse profile, it needs to be drunk on the corner.
- You can proceed to the assembly of cells for ceiling tiles: the first thing is strengthened by a profile of 120 cm long, it should be placed in parallel to the angular guide. If the question arises, how to fix profiles, then there is nothing complicated. Before installing it, you should bend in a certain side of the petal. If the profile is secured properly, a small click will be heard, which indicates a good job.
- When the ceiling installation is carried out, it is necessary to ensure that it does not fade in the middle. For this, the transverse profile should be attached to the old ceiling or overlap supports. It is necessary to use special metal cables. Sculpt the suspensions to all sections should not. They need to be fixed through two mounting openings. For strong retention, the frame is quite enough. The top plate of the suspension bends 90 degrees with the help of pliers.
Additional Information
Now the loop must be attached to the surface of the ceiling, after which it is fixed on the ceiling by screws. To do this, apply a screwdriver, the lower end of the suspension must be flexing in a hook into the profile hole. As you need, the suspensions need to be simply subject to compressing and tightening, thus adjustable the ceiling height.
To do this, prescribe a curved narrow plate, which is located in the central part of the suspension. After working with suspensions is completed, the creation of cells should be completed, for this, transverse profiles of small length are mounted.
Article on the topic: Curtains Blackout - Raisin in every interior
You should check the horizontal frame of the frame, and then go to the next area of the room. If there is a connecting box for the lighting device on the old ceiling, it must be dismantled (it must be borne in mind that electricity should be pre-disabled). The wire is lengthened to then put the socket on the new ceiling.
Ceiling panels are stacked alternately in pre-made frame cells. Before that, it is necessary to wear unpeiled gloves, otherwise you will have to wash drywall. And this is not the easiest and not the most pleasant lesson. When the work came to an end, from the new suspended ceiling you need to wash off dust.
Installation of the mounted ceiling is made. Thus, make all the work with your own hands is not so difficult, as it could seem at first glance. Installation of such ceilings is good in that in the event of an emergency, you can simply change several ceiling plates. To redo the whole design from the very beginning there is no need. When installing the ceiling should be especially attentive and neat, then everything will definitely work out and nothing will have to redo. Due to the simplicity of mounting the mounted ceiling, it is becoming increasingly popular.