
The toilet rooms are installed toilet bowls that are complemented by flushed tanks. In their functions, it includes the fact that with the help of water they are washing toilet. Installation - the process is simple and can be done with your own hands.
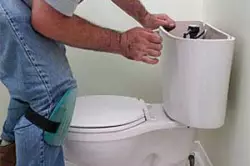
The first thing is set to the toilet, and then the drain tank.
How the principle of the washed tank is also arranged
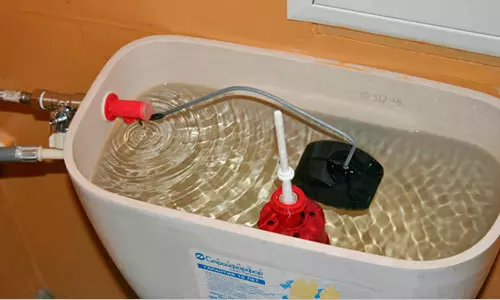
Toilet bowls are divided into highly high-profile and low-profile. The high-pressure semi-automatic tank consists of a cast-iron case and a cover, a siphon, a trigger valve that is suspended with a metal lever, a float valve and a handle for water descent. The float valve is necessary in order to ensure semi-automatic filling it with water when washed. It is attached to the tank housing with a nut, join the clutch to the water supply network.
In the tank, water enters through the float valve, filling it up to a certain level. After pressing the drain valve rises on the water shutter knob, and the hole in the siphon opens, which rushes water. When it drops its level, the float is lowered in it, after which the float valve is discovered.
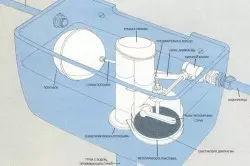
Wash tank diagram.
Then it begins to fill the tank with water. Filling it up to a certain level, the float rises and closes the valve, after which the water stops flowing.
The low-voltage semi-automatic tank does not have a siphon. It includes a housing and a lid, a decking and float valve, as well as the drilling fittings. The principle of its actions is that lowering the float and the opening of the float valve occurs simultaneously, and then water enters the tank and fills it up to a certain level.
Assembling washplate
Read:
- Internal tank details;
- wrench;
- screwdriver;
- plastic pipes;
- Head hose with naked nuts.
First, installing and connecting the toilet, and then - install and connect the tank.
Side eyelid has the greatest distribution, since it has a convenient and compact network interchange. This type is performed by either a rigid line of water pipeline, that is, with steel or plastic pipes, or flexible eyeliner, that is, a pressure hose that has fixing naughty nuts at the ends.
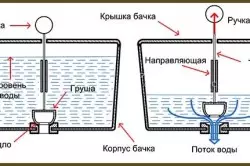
Scheme of the drain tank.
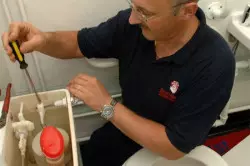
To assemble and install a hinged tank, you need to screw it with a pipe connected to the sewage system, connecting it through the coupling. Then mark the place on the wall, where it will be fixed, and connect it with a trigger through the coupling. After that, disconnect the tank with the coupling and fasten it on the wall, and then fasten it back to it. Next, it is necessary to collect its internal parts.
The assembly must be started with the screwing of the descent mechanism, which is the water descent lever. Then you need to insert the saddle and the descent vertical valve with a overflow, to which the water descent lever is joined through the thrust. Next, you must attach the supply pipe of the water pipe to the tank using the clutch through the gasket. After that, to the coupling itself you need to fasten the float valve to which the twist should be attached. Then it must be fixed and adjust the twinge of the float knee so that the desired angle is. To inside the tank, the water level was higher, you need the knee tilt angle to do less. At the end, it is necessary to adjust the saddle and tweak the locking clutch of the drain from it in the toilet.
Article on the topic: Wallpapers: photo for small kitchen, interior ideas, washable and fliseline, video instructions
Installing a flue tank
The operation of the overlapping valve is adjustable by the float, to reduce the water level, the float knee should be adjusted.
Read:
- bolts;
- pads;
- Silicone glue.
Before starting the device shelves for the toilet, it is necessary to make a rubber cuff, which is on the nozzle of the shelves, put on the flue to the toilet, and then attach it. Installing the tank is made on the regiment of the toilet, after which it is grabbed by fastening screws, that is, bolts. After that, you can proceed to the assembly of its details, also all internal parts can be collected in advance. Oval gaskets are stacked between it and the shelf, which should be labeled with silicone glue from both sides. Then everyone needs to withstand for 20 minutes until it dries the glue, and drain the water to check whether the water between the shelf and the tank is not selected. In the event that it proceeds, it is necessary to remove the tank and in the places of leakage it is adhesive again. At the end, it is installed in place.
If the internal parts need to be collected after installation on the toilet shelf, then you must first connect the water pipe supply clutch to it and fasten the float valve to it. Then you need to screw the water overflow tube and screw the descent mechanism, that is, the water descent lever.
The drain tank is installed on the toilet shelf, after which it is tightened by bolts.
After that, insert the saddle and the descent vertical valve to which the water descent lever should be attached through the craving. Next, it is necessary to fix it and adjust the twist of the float knee, as described above, until the desired level. Then the tank is installed on the toilet shelf, it is fixed by overflowing into the saddle, which must be adjusted. In the end, it is necessary to fix the plum gasket in the toilet and fasten the tank using the locks to the toilet.
The float valve is of great importance in the tank mechanism, since it takes automatic receipt using it, as well as the cessation of water supply. All his work is regulated by the position of the float. To adjust the water level, you need to adjust or disperse the twinge of the float knee. This is necessary so that the float can not be lowered low and did not cling to other details. For an economical flow of water, that is, to reduce its number in the tank, you need a knee of twist lever with a float to adjust in the direction of the bottom of the flush tank. The valve itself is obliged to completely overlap the flow of water when it reaches a level of 20 mm below overflow.
Troubleshooting
Shutter diagram at low-covered tanks.
Read:
- wrench;
- screwdriver;
- linen thread.
If the float is poorly adjusted, the water will start over the flipping tank and flow through the drain pipe. In this case, it is necessary to make sure that it is not damaged and not filled with water. When damaged, the float should be disconnected by the trigger and remove the lid. Then you need to adjust the stem of the float and tighten the adjusting nut. Next you need to check the work. To do this, you need to pull the descent, while the water level in it should not reach the hole of the drain pipe. If everything is in order, then the lid and the triggering lever is installed in place.
Article on the topic: Combining a kitchen with an entrance hall
If the float is filled with water, it must be removed from the lever and turn down the hole down to shake the water. It happens that in the design of the float there is a stocking. Then, before shaking the water, you need to get it. Then you should hide flax threads on the lever where stocking or float without it should be stopped. Flax will not give water to flow, as he, falling into it, swells. In order for repair to be better, it is necessary after planting the float to the gap to pour oil paint between its hole and the lever or into the gaps between it, the stocking and lever. Paint must be ashamed.
The float valve has a device that overlaps with a membrane water. If, with the health of the float, water continuously flows, it means that this device failed. Then you need to unscrew the float valve from the tank wall and disassemble its head. Then replace a torn membrane and set the head with a new one. If necessary, they regulate the level of the float, turning the screw. After that, the float valve is installed in place.
Replacing water descent mechanism
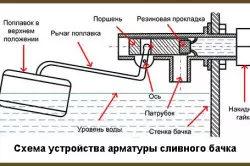
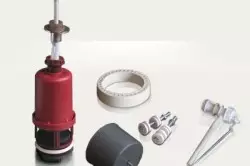
Diagram of the drainage tank fixture device.
Read:
- screwdriver;
- gasket;
- wrench.
If it is necessary to replace the water descent mechanism, then you first need to overlap the water and drain it from the tank. After that, the triggering lever is unscrewed and the lid is removed. The mechanism is removed by its turn to a quarter of turnover. In the event of a malfunction of the valve, it needs to be either cleaned, or replaced with a new one, and then install the mechanism in place.
If there is a need for a drain mechanism to disassemble completely, then you need to disconnect the water supply hose. Then you should unscrew the fastening nuts and remove the flushing tank from the toilet bowl. Next, you need to unscrew the stand of the mechanism, install new tank mounting, using the gaskets that are attached to this mechanism. After that, the new stand must be consolidated. Then remove the sealing gasket, which is installed between the washed tank and the toilet. Place under the gasket must be carefully cleaned and install a new one. At the end, you need to put the tank on the toilet, securing it with the screws, connect the water supply hose to it, adjust the float and install it in the tank.
Body repair, lids and shelves
If there are cracks on the body of the drain tank, they can be lined with liquid glass, sealant or epoxy glue.
Read:
- liquid glass;
- epoxy adhesive;
- steel sheet.
If water flows through the outer wall of the body, the reason for this can be too high water levels in the tank. In this case, water falls into the holes of the upper edge of the body. Then you need to adjust the lever of the float valve or the end of it to plug in the float, which bent at an angle of 90 °, and the water level will immediately decrease. The cause of the leak can be a crack in the vertical wall of the case. So, you need to overlap the water to the valve to dry the body. The crack should be lined with liquid glass, epoxy glue or sealant. If cracks on the bottom of the housing, then the repair is not possible, since there are heavy loads on the bottom.
Article on the topic: Forged fences (fences) for private houses - choose your style
Often, the crawled tank breaks the lid. Its repair is possible if it is broken by no more than three large pieces. Then they can be glued with epoxy glue. If the lid crashed into a larger number of pieces, then its repair is impossible. For a while you can use the lid of plywood or sheet plastics.
Cracks may appear on the toilet shelf. To avoid this, the rear wall of the tank is needed or it is necessary to install it on the support-support, made of bricks, wooden bars, corners or pipes. If the shelf from the faience was bursting, it is impossible to glue it. Due to the cracking, the water will begin to merge along its nozzle, falling on the floor. You need to disconnect the tank and turn it over, then the crack will be noticeable. The shelf made of metal is much more practical and stronger than from the faience. It is necessary, taking for a sample an old shelf with a crack, make it from the steel sheet. For this, the trimming of the curved tube is also suitable.
Repair overflow
Read:
- wrench;
- sealant;
- Oil paint;
- knife or tubing.
If it is faulty overflow, the water trickle may appear in the toilet. Then it is necessary to click on his fallen, and if it stopped flowing, it means that the fastening of the overflow nut weakened. It must be spinning, pre-disconnecting the shelf. When repairing overflows, two situations may occur.
First, if you have a clearance between the outer surface of the end of the tank, the tank appeared, it is necessary to overlap the water supply valve and pull it out of the tank. After that, it is necessary to wait until its walls dry. Then you should hide the seal in the slot and pour its oil paint. Using can be started after the paint is completely dry.
Secondly, if the nut completely turned away, you need to drain the water and block the valve. Next should be removed overflowing and winding onto its threaded part so that it is tightly in the hole at the bottom of the tank. You can lubricate the oily paint compaction after the tank gets up.
It is impossible to allow blocking overflow to avoid its overflow by water. If there is no blockage, but the water does not go to overflow, it means that there was a weakening of the fastening bolts to the toilet. The tank can give a roll, and overflowing is above its walls. It is possible that due to rust, it will not be possible to wrap the bolts, and the tilt is too large, then you need to shorten overflow. For this, it should be powered by a triangular recess, starting from the upper edge. It can be cut through with a knife or contact with nippers.