
Recently, plasterboard has become a fashionable material for decoration as ceilings and walls indoors. This is explained by its numerous advantages and the ability to make the surface imperfect perfectly smooth and ready for any kind of decorative decoration.
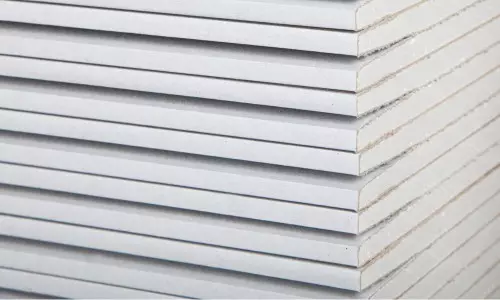
Plasterboard helps to make the surface perfectly smooth. Material support allows you to perform many design options.
More and more people wish to learn how to work with drywall do it yourself. After all, then a unique opportunity will appear to transform not only their home with minimal financial costs, but also earn money on repairs. In addition, if you make a ceiling and plasterboard walls with your own hands, confidence in a qualitative result will increase.
Tools and Materials for Work
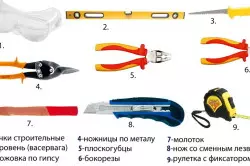
Tools for mounting plasterboard.
The process of finishing with the help of plasterboard sheets (GKC) walls and the ceiling in something similar, but has some differences. Therefore, we consider separately all the main subtleties. But before being taken for the installation of structures, you need to stock all mandatory tools and materials. This refers to:
- construction plumbing and level;
- putty knife;
- Roulette and labeling pencil;
- Perforator;
- screwdriver;
- Set of self-tapping and dowels;
- construction knife;
- Scissors for metal;
- putty;
- primer;
- Tassel.
In addition to the tool, you need to buy the most important - plasterboard. As a rule, there are sheets of different sizes on sale. It is necessary to choose material with such dimensions with which you will be more convenient to work. It is better to stay on standard sheets. Their amount depends on the area of the room as a whole.
But the sheets are just not glued to the surface. Therefore, I also need to buy profiles. They are sold from stainless steel of different sizes. You will need two types of profiles: special ceiling and galvanized for mounting frame. Length depends on the height of the walls and the size of the ceiling. But the missing parts of the profile can be easily adding with shorter. For this, they are purchased, if necessary, special extension profiles and connecting crabs for fastening them.
Installation of plasterboard design on the ceiling
Preparation and markup of surfaces
So, now it's time to move directly to the process itself. We start working from the ceiling. Initially, the surface is carefully tested for the presence of places with a loosely adjacent putty or plaster. If such are, it is necessary to dismantle the old material, the ceiling is negotiated and the resulting excavations and cracks to smell with fresh mortar.
Article on the topic: Wallpapers for the kitchen in different styles: Provence, Modern, Country
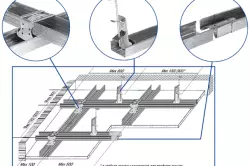
Frame mounting pattern of plasterboard ceiling.
After grappling the solution, the surface is rejected again and covered with putty. You can use the thin layer. When the putty completely grabbies and dry, you can proceed to the next step of work. It consists in choosing a ceiling design and markup.
First, it is advisable to determine the design of the future design. Plasterboard allows you to make a ceiling non-standard, which can be achieved using several levels of so-called steps. But you are entitled and just to make the usual ceiling based on GLC, simply aligning the surface with this method.
So, if you are going to make an ordinary smooth ceiling, then you need to hold a line along the wall, showing how the sheet will be lowered. It does not make sense to take a lot of vertical space if you do not plan under the sheets to have a multi-layer insulation. You need to try to make a markup so that as a result inside the design it was as much emptiness as possible.
Drying cabarton painting scheme.
The only thing that should be paid here is the type of lighting. If you plan to mount point lights, you need to provide for sufficient space under the sheets. The same applies to the ordinary chandelier: it will also have to hide the wires from it in the plasterboard ceiling. But here the vertical space will be needed much less than for lamps.
If you want to see a multi-level ceiling, then the main markup is made in the same way. Just then you should add the required number of levels below it. Note that mounting the lamps in such a step ceiling will be a bit more complicated. All marking, both for even and for a stepped ceiling, produce using the level. Otherwise, you can get the ceiling curve.
Markings must be made not only on the walls, but also on the ceiling. You need to carry out parallel to each other lines every 40 cm. They will serve places for fastening the suspensions of the metal frame. On the wall we will fix the guide profile.
Fastening frame and sheets
Now it's time to go to the installation process. First mounted frame on the ceiling itself. To do this, we take the right length of the bar and with the help of a perforator (you can screwproof) and a dowel-nail montine to the surface. Remember that if the ceiling is made of a powerful concrete slab, it is more convenient to work perforator. At the same time, it may even be necessary to make holes first, then score a dowel, and after that it is fixed the framework.Fastening is made in specially marked places on the planks. As a rule, the planks already have the necessary holes under the self-tapping screw. Therefore, you will not need to suffer from the drilling of the metal. During the work, check that everything keeps firmly. In the same way, dripping guides and walls, adhering to a clearly marked line.
Article on the topic: smokehouse do it yourself for cold smoking
So, the frame for the ceiling is ready! Now it remains to see it with sheets. To do this, either we take ready, or cut the sheets of the desired dimensions so that it remains for at least 5-7 cm from the edges. It is more convenient to work together: one person must smoothly hold the sheet close to the ceiling, and the second will be fixed with the help of a screwdriver.
Experts advise in advance on the sheets of pencil to put the mark, where it will be necessary to plant the screws.
First, the sheet is applied in the draft variant, it is placed, and then installation is already carried out. Now neatly immediately cut out the places for the lamps. You can do it in advance, relying on the exact measurements. The ceiling made of plasterboard is over with their own hands!
Subtleties of the device of the walls of plasterboard
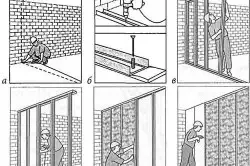
And now it concerns the walls. Walls made of drywall do it yourself faster and easier. After all, you do not have to constantly look up and maintain the frame and lists with great efforts. The order of work is the same as with the ceiling. Therefore, we consider only the main differences and subtleties for mounting the plasterboard design on the walls.
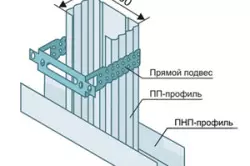
Mounting scheme of the main profile of the frame system.
So, first everything is placed. Walls may also have complex levels, only they will already take horizontal space. But we will focus on the simple walls of the walls of the sheets of GLC. So, first is prepared by surface preparation, as well as in the case of the ceiling. After complete drying of the material, proceed to measurements.
You need to take a long roulette and stringly pull it away from one edge of the wall to another so that it concerns the most protruding sites. You can use a long cord instead of roulette. You also need to call the assistant, as you do not measure everything right. This method allows you to remove as little space under drywall, thereby keeping the area of the room.
Marks need to be placed on perpendicular walls. In the same way the markup is carried out for other walls. Only put the marks to another color so that as a result, do not get confused in them. After that, it is necessary to work out where the guide strips will be located before the framework. Unlike the ceiling, they need to be installed on the walls at a distance of about 50-60 cm from each other. This will be quite enough so that the framework and on the wall is firmly held, and the sheets held on themselves. Again, use the plumb and the level so that the lines are parallel to each other.
Article on the topic: Choose a loft bed for children
Scheme of work on the installation of decorative plasterboard partitions.
Now just secure the plank to the wall. From what is precisely used, perforator or screwdriver depends on the wall hardness. For concrete and slag block walls, you can easily do the screwdriver. For the stove it is better to use the perforator, and then step by step to make the mount, as already described for the case with the ceiling.
It's time to mount the sheets of plasterboard. It is pretty hard to mount a large leaf right away from the floor line to the ceiling line. Therefore, it is better to cut it into two or more parts. Again, first it is better to make marking plaster with future places for self-tapping screws, and then make the installation itself. Everything is done in the same way, with the simultaneous check of the reliability of the fastening of the sheet to the frame.
Final processing of seams
So, all the main works on the installation of walls and the ceiling of plasterboard are considered. But it is very important to bring the matter to the end so that you are left only to determine the final decorative coating and apply it to the surface.
Scheme of putty joints.
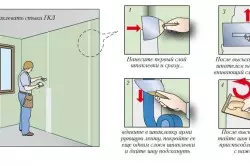
To do this, it is necessary to treat plasterboard sheets. At first, you need to cover them, especially seams, primer with antiseptics that will protect against fungus. When it is absorbed, take a spatula and putty. It will be necessary to carefully close all the joints between the sheets, trying to smooth them all as much as possible and to be counted with the main surface of the sheet. Do not be afraid if a small amount of putty falls on the middle of the sheet - it will not all be then seen.
Special attention should be paid to the corners and transitions between the ceiling and the wall. They require particularly careful and neat processing. After all, surplus putty, like her drawback, can badly affect the final result. When the putty dry, cut all the thin layer of primer again. Finish finished!
Walls made of plasterboard
Now you can only make a final finish. Walls and ceiling of drywall can be decorated in any way. It is allowed to use paint, wallpaper, tile, decorative plaster - in general, all that you yourself will wish.
So, the main points on the design of designs from plasterboard were considered. All this is quite realistic to make her own hands, calling only one person to help. If it does not rush and carefully work, you can qualitatively make the walls from the plasterboard with their own hands and the ceiling.