
House design is a complex and responsible task, to cope with which you can independently. The peculiarity is that some interior items can be created with their own hands. So, the lamps are essential interior objects that are used to illuminate the room as a whole or separate zone. The store presents a wide range of such products. But there are master classes how to make a lamp do it yourself from the bottle. And now we will show you! :)

How to make a chandelier (master class!)
The main lighting device of the house is the chandelier. It is possible to make it from a conventional glass bottle. The main thing is that it will be exclusive.
To create such beauty you will need:
- bottles (size and quantity depends on host preferences);
- protective equipment (glasses, mask and gloves);
- glass cutter and sandpaper;
- Screwdriver and wire.

Having the necessary tools and materials at hand, you can proceed to the direct fabrication of the chandelier:
one. Soak a bottle in water . This will make it easy to eliminate labels and trash. After cleaning, the container must be carefully dried.

2. Make a bottle cut . The glass cutter is installed at the required level. Cut is carried out in slower, which will allow you to get a flat line of cut. Working with cutter is needed exclusively in protective clothing. If there is no necessary tool at hand, then the slice of a glass bottle is easily performed by thread. On the video below, it is clearly demonstrated.

3. Now bottle is substituted under the crane . Turn on hot water and keep the workpiece under it. Hot water alternate with cold. As a result of sudden temperature drops, an unnecessary piece will disappear exactly along the line of the cut.

four. The cutting place is processed Emery paper. The slice should be smooth and smooth.
Article on the topic: Stone of foam - Garden and wall design

5. With a screwdriver, a lamp is disassembled. The wire must be carefully drawn and skip through the neck, assemble the lamp back and check it in operation.

6. It remains only to decorate the lighting device. This uses the usual wire. Starting from the neck, wound it on the bottle. For this, any material is used. It can be the usual black or colored wire.

Suspension on the chandelier is ready. It remains only to install it. If desired, the product can be painted and give any design. The main thing is that it is organically combined with the interior of the room.

A good solution will be the use of glass stone. It should be borne in mind that the light permeability of the product will slightly decrease. For decorating, a stone is used for various shades. You can combine a few shades. The main thing is that the lamp looked organically.

Stones are attached to the glass with glue. The lamp can only be used after its complete drying. It will take no more than a day. Complete drying of glue will provide a reliable clutch of stone with a surface. It is better to use a glue composition that can withstand temperature differences.
On video: How to cut a glass bottle thread
Table lamp (master class!)
A glass bottle will become the perfect material for creating a desktop lamp in a bedroom or living room.

To do this, you will need:
- bottle of appropriate shape and size;
- diamond drill;
- shade;
- screwdriver;
- means of protection;
- old towel;
- patch;
- Wire with carton.
Production of a lamp from a bottle with own hands is carried out in the following sequence:
- Stand opening on the workpiece through which the wire will pass. To stick the plaster.
- Bottle lay on an old towel and drill a hole under the wire. Drilling is carried out using a diamond drill. Work is carried out in the means of protection.
- Finished bottle to soak in water and eliminate all stickers and pollution.
- The wire is passed into the hole and stretches to the neck. At the outlet, it connects to the cartridge.
- Secure the cartridge and lampshade on the neck.

Homemade table lamp made of glass bottle ready. It remains only to check it in work. If desired, the product can be decorated and decorated. For this use various technologies and materials. The original solution will be glass stones, especially if the room has a glass chandelier, manufactured using the previous master class.
Now you know how to make a bottle lamp. Most often, bottles are used for the manufacture of such devices. They have different sizes and shapes. This allows you to build an exclusive item that will be decorated for the room.
Article on the topic: Making decorative boxes with your own hands: Several interesting ideas (MK)
On video: how to make a hole in a glass bottle
Plastic lamp (MK)
Plastic bottles are widely used for the manufacture of the lamp. The peculiarity of such a product is the simplicity of attachment and ease. Perform such a lamp from plastic bottles with your own hands. Today there are several technologies with the help of which the original lighting devices create. Let's start with a simple method.

For the manufacture of the lamp will take:
- 5-liter plastic bottle;
- stationery knife;
- glue;
- Disposable spoons.

Manufacturing process:
1. Using a knife Cuts bottom . The slice should be smooth. In the future, this will make it easier to work with decoration.

2. Pens cut off spoons . Using glue, convex parts are glued to the workpiece. You need to start with the neck. Each subsequent row should go to the previous one.

3. Torn closes Ring from spoons or for this purpose you can use the details from the old chandelier.

4. Next, inside the bottle Light bulb is located . Lamp ready for your own hands. It remains to consolidate it.

There are other options for the manufacture of the lamp from bottles with their own hands. A good option will be the bottoms from bottles. They have the appearance of 5-lasty flowers. The billets are bonded between themselves by the bypass thread or rope. To do this, use bottles of various shades. The main thing is that the product is organically looked and easily fit into the interior of the room.
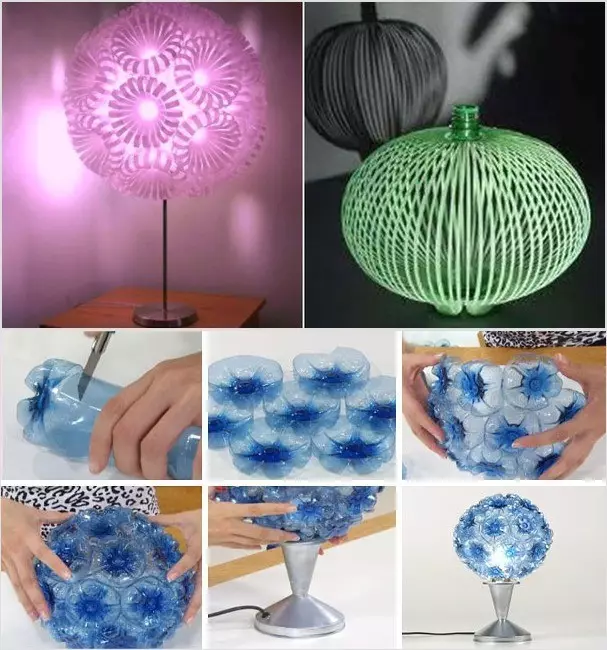
Plastic bottles can be used for the manufacture of the celeform to desktop and floor lamps. With the help of the stationery knife, the bottoms are cut and bonded with a caprony thread. As a result, a ball with a hole for the cartridge should be. In conclusion, the joints gently close up with silicone. This will allow you to close all the gaps. Plafones are manufactured in various shades. This will create a lighting device and decorate your home to them.
How to make a lamp pineapple (1 video)
Interesting ideas (36 photos)
")
")
")
")
")
")
")
")
")
")
")
")
")
")
")
")
")
")
")
")
")
")
")
")
")
")
")
")
")
")
")
")
")
")
")
")
Article on the topic: How to make a decorative pillow with your own hands: Interesting ideas [Master Classes]