
The arches in the openings were already used for a long time, as it was believed that this architectural opening is very aesthetic. Today, the arches arches in the doorways became popular due to the fact that they are easy to assemble from drywall. With the advent of the arches from drywall, it became possible to separate the premises, without applying to this special effort. Such arched arches will help to afford to give each room individuality.
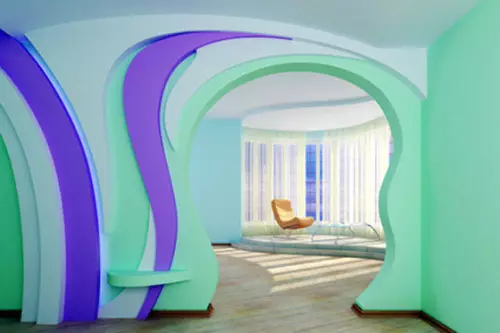
Thanks to the arch, you can visually expand the small space of the corridor, kitchen or room.
As for the forms of the arch, there are a lot of them. Maching plasterboard arches, you can recreate almost any historical copies. The main convenience is that plasterboard is a very flexible material. We make the arch in the doorway according to the following scheme:
- All necessary measurements are performed and the required amount of material is calculated.
- Next prepared all the necessary tools that will be required to work.
- Facial parts of the arches are cut, a frame from a profile or tree is performed.
- Next are attached to the front elements of the arches.
- The lower parts of the arches are cut and attached.
- Arched corners are attached and put all the surfaces.
What materials do you need?
The following materials and tools will be required for work:
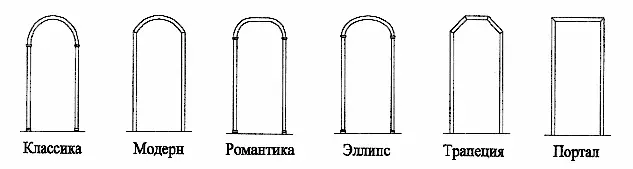
Types of arches forms.
- Gypsum Carton with a thickness of 9.5 mm;
- Guide profiles - 27x28 mm;
- rack profiles - 60x27 mm;
- Self-tapping screws for fasteners of GLC (drywall sheet) - 3.5x25 mm;
- Dowels with screws - 6x60 mm for fastening the profile frame (you will need if the walls are made of brick or concrete).
- Self-tapping screws with a press washer - 4.2x12 mm;
- Self-tapping screws (if the walls are made of wood);
- Pluckle in GLK;
- needle roller for flexing plasterboard sheets;
- arched corner with performation;
- putty knife;
- screwdriver;
- protective gloves;
- roulette;
- Corolnic;
- pencil;
- Scissors for metal;
- Stationery knife for cutting GLC.
Article on the topic: Laying of laminate on chipboard, linoleum, parquet (video)
What kind can be the arch?
The opening of the doors or windows can be issued using the creation of the arch. There are a large number of arches that can be performed in your home. If you select, you need to be guided not only by taste preferences, but also the following parameters: first of all the ceiling height and the width of the doorway. So, some structures look good at high ceilings, while others, on the contrary, at low. Views:
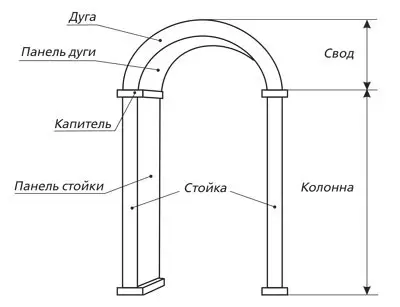
Device diagram Arch.
- Portal - This arch is performed standard in the form of the letter P. The arch of the arch can be different: polygonal or wavy. It all depends on the materials and fantasy of the owner of the house.
- The classic arch is differently called "Classic". This type of arch is suitable only for ceilings, the height of which is more than 3 m in height. On average, with a width of the opening of 90 cm, about 45 cm of the height will occupy the arches, so the height of 2.5 m may not be enough.
- Romance. This option is great for wide openings, relatively small in height. Between the rounded corners, the direct insert is performed either at an angle or horizontally.
- Modern. This type is great for performing a doorway inside a typical apartment. At the same time, the angles can be both rounded and sharp.
- Half a day. This option is able to perfectly perform the zoning of the room.
- Direct arch is an excellent option for rooms performed in the style of High-tech and modern.
In addition, the arches differ in both their design:
- Radius (asymmetric) is the most simple and at the same time cheap technology that will be suitable for any interior.
- Multi-level. This design is used mainly in cases where the interior is made in one specific style.
- Openwork is suitable for all cases, except for those when the walls are made in non-standard form.
- Dome and symmetric are suitable for classic arches, which are not less than 1 m.
Door opening: Perform the necessary measurements
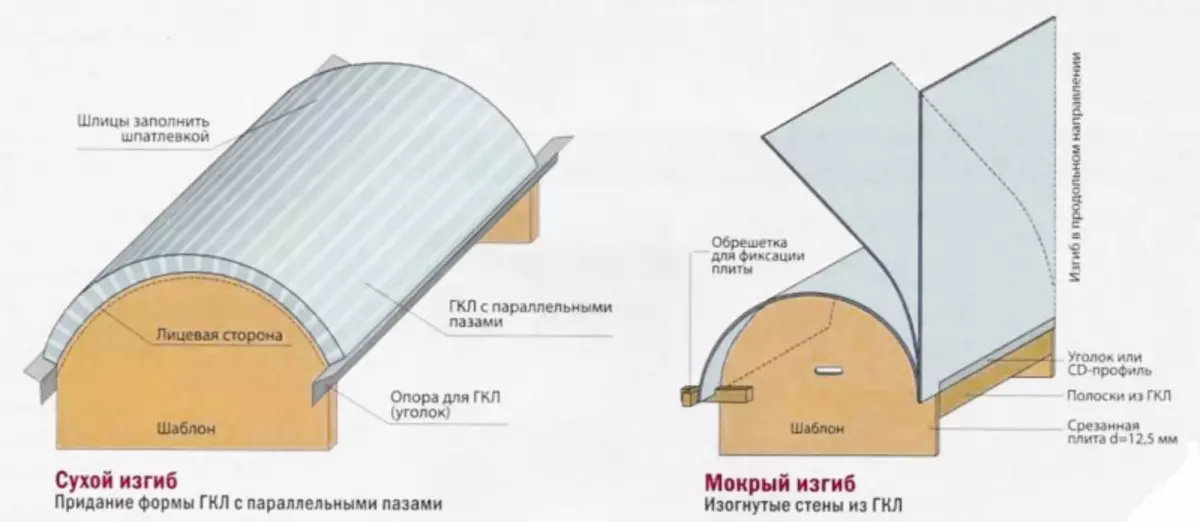
Methods of bending sheet of plasterboard: Dry and wet.
Before making the arch in the doorway, you need to do all the necessary measurements. Naturally, you need to start with the measurements of the opening. It is necessary to find out the height and width of the opening.
Article on the topic: Build the door frame with your own hands. How to assemble the door frame correctly. Photo
As for the width of the arch, it should be equal to the distance between the opposite walls of the doorway. It is necessary to measure this distance and divide it in half. This size is needed in order to make the exact semicircle.
In addition, it is necessary to determine in advance the form of the future arch. If a classic arch is selected, then you need to align all the walls. They must be completely vertical, so that the arch does not look awkward. Align the walls needed with the help of lighthouses with a putty or plaster.
Preparation of GCC for Arch
- First of all, you will need a regular pencil and a tight rope. Pencil is tied to the rope and it turns out an excellent large-scale circulation.
- Next, the GLC is marked by the middle - that is, the radius of the future arch. To do this, you need to remember the size of the width of the opening.
- Where the arches will be the top of the arch, the mark of 60-65 cm is marked. This figure was taken at the rate of 50 cm radius and 10-15 cm - height above the arch.
- Next is clipped with a plasterboard sheet exactly along the width of the doorway.
- After that, there is a point that will be the center of the radius.
- A rope with a pencil is taken, its length should be equal to radius. A semicircle is conducted at a point marked in advance. When performing the correct measurements, the perfect circle should be turned out, which will be the arch of the opening.
- After that, the stationery knife or electrolybiz is taken, with which it is necessary to cut the semicircle along the drawn line. In our case, its width should be 100 cm, and the height is 60-65 cm.
Mounting frame for arch do it yourself
From the competently executed frame will depend both the aesthetics and the strength of the structure.Stages of manufacture and installation of the frame look like this:
- First of all, at the top of the opening, the guide of a metal profile is attached using a dowel. Next, the guides are attached to the wall in 2 places.
- After that, the arcuate profile is manufactured, also made of metal. For its manufacture, with the help of metal scissors, the same cuts are made in the profile, each of which then need to bent until the formation of a straight angle. As a template, you can use already made parts from GLC. The profile is attached with the help of a dowel, and the drywall is already with the help of self-samples. For the arch, you will need 2 arcuate profiles.
- To strengthen the frame between 2 arcs, you need to attach profile segments.
- Next, arcuate details are attached to the frame using self-tapping screws.
Article on the topic: How will it help to transform your interior bamboo and its drawing?
Bending of plasterboard sheets
After the frame will be fully ready, you can proceed to the final stage - the bending of the installation element. For this, the rectangular sheet of GLC of the desired length and width is cut. In order to accurately calculate the length, you need to remember about 10-15 cm, which were added earlier. Thus, the length should be on average 15 cm more.
So that the GLC did not crack during the bend you just need to moisten it with water and make punctures, then leave for several hours. After time, you can start mounting the sheet to the frame: first with the adhesive tape, then screws.
It should be remembered that it is necessary to twist the screws smoothly, otherwise you can damage the sheet.
It remains only to wait for a complete drying of the sheet - on average 12 hours and Arch is ready.
Facing work
- First you need to walk all the surface of the argy to walk with sandpaper and sweat all the existing irregularities. Everywhere there should be rounded corners.
- All seams of installation work should be sealing with putty for docking seams. However, before this you need to install perforated profiles for arches corners.
- Next, all the remnants of putty after drying are cleaned with sandpaper.
- A layer of primer is applied. It is necessary to wait for her complete drying.
- At the end of the arch, it puts off with a special finish putty, and polished again.
- Once again walking on the surface of the shallow sandpaper. On this arch is ready
That's all the arch is ready. It remains only to create a decorative facing coating. To do this, you can use various materials: wallpapers, decorative stone, water-emulsion paint, etc.