
Give or make a home for her dolls for her daughter - it's just the beginning. Next, this house will have to furnish. It is a bunch of toy furniture, techniques, accessories. On how to make furniture for dolls will be told in this article.
How to determine the size
Dolls, their houses and furnishings are reduced copies of us and our dwellings. And the most reliable way to make doll furniture with your own hands and not mistaken - measure the real items, reduce them several times, and then work with the obtained values.
Furniture for dolls - copies of our furniture
How much to reduce real sizes depends on how small or a great doll is, because they are from 7 cm to 60 cm or even higher. Accordingly, the furniture for them needs different sizes. To determine the number to which real dimensions should be divided, the average human growth in centimeters (170 cm) is divided to the height of the doll. We get some kind of number. Here on it and it will be necessary to divide the size of real furniture.
For example, the height of the doll is 15 cm. Calculate: 170 cm / 15 cm = 11.3. That is the number and divide all the parameters of "human" furniture. It is still worth saying that it is 14-15 cm that is the most popular size among the doll population. Therefore, most of the finished furniture is made in a ratio of 1:12. It is possible for us to use existing dimensions at least in order to be oriented with the scale of the required parts and the number of materials.
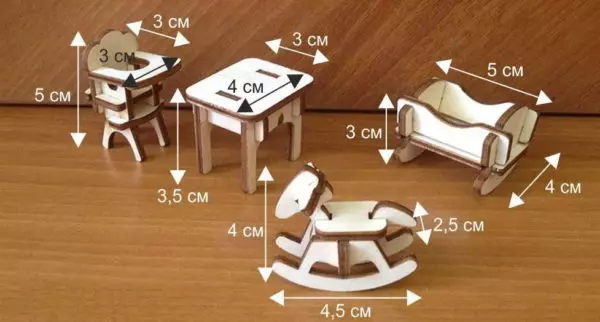
Approximate dimensions of furniture for dolls
So, the most common sizes of dolls:
- Doll-man 150 mm;
- Doll-Woman - 140 mm;
- Doll-child - 75-100 mm;
- Toy baby - 65-75 mm.
If you need furniture for dolls of such sizes, its parameters will be such:
- Bed:
- double - 160 * 130 mm;
- single - 160 * 75 mm;
The size of the situation depends on the growth of the inhabitants
- Chair - height with a back of 75 mm, the height of the seat is 40 mm;
- Cabinet not lower than 165 mm;
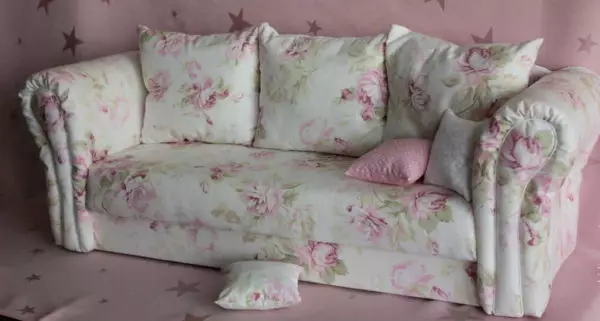
- Sofa, chair - 40 mm seat height, backrest, armrests can be different;
- Table worker, dining - height 65 mm, shape and width / length can be different.
If you have more toys more / less, you can not adjust the dimensions. With a great difference, you will have to increase or decrease (and you can count on your own).
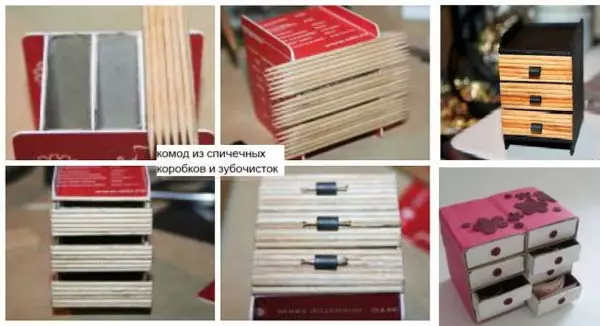
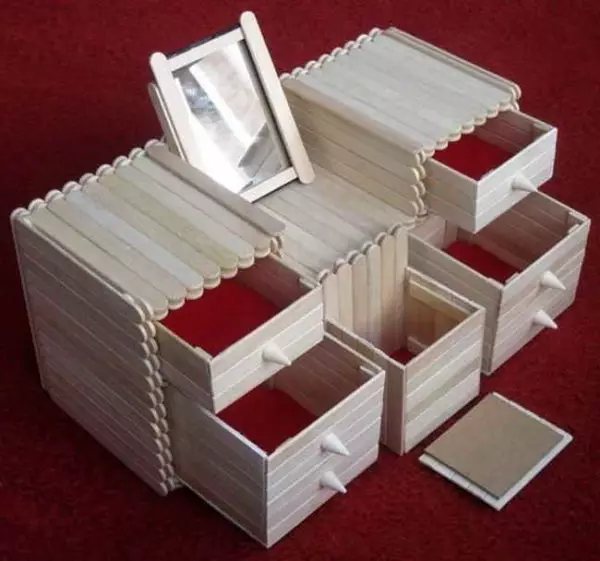
Doll Furniture made of match boxes
The easiest way to do furniture for dolls do it yourself from ordinary match boxes. They are glued with the help of PVA glue, creating certain structures, then glued with paper or cloth, self-adhesive film, etc. You can use wooden beads as legs, drawers for drawers from small butt on legs or from long beads.
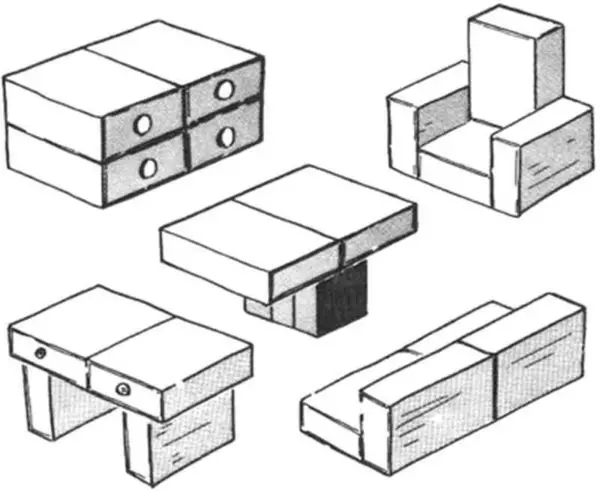
Simple homemade doll furniture made of match boxes
From match boxes you can make chairs, table, chest of drawers, bed, bedside table. Another thing is that the furniture is obtained for very small dolls, no more than 10 cm high. Although, you can use a larger number of boxes, gluing them into blocks, and from these blocks to create furniture for dolls with a height of about 15 cm. Also, but to work with others Materials are not much more complicated, and they are more plastic and allow you to create products of more elegant forms.
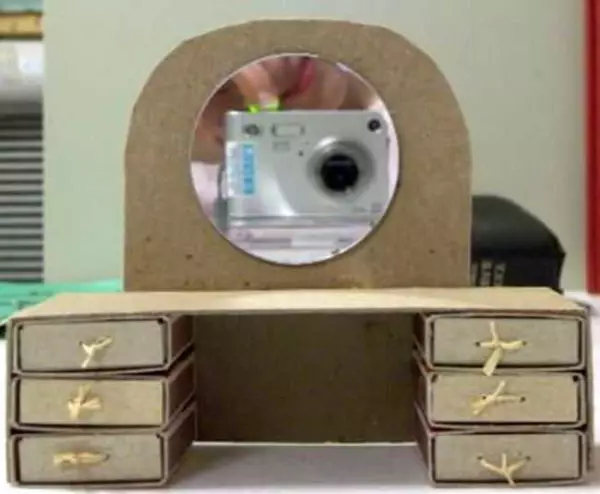
Toy dressing table made of match boxes
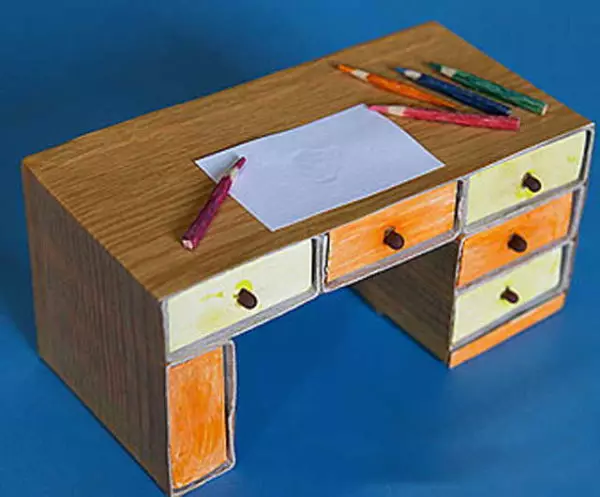
Puppet writing desk with your own hands
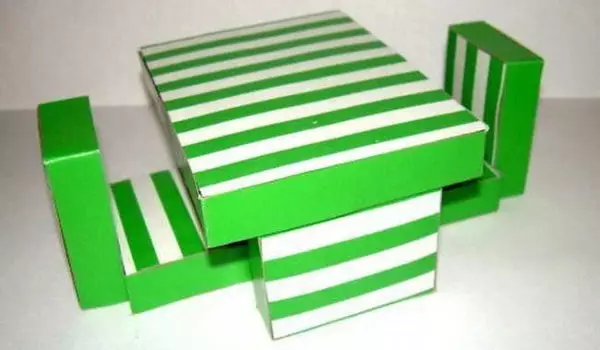
Dining table and chairs made of match boxes for a puppet house
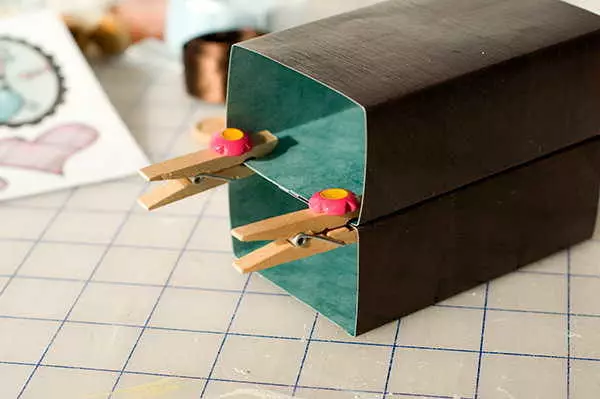
How to glue boxes
Several search techniques for finishing homemade toy comed machine boxes
This may be your first experience in making doll furniture. Later it will be possible to take on something more serious.
Furniture for a doll house of cardboard
You can try your hand in the manufacture of furniture for dolls using cardboard. The material is inexpensive, affordable, it will be possible to try and mistake, redo. Cardboard usually connect with the help of PVA glue, you can use a glue gun or any universal glue that can glue cardboard, fabric, wood. Just making furniture for dolls with your hands from cardboard, you will also use these materials. If we talk about convenience, it is preferable to the adhesive gun - glitter quickly, it is convenient to work comfortably, the connection is reliable.
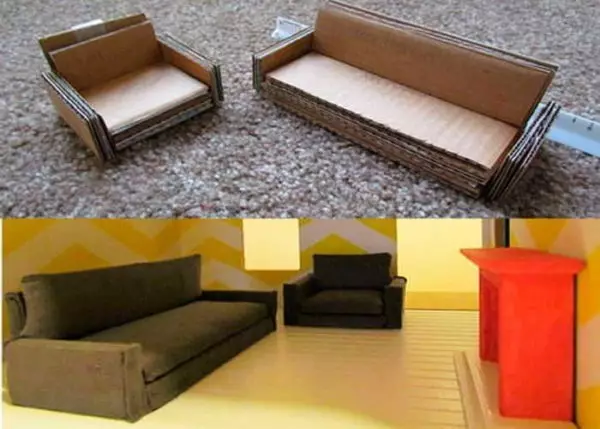
Without finishing doll furniture from cardboard looks not very good
To make furniture for dolls, you can use the usual packing cardboard. He is cheap, but the furniture from it turns out very tender. It is unlikely that the child is enough for a long time. But, as a "first experience", this is a good option. More reliable obtained products from cardboard for scrapbooking. It is a tight, uniform, has a different thickness (from 2 mm and more), may be with a textured surface, extruded by one-photon patterns, a pattern with one or both of both sides. The lack of such cardboard is to buy it, and some types of such cardboard are not too cheap.
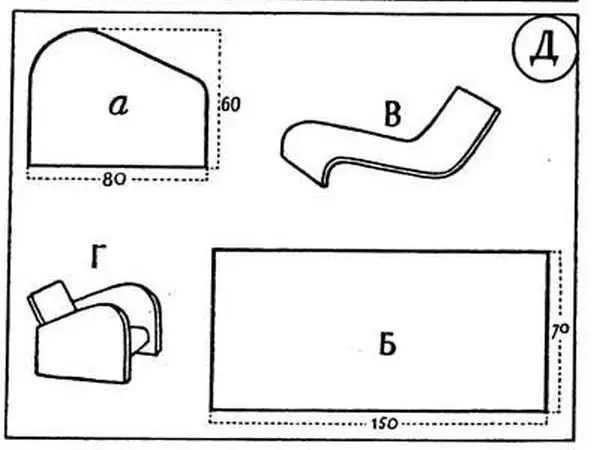
Cardboard Bed for Dolls
This bed for dolls from cardboard is designed for a large doll - up to 50 cm of height. If necessary, all specified dimensions can be reduced.
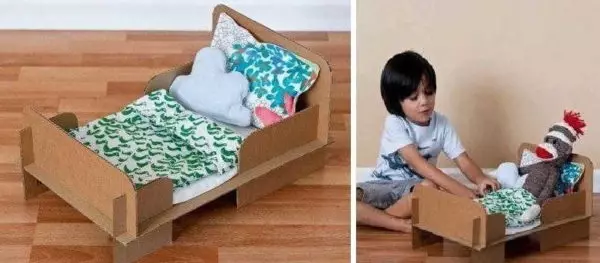
You can make such a cardboard bed in a few minutes
This option can be made literally for 10-20 minutes. It does not need glue or other clamps. Details are kept due to grooves cut in cardboard. The width of the groove is equal to the thickness of the cardboard, the length of the slots and the size of the blanks are listed on the diagram.
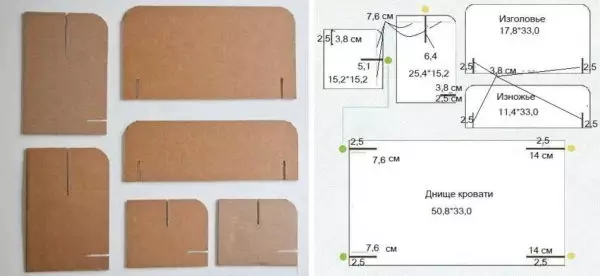
Doll Bed Scheme
Green and yellow dots indicate the combined cuts. They are inserted alone in another, on what the assembly ends. If you like this model, it can be done from plywood.
Schemes for the manufacture of cardboard doll furniture
Basically, furniture for dolls from cardboard is glued. To make something openwork from this material or very complicated is unlikely to succeed, but the manufacture of simple models does not take much time. Having a diagram with dimensions, you can even do without explanation. Everything is so clear.
Chair for dolls
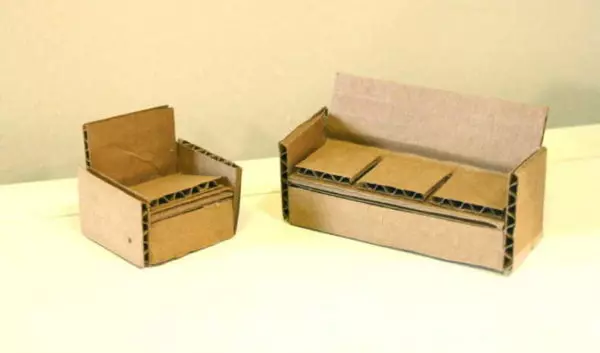
Such models can be done on the eye. Without "upholstery" they look unsightly, but after quite decent
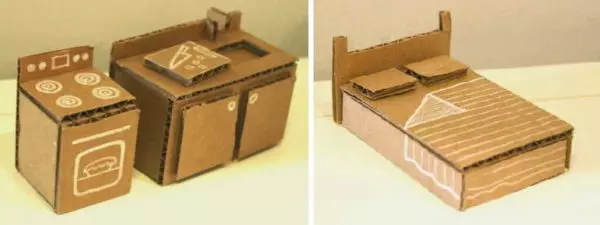
Bed to do quite easily, but with lockers for the kitchen will have to fun
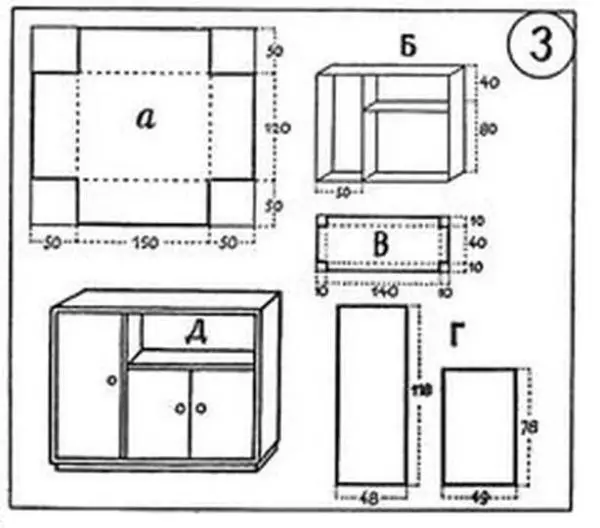
Bedside table and open shelf - Scheme One, Miscellaneous Execution
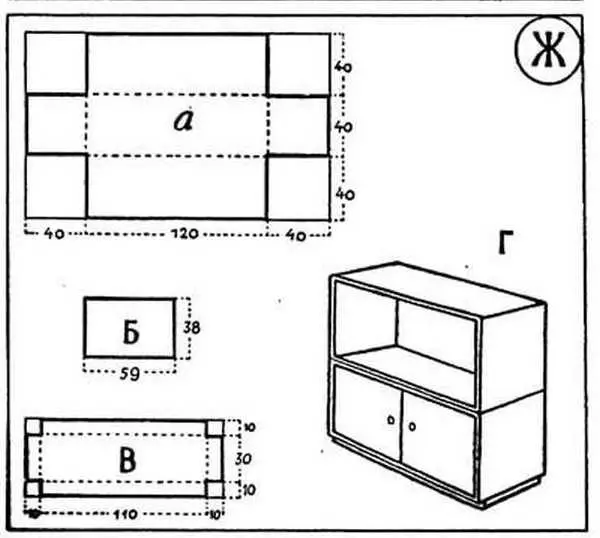
Other model bedside tables for making cardboard or plywood
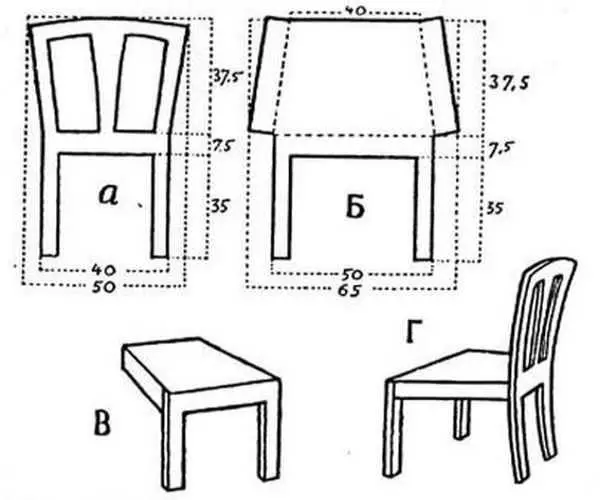
Toy table for dolls do it yourself for this scheme do not do a problem
Cardboard dolls
Furniture schemes for dolls can be used not only for making cardboard. They can be transferred to the paneur and cut with a jigsaw.
Cabinet for dolls of girlfriend
The toy cabinet can be made of plywood, paint or envelop wrapping paper or self-adhesive film. There, probably, the questions will not arise - everything is clear, and if there are questions, you can look at their solution in the "natural" closet. But you can make it from all inexpensive materials. Furniture for dolls with your own hands and good that the cost of it is very small.From a cardboard box
The main task is to find a box of dense cardboard suitable size. Moreover, it will be easier to work if it is packaging - with rejuvenable edges. Such a bending part is the finished door. It will only be necessary to finish it - hang the mirror, attach the handle, etc.
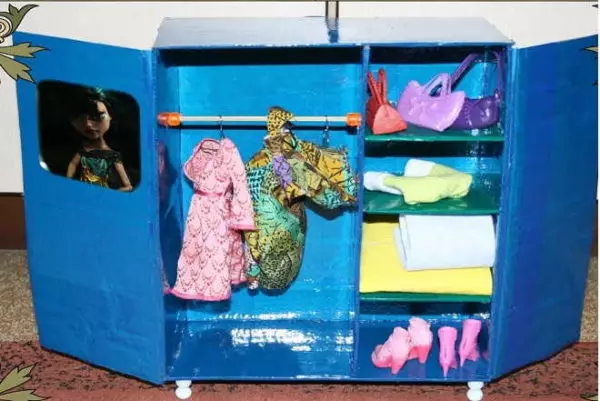
One of the options for homemade furniture la dolls - wardrobe
What is needed for work
It will take good tape for work, better - on a paper basis, as it is then easier to glue the finish. If there is a glue gun or construction (a large stationery fit) stapler with brackets is also not bad. If, in addition to cardboard and paper, you will also use other materials, the glue is better to find the universal, which glue paper, cardboard, fabric, plastic. We still need scissors and a stationery knife, a ruler.
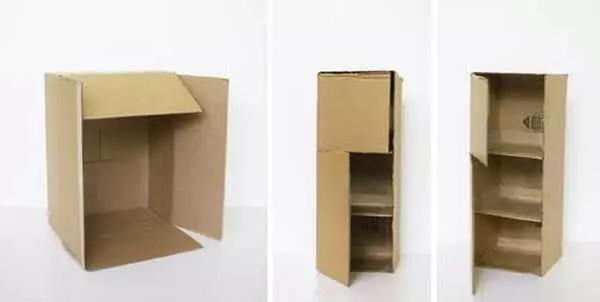
How to make a cabinet for a doll from a cardboard box
If the box found is too big, it can be reduced, cutting off unnecessary. So that the bends were smooth, take a ruler. We apply to the place of the future fold, several times we go along the lineup of a stupid solid object (with a snap or fork). After that, the cardboard bend will be easy.
Filling for a toy cabinet
From trimming or from another box, cut the shelves. They should be a little - by 5-8 mm - longer and wider inner cabinet space. Surplus bend so that sides are formed from all sides. In the corners, folds are formed, they are gently cut off. One of the parts bending 180 ° and glue to the shelf itself. This side of the shelf will "look into the world." Three other parts bend at an angle of 90 °, we wash the glue and the shelves insert into the closet. In the photo on the right you can see how the shelves are glued. But that the places of attachments do not get into the eyes, the sides are better to wrap down.
Make furniture for dolls with your own hands - it's no less pleasure than playing with her
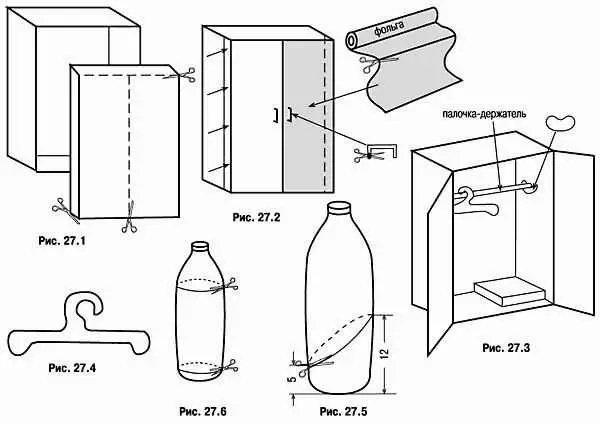
In addition to the shelves, you can still make a crossbar for hangers. It can be made from bamboo speakers, for example, you can try to use a tube for juices, a wire, etc. The hangers can also be twisted from the colored wire or cut out of pieces from juice, from plastic bottles, etc.
Finish - creative process
Next, it's a finish. You can paint the cardboard with watercolor or acrylic (better) paints, shove the wrapping paper, cloth, felt. You can simulate a mirror surface - to attach foil (food, for example). If you want to make a "plastic" surface, look for bottles from under the water of the desired color, cut off the neck and bottom, and the "body" use as a finishing material.

Finishing - the process is creative, but, first, use the materials simpler, softer, feel easier to work with them
Handles can be made of wire, from beads, long beads. For toy larger cabinets, you can find buttons or buttons. All this "beauty" adhesive after "washing" the cabinet.
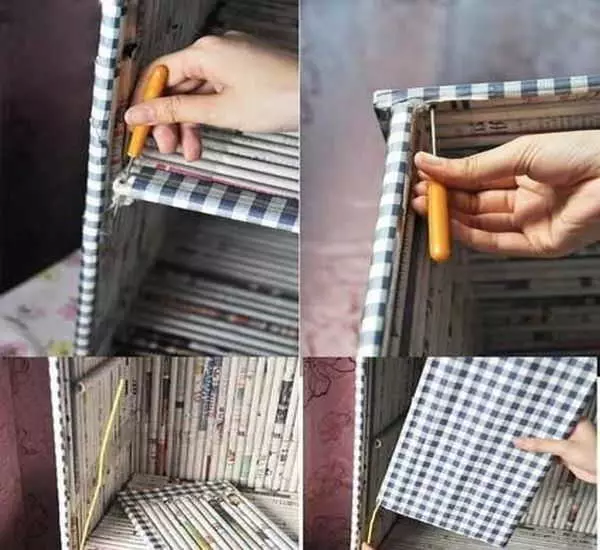
Warding Doll Cabinet Newspapers
We need old newspapers, PVA glue with a tassel, a glue gun, a couple of wires or threads, wrapping paper for trim and paint.
From the newspapers twist the dense tubes, we wash them along the edge of the PVA and leave up to dry. Then the tubes can be glued together. For this operation, the adhesive gun is suitable. There are two ways: first collect large blocks, then chop them into fragments of the desired length or immediately cut the tubes of the desired length and glue immediately blanks in size. The second path is more painting, but the waste is less.
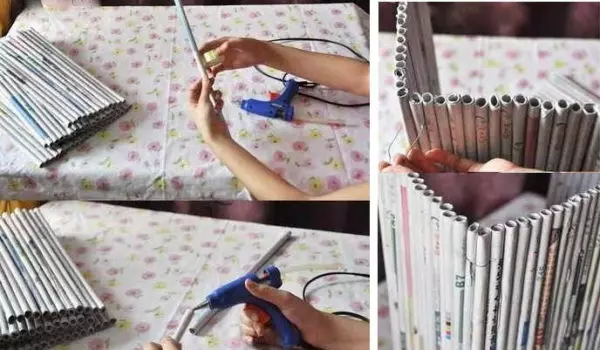
We collect planes from newspaper tubes
The finished walls of the cabinet should be copped with each other. To rigidly fix the angle of 90 ° better to use a thin wire. First, wash the joints with glue, then put the walls one to another. If the wires interfere, they can be removed after drying the glue.
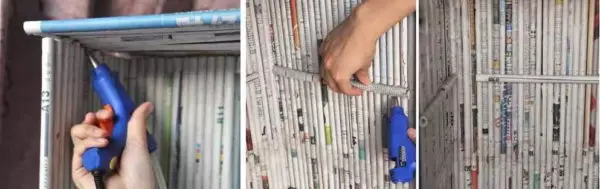
Under the shelves glue holders
For the same technology, the bottom, the top, shelves are glued. Doors will need to do a little differently. So that they open up, two strips of about 1.5 cm wide from the scotch. On the edge of the door, the tape is sampled so that a little more than half hung in the air. With this free tape, we glue the door to the wall, but so that between the wall and the door there was a clearance of 2-3 mm (just tape). This will give the opportunity to close the doors. The glued door is fixed on the other side of the second scotch band.
Wire mounting
The second way to fasten the doors - on wire. Only this time it should be tough and thick enough. Cut a piece that is 2 cm longer than the height of the cabinet. Immediately on the wire on the one hand, we make a loop using 1 cm. The loop is bending at an angle of 90 ° to the wire. Make a hole in the bottom and roof, we skip the wire through the bottom, the loop remains downstairs. We wear the door on the wire using the extreme tube instead of hinges. Slightly flexing the wire, we produce it into the hole in the roof of the cabinet, bending the surplus, fixing the door. We repeat the same operation with another door. Please note the door to the tape is needed to finish the cabinet, and on the wire - it is possible after.
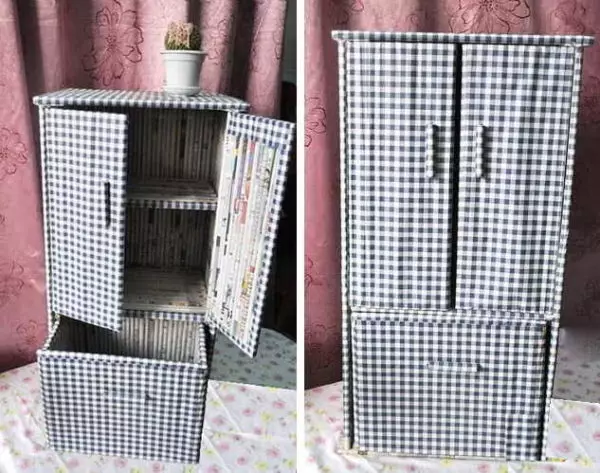
Ready cabinet for dolls from newspapers
There are some little things that need to say a few words. The legs and handles for the cabinet can also be made of paper tubes. Just twisted them from the paper that you finish the toy. Cutting it into a dense roller, the edge is glued with glue, then cut on the segments of the desired length and stick to the right places. Instead of the tubes there may be wooden sticks, beads, etc.
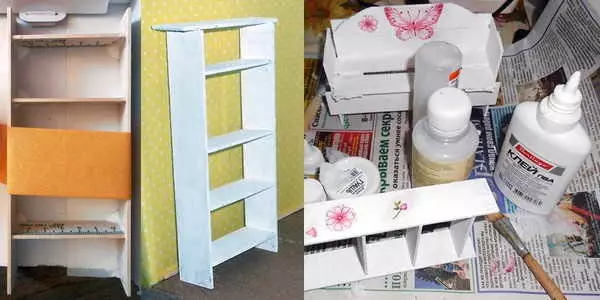
Puppet Bookcase or Lines Shelf
You can make furniture for dolls with your own hands from school wooden lines. They are good for those already processed, have the same width and thickness. In the stationery store you can find the desired size - more / less, wider / already - at will. For example, for the manufacture of a puppet bookcase, you need 6 lines of 15 cm long.
Make a toy bookshelf from wooden lines just
Still, you will need a jigsaw. If there is an electric - excellent, if not, is suitable and manual, as it is not too much work. We also need emery paper with small grain, glue (PVA or carpentry) and paint (acrylic or gouache).
From the line, cut segments: 4 pieces of 6 cm, one - 8 cm. The edges sand up to an even state, remove the markup and bar codes. Between the two line, we have the shelves (which are 6 cm), we leave the same distance from above the same distance - under the cover (segment of 8 cm). The joints are missing the PVA liner or carpentry, we connect and tighten with a painting tape, we leave for a day. When the glue is dry, we glue the latest item - the lid on top. Actually, the shelf itself is ready, it remains to paint it.
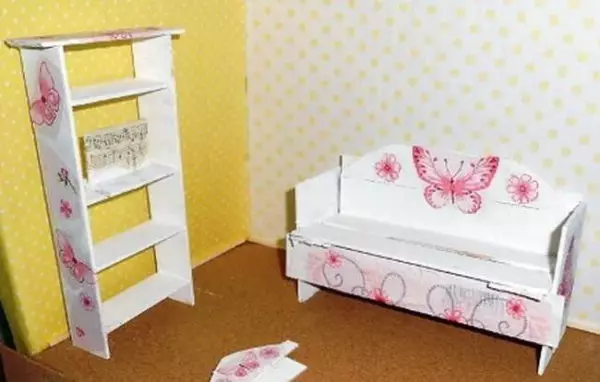
Other furniture items for dolls can be done from Linek
To obtain a smooth and bright color, the design is better covered with white, after drying it is already painted with the desired tint. Also made with your own hands, doll furniture can be decorated in the technique of decoupage.
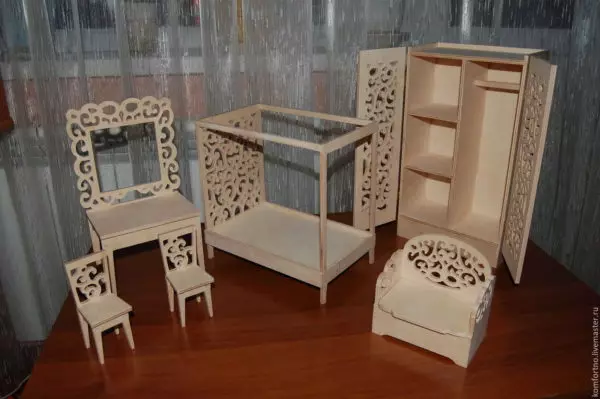
Furniture for dolls: photo ideas
You can make furniture for dolls with your own hands from the most unexpected materials. How to use newspapers and wooden rules you have already seen. But you can make tables, chairs, chairs, sofas, beds, shelves, cabinets, etc. From sticks for ice cream.
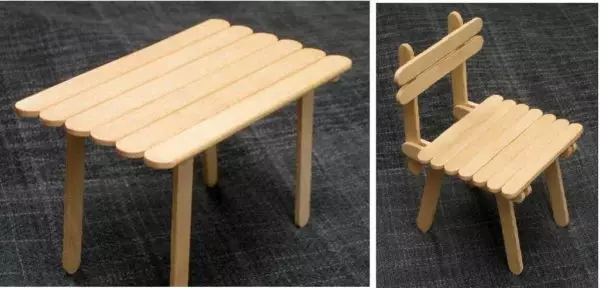
It is better to start with a simple: table and chairs for dolls from sticks for ice cream
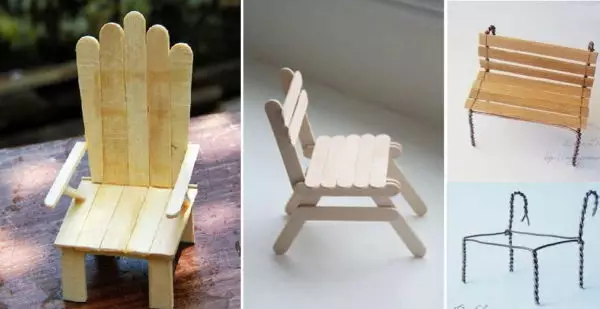
You can make chairs and sofas
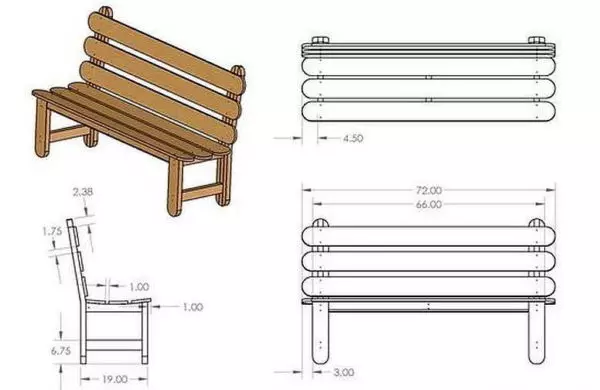
Garden bench or sofa - depending on the finish
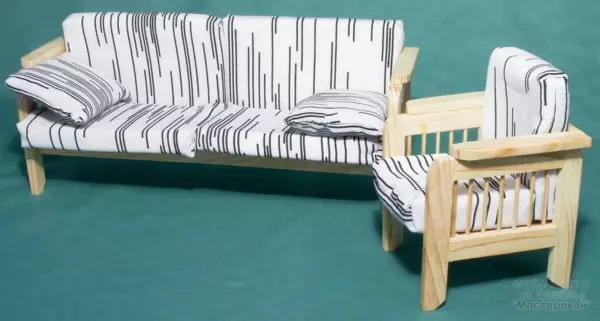
Almost the same designs with soft upholstery
Make such a checker for dolls = this is the task more complicated

You can collect a crib
What is good for this material, you probably have already understood - it has rounded treated edges, the same in size and well-processed. If the sticks seem too rough, milk them to smoothness with the help of sandpaper with small grain.
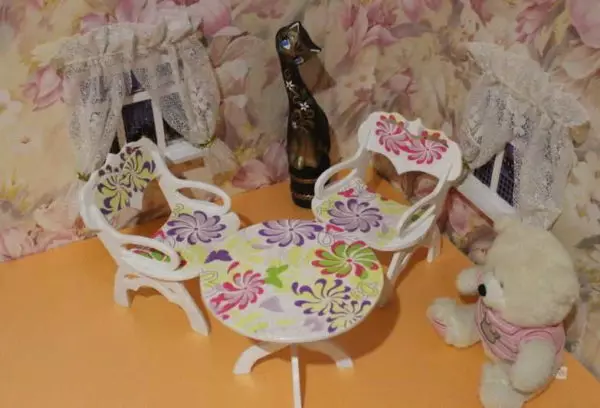
From the clothespins, quite good chairs and chairs are obtained. They are disassembled on halves and are connected using joinery glue. Figure products are obtained by almost several dozen minutes.
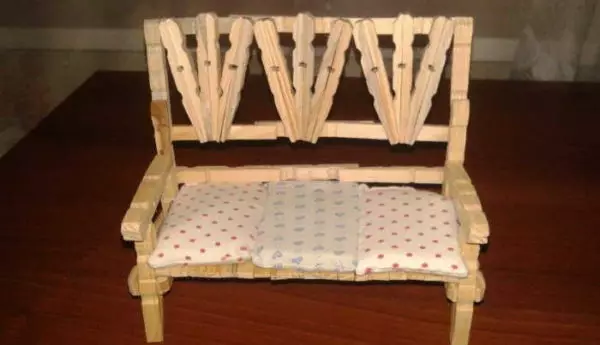
This sofa can be collected from wooden clothespins
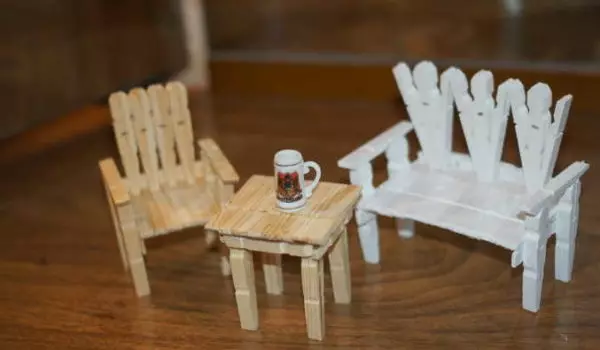
Armchair, table - also you can make clothespins
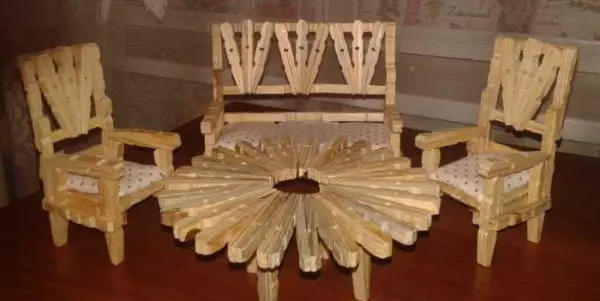
If you add a little holes, it turns out the openwork
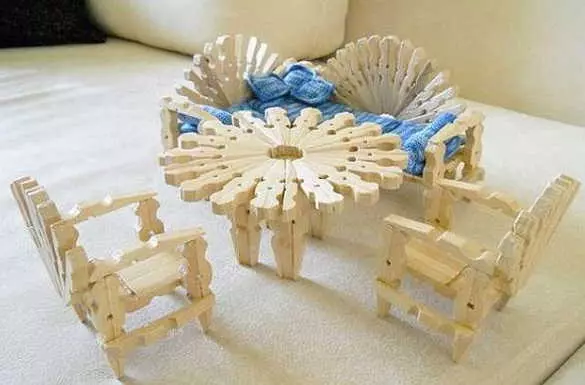
Round table for dolls from clothespins to do quite easily
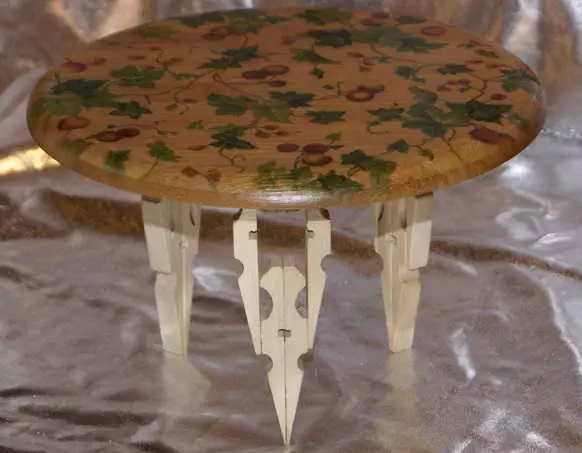
Original three-halves legs from clothespins
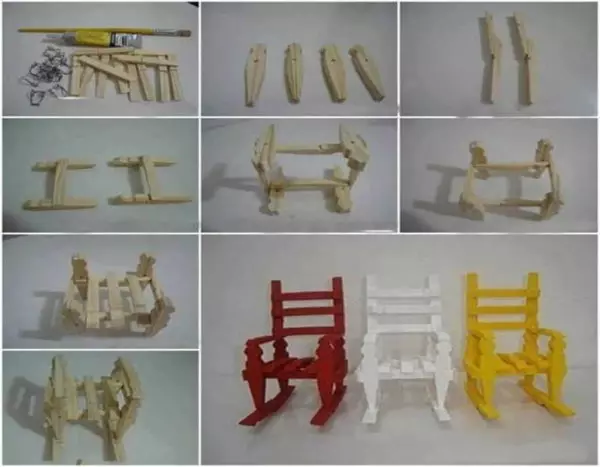
Rocking chair for dolls

Toy stools
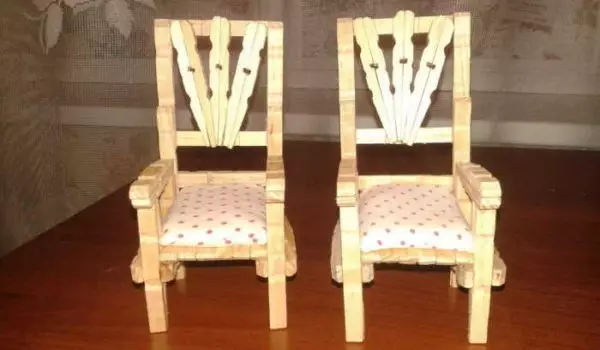
Chairs with armrests for a puppet house
Almost always for the manufacture of doll furniture use wooden clothespins. But no one forbids to take plastic. It is also difficult to work with them just the difficulty in the fact that the wooden is easier to refine, changing the thickness of the form, etc. If the product is simple, refinement does not require, you can also take plastic. They are more diverse in shape and sizes, already painted, so there is less than one with them.
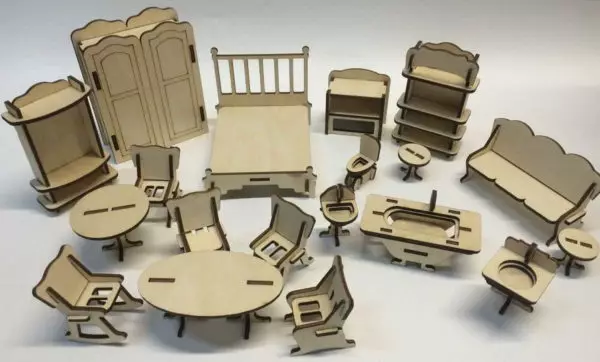
With an increase in skill, you can go to a more complex material - a fane or wood. The complexity is that the outtage and cutting of miniature parts requires filigree accuracy, perfection and takes away the mass of time. But you can do everything you wish.
Make furniture for dolls with your own hands you can do any size, style
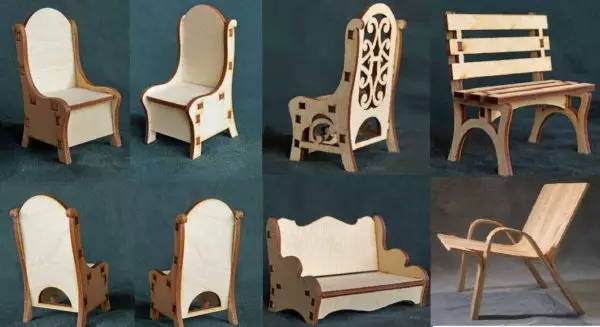
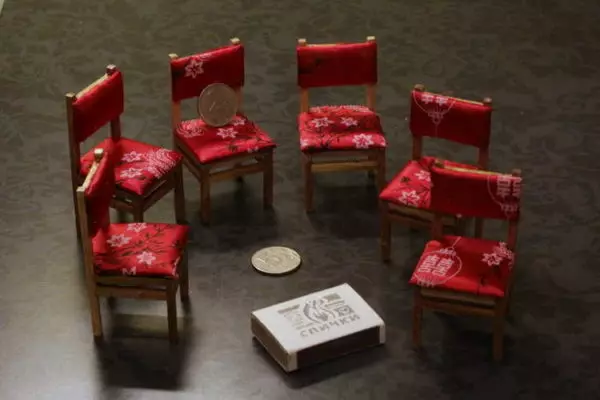
Several models of plywood puppet chairs
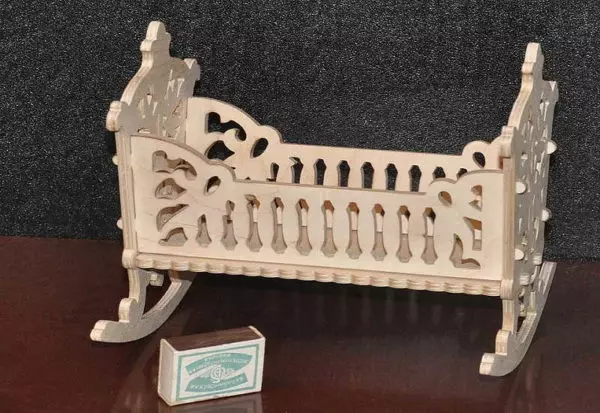
Toy Crib for Bumblebee
For those who have the abyss of patience
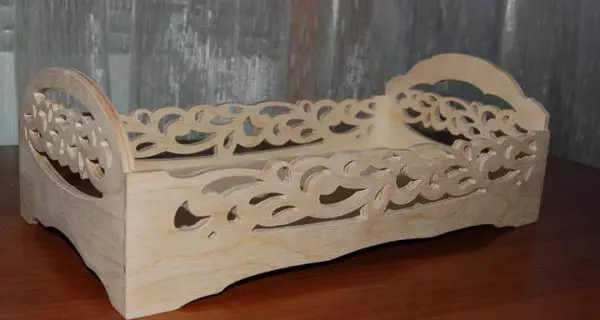
Carved wooden doll crib
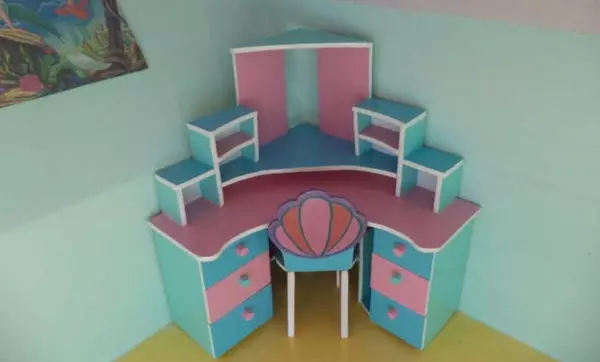
Corner writing desk for doll ....
Styles are different
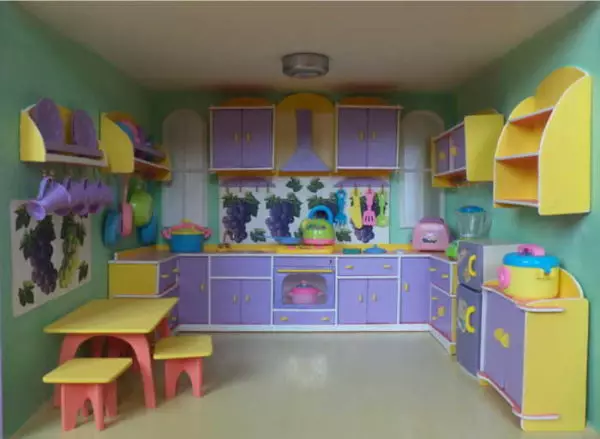
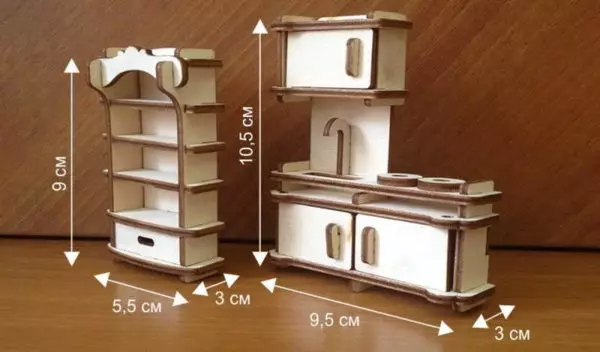
Furniture for kitchen in a puppet house
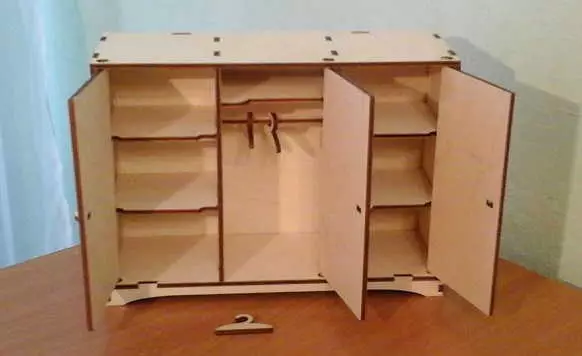
Plywood Wardrobe Cabinet - Play Accuracy Very High
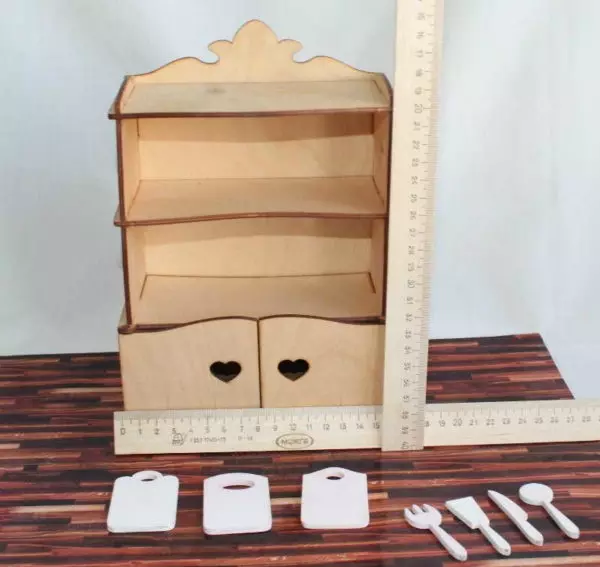
Kitchen cabinet with filling
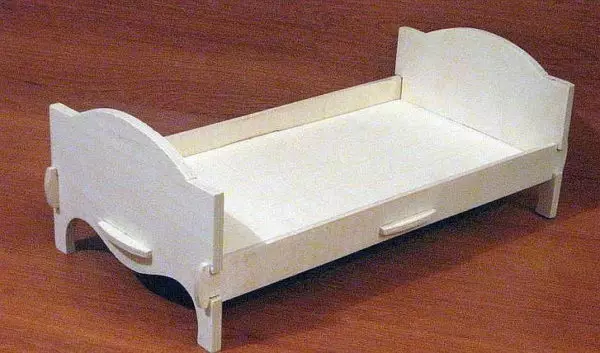
Cot plywood for dolls

Toy kitchen tables do it yourself from plywood
Highchairs for playing dolls
Article on the topic: How to stick to leak in the radiator?