
The balcony has long ceased to be a room for household needs. Increasingly, it is used as an extra living area or a place to relax. To enjoy the room and bring it in a residential look, you need to perform a number of activities on its glazing, insulation and interior decoration. In this article, we will consider step-by-step instructions, how to sew a balcony with plastic panels with their own hands, characteristics, advantages and disadvantages of plastic panels. We will tell you what to pay attention to when choosing a material for the internal finish of the balcony. You can order an internal finish in a construction company or finishing a balcony with plastic with your own hands.
Advantages of the loggia finish with plastic panels
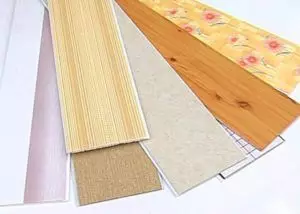
PVC panels are the best option for the interior decoration of balconies and loggias. How to properly sew a balcony with plastic panels so that the finish looks beautiful and served a long time.
Description of the advantages and basic characteristics of PVC panels for the balcony:
- The PVC panel for the balcony is environmentally friendly, safe for humans and animals.
- It has a relatively small cost.
- Lifetime from twenty to fifty years.
- The material is completely not afraid of the effects of high humidity and water.
- Resistance to ultraviolet. It practically does not fade, it does not destroy under the action of ultraviolet, does not distinguish harmful substances.
- Plastic does not change its characteristics when the temperature drops, frost-resistant, is not prone to deformation and rotting.
- Logging cladding with plastic panels will increase thermal insulation and noise insulation of the room.
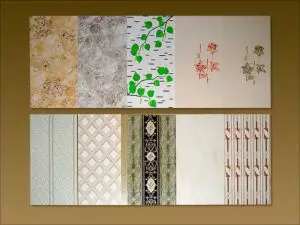
By what criteria choose the material to cover the balcony
There are several criteria for choosing plastic panels onto a balcony. Consider what you need to pay attention to, when choosing a material:- The number of stiffeners inside the panel affects the strength of the material than their more, the plastic will be stronger.
- Both sides of the plastic must be homogeneous, evenly scratched, without extraneous impurities and additives. In cheap models for the manufacture of the inside sometimes use raw materials recycling. Also a sign of recycled raw materials can serve a grayish tint.
- The edge must be perfectly smooth. When connecting parts, there should be no gaps between them. When the connection must be heard click. This speaks about the density of the material and good docking of parts with each other.
- There are PVC panels narrow 250 mm wide, and wide 380 mm wide. For an open or not warmed balcony, it is better to purchase narrow plastic. It is more resistant to seasonal temperatures.
For the ceiling, you can choose a cheaper material. For walls, more dense plastic is needed, since there are more mechanical effects on the walls.
Calculate how much the material goes, and what types of plastic finishing products need to be purchased.
To persuade the balcony panels PVC, you will need finishing plastic profiles:
- Straight panels for plastic walls. They are fixed to the crate with self-tapping screws or stapler.
- Corner with two grains The trim profiles will be needed to separate the angles of the balcony or loggia. Two profiles are connected to each other at an angle of 90 °.
- Corner profiles with three edges will be needed for decoration of slopes. The three profiles at an angle of 90 ° are connected.
Article on the topic: how to sew classic curtains in the living room with your own hands
We measure the perimeter of the room, which will be plastic. The resulting value is divided on the width of plastic. We get the desired amount of material in pieces. We take about the supply of a few pieces.
Decoration balcony plastic with their own hands
The lining of the balcony with plastic panels will take from four days to a week. Sewing balcony PVC panels will be in several stages. Before the inner trim of the loggia, it is recommended to install a balcony frame, perform the repair of the balcony plate, close all the gaps. When finishing the balcony panels, the PVC are all elements secure strictly by level.
To qualitatively shelter the balcony plastic, we need a phased plan for performing work.
Steps to perform a balcony with PVC panels with their own hands:
- We estimate the state of the balcony. We pay attention to the stove, walls, ceiling. If the stove requires repair, you must perform this stage of work first. The ceiling is examined for the presence of yellow or brown spots, they can signal leaks. If the balcony is suspended, it is recommended to replace or strengthen metal fences.
- We carry out work on glazing balcony. If you do not plan to make a living room from the balcony, it will be enough to install a frame from a three-chamber profile with a single-chamber double-glazed window. It makes sense to order a glass stack with an energy-saving coating.
- All slots on the balcony are filled with cement mortar or bleed by mounting foam. Foam is better to grab if applied to a moistened surface. When the foam dried, cut off all the protruding parts and cover it with a sealant.
- We lay a vapor barrier layer. To do this, it is necessary to fix on the perimeter of the room a vapor insulation material.
- Make the crate on the ceiling and walls. Wooden rails or metal profiles can be used for the crate. Reiki must be dry and smooth. It is inconvenient to mount the PVC panels to metal profiles, but their use is appropriate on open balconies with high humidity. If the mount is vertically, the crate must be attached to the wall horizontally. Read more Process is shown on the video, see:
Article on the topic: How to make a stretch ceiling with your own hands (video and photos)
Phased Mounting Fitting Plan
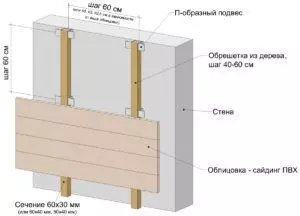
Mounting scheme shaft and facing material
The doomle is an important element, on which the evenness of all edges and surfaces of the panels depends. To implement the installation, you must perform the following steps:
- In the rails every half meters drill holes. Through these holes, secure slats to the ceiling and walls. If the surface is concrete, you will need a perforator. If the brick, then it will be enough electric drill. Can be mounted on a dowel.
- Reiki Brepim strictly by level, in parallel to each other with a pitch of 400 mm.
- Lower Rake Brepim at a level of 30-50 mm from the floor.
- We put the insulation between the slave racks. Fix it with glue. A foam, polystyrene foam, mineral wool can be used as insulation.
Planned electricity to your balcony, we think over the location of the lamps, switches. Stretch the wiring.
Step-by-step guide: how to shelter the loggia plastic
We carry out all stages of the interior decoration step by step:
- We start sowing the room from the ceiling;
- along the entire length you need to install the starting guide;
- The first profile is fastened with self-drawing to the frame, to the ceiling is fastened on a dowel. It is necessary to attach it in terms of the level, otherwise all the following panels will go to the skew;
- Panels Brepim to guide self-drawers or brackets with a stapler. See the process on video more details:
Install plastic panels start with angle
When the ceiling is ready, go to the trim of the walls of the balcony panels PVC:
- Installing plastic panels on loggias start with angle;
- We set the guide profile in the first corner;
- Cut the starting panel in size, insert it with a narrow side in the groove of the guide angle;
- Cut the panel and connect with the start panel to the zip-groove lock with a high-quality connection, a click is heard.
We control the details firmly fit to the guides and each other. On this principle we are wearing the entire perimeter of the room.
The first panel must be installed in the vertical attachment of strictly perpendicular to the floor and ceiling. The rest will be equal to it. We carry out the trim of the loggia and the balcony panels of PVC with their own hands using a high-quality construction level. An insignificant skew of the first panel will spoil all the trim of the loggia in the finished form. The panels need to be consolidated so that they fit tightly to each other.
Features of the mounting panels on the wall with the windowsill
How to separate the wall on which the windowsill is attached? It is necessary to fix the guides to the floor and under the windowsill strictly parallel to each other. Next, we are separated by plastic according to the scheme described above. For details, see this video:
Article on the topic: How to glue wallpaper on the kitchen wallpaper: advantages and disadvantages, admissible and prohibited cases, work with paper, vinyl wallpaper, instructions for sticking, photo, video
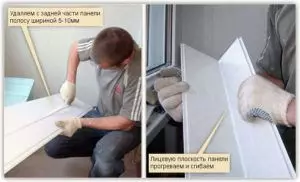
During installation, the last and penultimate panel is pre-prepared. This is a rather complicated and capacious part of the work. To do this, the last board should be cut off the width to the height of the tongue (6-8 mm) and add one millimeter. Trimming is easy to perform with the help of a stationery knife. If necessary, the transverse cutting can be used for metal with metal.
In the finish guide drops, squeeze silicone. Insert the penultimate panel with the last panel, pre-fix the panels with each other.
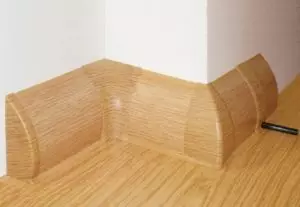
At the end, we perform the floor lining and install the plinth.
The finished loggia should stand for a day until Silicon will find, on which the last detail was fastened.
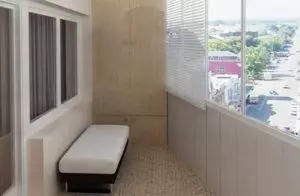
The balcony, covered with plastic, looks very beautiful. The plastic installed in terms of the level is well joined and will serve as an additional noise insulation, and will also significantly increase the thermal insulation on the balcony. Your balcony will be clean and neat to envy all neighbors. It will be nice to sit with guests a summer day, or you can organize a winter garden on a heated balcony.