
Installation of the mixer for the bathroom does not include particularly complex manipulations, in this process the main thing is that the distance between hot and cold water removal points coincides with similar holes on the wall. It is worth considering the installation in two versions: setting a new mixer with general repair when the bathroom is placed from scratch, and simply replacing the old mixing system to a new one. These options are similar to each other, but there are small nuances of differences.

Mixer diagram for bathroom.
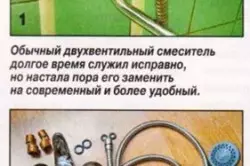
Choosing a mixer for the bathroom
First of all, you need to purchase a good and high-quality model that will last long. The quality of the model can be determined by weight.
The good mixer cannot be lightweight, the thickness of the metal affects the long-term service.
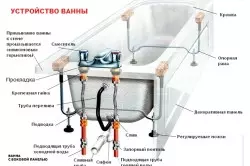
Bath device with mixer.
We should not forget that a heavy model may have a number of shortcomings, but the factor is the fact that the manufacturer has not saved on the material, is already a good sign. Often mixers are made from silumin and brass. Silumin is a silicon and aluminum alloy, it is not so reliable as brass. Common "disease" of silhouette mixers - broken handles and blasting presser nuts.
Silicon mixers do not differ in durability, but are successful due to their low price. Brass models are more massive and have a high viscosity alloy. Making the installation of elements made from brass is guaranteed the absence of deformation during the installation process and upon subsequent operation. Specifications are also important, the mixer must correspond to the place where the installation will be made, because there are embedded models, for example, on board the bathroom, which are absolutely not suitable for installation on the wall. Be sure to consider the nuances of working parts - the length of the spout, the hose, the equipment to install the watering can on the wall, etc.
Article on the topic: What wallpaper is better suitable for the bedroom: 10 tips on the choice
Dismantling of an old mixer
A dismantling diagram of an old bath mixer.
After the choice is defined, and the desired model is purchased, you can proceed to the dismantling of the old mixer. The first thing is overlapped with the water supply to the bathroom, then with the help of an adjustable or wrench key, the mixer is neatly unscrewed from the wall, while it is necessary to ensure that it is not necessary to damage the carvings of the stationary fitting connected to the water supply. It will be worthwhile to check the lumens of the pipes of hot and cold water. Garbage and dirt may accumulate there that need to be deleted. Fitting thread must be cleared of winding residues. Before making the installation of a new mixer, you need to collect it, because the mixers are often sold in a disassembled state. When buying also carefully trace the presence of parts in the box. These details must be listed in the attached instructions and are packaged into separate tissue or cellophane bags. When buying carefully consider the integrity of the thread on the fastening nuts and the eccentrics.
The mixer for the bathroom consists of the following details:
- main unit;
- shower hose;
- gander;
- Shower canoe;
- Decorative Plafones,
- pads;
- Eccentrics.
When it is installed, you will need the following tools:
- Fuma tape or pacle with special paste;
- roulette;
- set of wrenches;
- gas key;
- adjustable key;
- Passatia;
- Cross and ordinary screwdriver;
- bubble level;
- Hexagons (6, 8, 10, 12).
Installation of the mixer in the bathroom
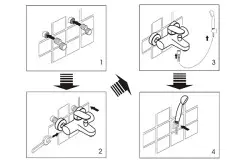
Bath mixer mounting circuit.
After the mixer is assembled, you need to make sure whether the distance between the nozzles of the mixer corresponds between the pipes on the wall . If it is suddenly observed, then with the help of eccentric adapters installed on the supply pipes, the situation can be corrected. Threaded compounds of adapters and pipes before installation are wrapped with fum-ribbon or palauls, impregnated with special paste. After that, the adapter is satisfied with the fitting and screws up clockwise. In order to completely spin eccentric, a wrench is used. After both adapters are installed, the installation accuracy is checked using a bubble level. If necessary, the position of the eccentric is regulated by a wrench.
Article on the topic: How to adjust the interroom door so that it does not close
Decorative lids are often installed on the place of connection of the mixer and supply pipes, after their installation between the fastening nuts and eccentric adapters, put sealing gaskets, then you can start setting the crane. Cape nuts are planted on the threads of adapters, then alternately, to avoid breaks, the left and right nuts are tightened to the end. After that, it is necessary to include hot and cold water. This is done in order to make sure that there are no leaks between the parts of the cranes and at the mixer's junction with a plumbing. If leaks are detected between the supply pipe and the mixer, tighten the stripping nut. If this manipulation does not help, then remove the entire device and do the installation again, but with a large number of sealing materials during the installation of eccentrics.
Installing the mixer to a new wall
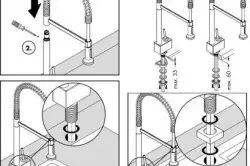
Installation scheme of mixers.
In the case when the installation of the mixer is carried out from scratch, the most used option is metal-plastic or plastic pipes that are connected to the main pipeline. When connecting the pipes, the overlapping ball valve is installed, then the pipes are displayed to the place of installation of the mixer and are attached with special grabs to the wall. The ends of the pipes are displayed at a level of 30 cm above the bathroom. This is the standard height of the mixer, the fittings are attached to the ends of the pipes to further compound with the mixing unit.
To remove fittings, some parameters are usually complied with:
- The distance between the fittings centers is at least 150 mm;
- the location of the fittings on one horizontal, relative to each other;
- The location of the end of the fitting after installation flush with the surface of the wall;
- parallel location of fittings when looking from above;
- The installation height of the mixer above the bathroom is about 30 cm.
And so as not to scratch nickel-plated parts, wrap the sponges of the keys with a conventional vinyl tape designed for installation work. The bath or washbasin will also be worthwhile to cover with a cloth or cardboard to avoid damage, because the heavy elements of the mixer or tools during a random drop can cause irreparable harm to faience or acrylic products.
Article on the topic: Smokehouse in the country with your own hands