
Plinth is made from various raw materials, including MDF. It is presented in the form of a fibreboard of medium density plates. The stove is made due to dry chips pressed under significant pressure and temperature. Installation of plinth from MDF is easily carried out with their own hands.
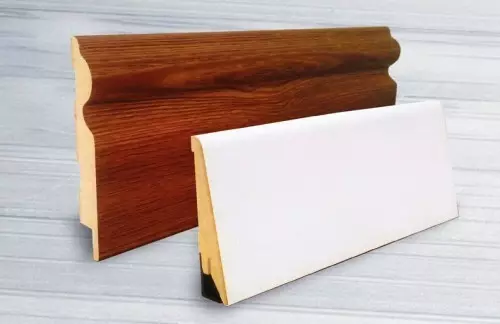
Plinth from MDF will not crumble and do not need special care.
Main ways
The product under consideration is subject to installation in rooms with various finish coatings:
- tile;
- linoleum;
- Carpet.
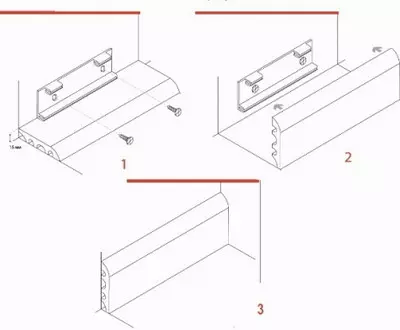
Installation of MDF plinth on special clips.
To install the MDF of the Plintus, special accessories will not need, in the task of which the connection of 2 slats in the corners is included. Therefore, they are bugged. It should be noted that such installation is carried out using special equipment.
This work is carried out in several ways:
- due to self-tapping screws;
- with glue;
- on fittings.
Before starting the installation of the plinth, you need to level the walls. This is explained by the fact that MDF is a very fragile material. As for the use of a special tool, this unit is represented in the form of a stub. It helps cut the plinth at a certain angle, providing the perfect knock of the layers among themselves. If this product was cut unevenly, then the resulting gap is rubbed with the help of sealant. It should be noted that such a marriage will not work. Plinth from MDF is lighter than wood, so it is easily installed.
Application of glue and screws
Plinth mounting diagram with screws.
The easiest method of fixing the plinth of the MDF provides for the use of glue or liquid nails, stouch, level, tape measure. This method is to glue this product on the wall. Initially, unlock the desired amount of rails, taking into account the specified angle. To cut off the measured part of the product, you will need a stub. Then glue is applied to the plinth and applied to the surface of the wall. So that the connection was more reliable, then it is recommended to apply glue 2 times.
Article on the topic: The principle of operation thermocouples
Installation of plinth on such technology has some drawbacks. In the case of its dismantling, the wall is damaged or a glued rail. The duration of such a procedure is associated with the requirements that are presented to the surface of the walls of the walls. If the installation of plinths is carried out on uneven walls, then the mount is not considered reliable.
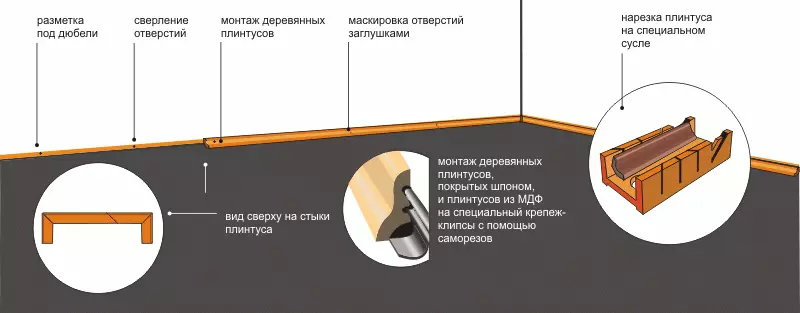
Another method of installing MDF plinths involves the use of self-tapping screws, screwdriver, level, stusl and line. Reiki washed down in Stusle. It is necessary to take into account that the self-tapping screws are located in the middle of the plinth 50 cm from each other. For uneven walls, this indicator is reduced to 30 cm. The first fastener must be screwed into 10 cm from the edge of the rail. At the final stage, you will need to hide the screws under special caps. They need to be selected in the color of the plinth. To this end, the use of putty is allowed. This technique is considered reliable and allows you to well fix the plinth to the wall. If necessary, the rails are easily dismantled. However, specialists are not recommended to carry out such work. The disadvantage of this method is the complexity and high demands that are presented to accuracy.
Furnitura allows you to carry out the installation of the rails, without damage to the plinth and walls.
The presence in a flexible system of special channels for the cable allows you to hide in the accessories of the wires of various communications.
With the help of the plank make marks where the holes under the fastening elements will be placed. Initially, dowels insert into the holes. Then screw the screws. It is allowed not to screw, but gluing accessories. In this case, there is a significant saving time.
Additional Information
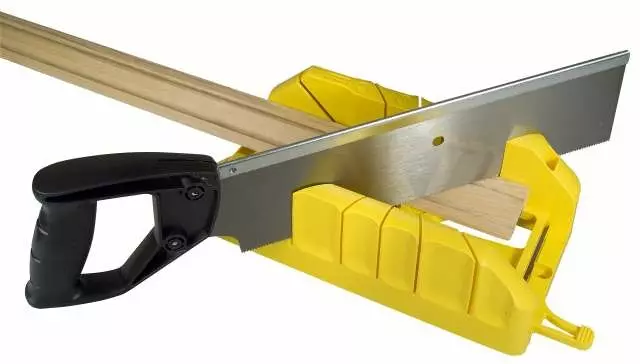
To cut the MDF plinth under the desired angle use special tool - stub.
For mounting the plinth (regardless of the selected technique), rains of various lengths are used. It should be noted that the MDF is manufactured in a length of 2.6 m. To install it, it will be necessary to find out the parameters of the room. It is recommended to add 2-3% to the result obtained. This will allow you to compensate for the material during trimming.
Article on the topic: Fabric rolets on the windows with their own hands
Often the plinth of this type is fixed to the wall with hooks hound up. Their width is 10-15 cm. They are attached to the wall by self-draws and dowels, the dimensions of which are equal to 6x40 mm. In the perimeter of the room, they are installed with an interval of 50-60 cm. Then the rails pressed to the locks. For their docking use external and internal plastic corners.
To cut the MDF, you can use the metal hacksaw. Such a procedure is performed with low vibration, while the rake in the direction of the break is minimal load. It is necessary to take into account that the mounted product has high moisture protection. However, it is not resistant to mechanical influences. Therefore, experts do not recommend mounting plinth from MDF in the children's room. In this case, you need to give preference to RIKS from PVC.
If you need to change the contrast of the plinth, then in front of its installation MDF is covered with the paint of the desired color. Thus, households can avoid performing additional and time-consuming procedures. It is allowed to perform such work after mounting the plinth. In this case, the rails and walls protect against paint with a special painting ribbon. For finish coatings from parquet and laminate, it is recommended to use MDF wide. It not only has an original appearance, but also is considered a more practical plinth of this type.