
How nice to hide or just lie down in a warm and fragrant bath, knows every apartment resident. Now there are many different types of baths, but one of the main requirements for them, along with beauty and convenience, is the following: the bath must be stable. Buying this subject to the house, the owners acquire with him special legs, providing a bath with support. Most people believe that this is not enough and that more reliable will install a bath on bricks. Why many owners prefer bricks specially intended for sustainability cups with metal legs and how to install a bath on bricks right?

Any bath should be steadily standing on the floor, relying either on special legs or on the foundation made of bricks.
Why do you still need bricks
There are several reasons why the bowl is installed on bricks. Baths are made from different materials. Most often it is iron, cast iron and more modern acrylic. Cast iron baths when installing on legs are quite stable due to its heavy weight. Steel and acrylic bowls are easier. If you put such a bath on the legs, it will be dangerous to steer, scaring the owners, which will prevent them comfortably and with pleasure to wash. The second reason is that, staggering, bathing tank can damage or scratch the walls of the bathroom. In addition, if it is loosely attached to the wall, water will fall into the gap between his side and the wall when washing. Since the bathroom is constantly wet, the mold will begin to appear in the creams and on the walls.To avoid health problems and save the aesthetic look of the room for making hygienic procedures, the owners prefer to attach static baths by installing them on bricks.
How to give stability to a cast-iron tank
The most important difficulty in installing a cast-iron bathing for brickwork is a heavy weight, so the installation work is recommended to perform together. For watering the bath on bricks, the following materials and tools will be needed:
Article on the topic: How to wash plastic windows and window sills at home
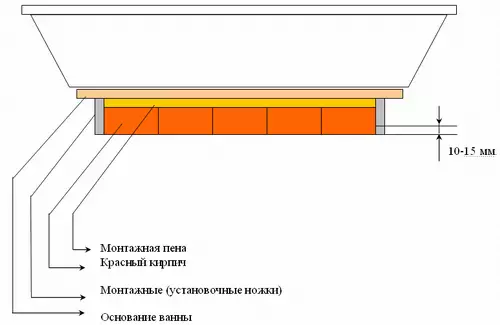
Bathroom installation circuit on a brick basis.
- bricks (at least 20 pcs.);
- Sand and cement for the solution;
- Sudine for a solution;
- shovel;
- Tile glue;
- brush;
- trowel;
- building level;
- ceramic tile;
- screen.
At first, the owners need to decide where the bathroom will be located in the bathroom. The next step is to prepare bricks. Usually there are across the tank of columns height in 2 or 3 pieces. From two sides of the baths around the edges, which are higher, add half the brick. The height of the tank installed on the brick supports from the side to the floor should not exceed 70 cm, as it will be difficult to climb into it. The height of the bath should allow the siphon function normally. The number of rows is calculated based on the length of the bathing. The distance between them ideally should be about 0.5 m.
The next stage is the preparation of a mortar from cement and sand in a ratio of 1: 4 + water. Then the brickwork is performed. In order for the solution better to clutch with the bottom and the outer walls of the bowl, the masonry gives the minimum of the day to stand out.
An important point in laying the base of the brick is a high-quality solution: a ratio of 1 to 4 plus water.
Next on the bath you need to install a siphon with overflow. For this, the tank is laid by the side, and the drain hole intended for the siphon is equipped with rubber pads, the tightness of which will prevent water leakage. The prerequisite for the good functioning of the siphon is the location of its output nozzle above the sewer tube with the drain.
After 24 hours, the tank is set. Its edges and side surfaces are recommended that will be brought to the wall, as well as the wall itself to lubricate with tiled glue. It will securely connect the bath with the wall, providing protection against moisture. Then the level laid on the bottom of the cast-iron bowl aligns its surface and install the bath on bricks. The bath must stand on a laying in a strictly horizontal position. Sometimes the internal side of the inner side of the tank of 0.5 cm relative to the outer is allowed in order for water when bathing is not spilled on the floor.
Article on the topic: How to clean the sink from a cloth in the bathroom
When the bowl is firmly installed and secured by cement mortar on brick supports, the hosts connect the sewage sleeve with a drain with a plastic corrugated pipe and a knee with a 45-degree angle. To check whether the installation is performed correctly, you need to fill the cast-iron bowl with water and open the drain. The liquid should be easily leaving the reservoir.
The final stage of the installation of the bath will decorate it. It can be made in several ways: set the screen or bind bricks with beautiful ceramic tiles, not forgetting to leave a hole to access the siphon.
Durable position of steel bowl
Installation of the iron bath occurs in a similar way. For work, in addition to the above materials and tools, you will need more:- Roll materials "Gerlend" and "Gerlene D";
- Rubber gaskets.
Bricks and the solution are prepared in the same way as in the case of installing a cast-iron tank. The difference is to prepare the iron bath for installation. Since the steel tank has thin walls and the bottom, on those of its places that will be installed on the supports of the brick, it will be necessary to stick a layer of the "Gerlene D" coal material. This gasket material is made on the basis of a synthetic rubber with a layer of fabrics applied to it. Plus "Gerlene" is that, thanks to this basis, it will help the iron bath to preserve the shape, because steel under the influence of temperatures can change its size. Another rolled material is a soundproofer. If you go through the entire surface of the tank outside, the noise published by water when pouring it into the iron bath will not be so heard. For this purpose it is better to use "Gerlen", duplicated by foil.
After pasting the entire outer surface of the bowl or its separate places, the wall of the bathroom, the sides and the side of the tank adjacent to the wall are deceived by tiled glue. Then there is a fitting of bathing on brick columns. Installation is made by level. Rubber gaskets help align the bathhouse. As in the case of a cast-iron reservoir, the outer edge of the bowl can be 4-5 mm above the adjacent wall. When the installation of the bathing will be made, you can fill with sand-cement mortar all the space between brick columns. And the last touch, as in the case of a cast-iron bathroom, is the installation of the screen or laying the ceramic tiles covering the bricks.
Article on the topic: How to sew baffles for curtains yourself?
How to strengthen acrylic tank
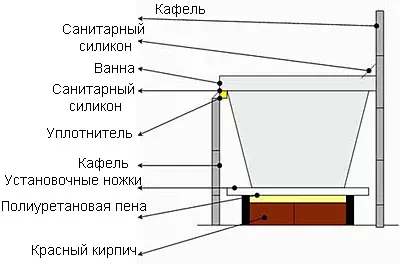
Acrylic baths are very lungs, so it is better to put them in the frame built of bricks, laid out in Polkirpich. It will need to leave a hole to access the siphon. Between the bottom of the bowl and framework requires a centimeter clearance. When the solution in the brick frame dries, the bath should be installed in it. The clearance is filled with mounting foam.
In the bowl of the reservoir, you need to pour water to allow the foam "stick" under the weight of the bath. The bath of the bath with the wall is recommended to be sealed with a silicone tape-sealant. Thus, it is not difficult to install the bath on the brick base with your own hands.