
During the repair of any complexity, the domestic wizard may have questions about how to deal with cracks on the ceiling and walls. On the quality of their sealing, sometimes the result of multi-day works on the design of the apartment depends.
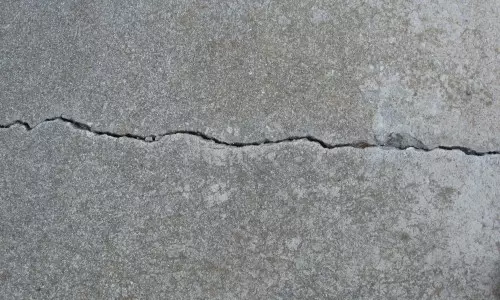
Cutting cracks can be caused by different reasons: due to the movement of overlapping, poor-quality finishes or due to violations in the installation technology.
The nature of cracks on the ceiling can be different and depends most often from the material from which the ceiling is made, from the quality of plaster and compliance with technology, from the reasons independent of builders, etc. In any case, it will have to process and eliminate these defects. You can do it well and with your own hands.
Ways to repair cracks on the ceiling
Available to self-eliminate problems of methods several:

Small cracks on the ceiling can be sealed by putty.
- The point shtpocking is performed if the crack is small and is not associated with a moving slab slabs or drywall sheets from which the suspended ceiling is made. Performed only in a problem location.
- With a large depth and length of a crack, associated with a sedimentary house or poorly laid ceiling slabs, a crack filling with various materials is used.
- If a colorful coating or layer of plasters, larger work will be required: it will be necessary to remove damaged parts and fill out the resulting recess. To learn about the presence of such a problem, you need to catch a plot around the crack. The deaf "empty" sound will indicate the detailed part of the coating or plaster.
- Cracks on the ceiling from GLCs arise due to violations in the installation technology and require sucks.
- Decorating defects with the help of suspended, stretch or other types of ceiling coatings. This method is used if it is impossible to repair the crack in the ceiling otherwise.
Article on the topic: Furniture arrangement in a small room
How to prepare for work?
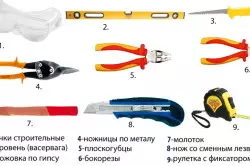
Tools for mounting and repairing drywall.
Before starting work to eliminate defects, it is required to carefully assess their dimensions: to estimate the state of the plaster, find out the true width and the depth of the crack. After evaluating activities, it is possible to choose an acceptable method for the repair and engage in the acquisition and preparation of such materials and tools as:
- dry mix dry mix for putty (cerezite or other);
- reinforcing grid;
- sealant, foam or other fillers;
- PVA glue;
- primer mixture of deep penetration;
- spatulas;
- a container for the solution;
- Pulverizer with water.
The detached part of the plaster is required to be removed completely to the layers that preserved strength. A deep crack caused by the displacement of the slabs of the overlap, to clean up from plaster, putty, decorative coating, etc. The defect between the GLC is free from the sickle or the reinforcing ribbon, if it is, to clean up and sharpen a knife to remove the chamfer from the edges of the adjacent plates of GLC. Repaired surfaces thoroughly clean from dust using a pulverizer with water. Such a measure is needed due to the fact that modern mixtures for shtcocking are made on the basis of plaster and have low adhesion to a dry surface. Neglect of such trifle as the removal of dust and wetting the surface will result in the formation of a new crack on the ceiling after repair just fixed.
Ceiling Defect Technology
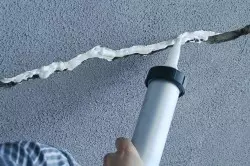
Deep cracks are filled with mounting foam, sealant or rag, moistened with PVA glue.
Small cracks need to be accurately filled with a mixture prepared by the manufacturer to be prepared according to the manufacturer's instructions for putty, with a strengthem rubbing it to ensure the filling of the cavity inside. The mixture protruding on the surface of the ceiling is removed by the same spatula and as closely can line the area around the repair point. After drying for 24 hours, the scalded crack and the seats adjacent to it sandpaper sandpaper, seeking smoothness and removing possible irregularities. After that, the ceiling can be painted or separated by another way.
Article on the topic: Hall in the style of Hi Tech
Deep cracks that arise due to building shrinkage in new buildings, repair will have to otherwise:
- The crack prepared for the repair is filled with by mounting foam, sealant or tightly fill the rods, moistened with PVA glue. Sealant Fill the crack, the spatula neatly removing the surplus, which fell into the ceiling site near the crack. After soaring the sharp knife to clean the surface before smoothness. Mounting foam is distinguished by the fact that it is capable of expanding and filling out all the cavities independently. Following the manufacturer's instructions, it is filled with a crack, and after setting (24 hours), the excess is cut with a knife, leveling the repaired area flush with the ceiling around.
- Moisten and clean the surface and apply a thin layer of finishing putty, aligning it with a spatula. After drying during the day, sanding the site to full smoothness and restore the decorative finish.
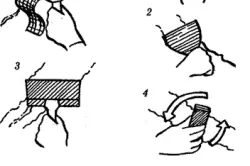
Cracked sealing scheme.
If the cracks appeared as a result of the detachment of plaster or paint, then the stripped and moistened site requires a primer composition, and then the layer of the spacion mixture, filling the excavation in the preserved coating. It is convenient to do this with a wide spatula or rule, spending it immediately over the entire surface of the repaired site.
With a significant depth of the excavation, it is best to fill it in several receptions, slightly dried by the previous layer, the surface of which is not aligned.
After completion of the work, the putty must dry during the day.
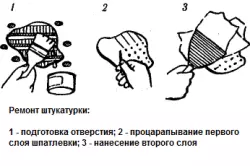
Repair of detailed plaster.
Then the finish mixture needs to be lost the small cracks, if there are, causing and leveling the thin layer of putty. After drying it, it should be sanded and painted.
Cracks between the sheets of HCL with the light wave filled with a mixture for putty, align the surface. On the seam to impose a reinforcing mesh or sulfyan and apply a layer of the finish mixture. Wait for it drying for 12-24 hours. Apply a primer composition of 1-2 layers. Slop the thin layer of the finish mixture. Align her, dry and sand up to a smooth condition.
Article on the topic: Label for the arbor do it yourself: manufacturer of wood
If it is impossible to repaired a crack on the ceiling with your own hands, you will have to stick to the ceiling decorative polystyrene foam tile. To calculate the number of tiles to draw out on the scale of the ceiling plan and apply a grid of lines in a step, which is equal to the size of the tile on the same scale.
It is possible to replace the tile with wallpaper or glass oxide under the color, but in these cases it should be remembered that the cracking slabs caused by the displacement or the walls of the crack will increase and will cause the disclosure of the wallpaper, the breaking on them, the breakdown of the tiles and other troubles. In the new buildings, the process of shrinkage of the building can continue for several years and only after its ending it will be possible to qualitatively eliminate the defects caused to them and make final repair of cracks.