
Repairs in a private house, in the apartment or at the cottage is a very important and responsible task. An integral attribute of any repair is the arrangement of a new ceiling. To date, attachments are increasingly used using drywall sheets.
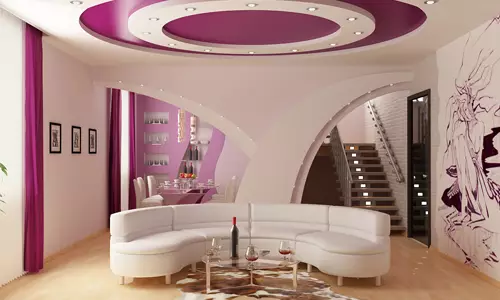
From the drywall, you can make a ceiling of any form by adding backlighting and other elements as desired.
Plasterboard found applied not only when the ceiling device, but also in the manufacture of window slopes and partitions. Not many know how to see the ceiling by plasterboard correctly. Plasterboard sheets (GLC) are the most affordable material. They are a design consisting of several layers: a layer of plaster filler located between two layers of paper. What are the main stages of work on the arrangement of a plasterboard ceiling?
Features of mounting plasterboard
The advantage of drywall in front of other materials is that with the help of special processing it can take various forms. Ceiling can be made simple and multi-level. In the latter case, certain skills will be required. The easiest way to make a mounted ceiling with one level. At the first stage of the work, it is required to inspect the old ceiling coating. If it has defects (cracks, recesses), they need to be seen. To do this, it is advisable to use putty. To impart the surface of strength and evenness, you can apply a layer of primer. To do this, you need to take the primer of deep penetration.
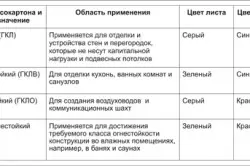
Types of drywall and color marking.
The chart of the ceiling device includes markup. Here it is necessary to know that the minimum distance from the old ceiling to the new is 5 cm. In the process, it is necessary to remember that ventilation pipe, electrical cable and other communications may be subsequently located in the interpostic space. Taking into account this, the optimal value of the interporal space is selected. Meat the height of the future ceiling should be started with the corners of the room. First, the lowest angle is determined, then the distance from it to the floor is measured. This will be the height of the new ceiling.
Article on the topic: We understand how to sew a Swag yourself
How to put the surface of the ceiling
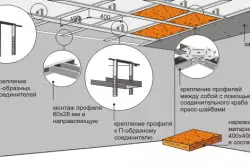
Before we see the ceiling, it is necessary to determine the contour of the suspension design. For this purpose, a laser level is applied. It is installed in the lowest part of the ceiling. Accordingly, the resulting circuit carries out a line throughout the perimeter of the room, which will serve as a landmark when installing drywall sheets. To seize the ceiling by plasterboard, you need to prepare the basic elements for forming a frame. They include:
- guide profiles;
- main ceiling profile;
- connector;
- Direct P-shaped suspension.
Until recently, many citizens crossed the ceiling with clapboard, but the lining fit is not suitable for any room due to the fact that it is made of wood. To seize the ceiling with clapboard, you need to correctly calculate the amount of material. It also applies to drywall.
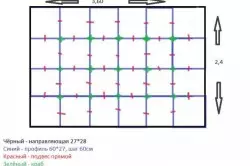
An example of a ceiling frame markup for plasterboard.
To decorate them the ceiling, you need to know that the area of the plasterboard should be equal to the surface area of the ceiling. Acquire sheets better with a reserve, as they often need to be cut. As for the guide profile, its length coincides with the perimeter of the room. The ceiling profile is installed by rows. When attaching the first and last row, 30 cm from the wall is made. The distance between all other rows is 60 cm. On 1 m ceiling profile there are 1 p-shaped suspension. The number of direct connectors is determined by the number of rows of the ceiling profile.
Installation of metal profiles
To independently make a suspended ceiling with plasterboard, you need to secure profiles. In order for plasterboard or plastic lining on the ceiling, it is required to make a frame. The first thing is to install guide profiles. Immediately before, you need to turn the axis on which they will be attached. Metal profiles guides should be located around the perimeter of the room. For their fixing, screws with wrenches are used. You can use dowels. Following them, you need to consolidate the main ceiling profiles. They should be located in the transverse direction.Article on the topic: Electricity for curtains: species, characteristics and features
To be between them the same distance, it is advisable to make pre-marking. Along the outlined lines, special brackets are mounted. They are located at a distance of about half a meter from each other. They are used as suspensions for major profiles. The ends of the carrier profiles must be mounted in the grooves of the guides.
Mounting plasterboard
Installation of plasterboard ceiling.
In order for the room to look beautiful, it is required to make a metal frame cover. Here you need to follow several important rules. First, it is recommended to start with that angle of the room, which is more even. Secondly, the installation of sheets is most often organized in a checker order. Thirdly, for fixing drywall, you need to use self-tapping screws with flat hats. So that there is no savory, it is advisable to screw the screws evenly throughout the plane of the sheet. Fourth, hats of selflessness should be recessed a few millimeters. Otherwise, it may make it difficult for the shtlock.
When creating a mounted design, it is often necessary to cut sheets. To do this, the stationery knife is used. Sometimes you have to cut certain figures from drywall. To do this, make an incision to the desired configuration and carefully break drywall.
Fifth, after installing sheets, it is necessary to apply a layer of primer and smear with putty all available joints. On this work does not end. The next step is to apply the finish putty. It is distributed over the entire area of plasterboard sheets. Then the layer of putty is subjected to grinding, ground. The last stage of repair is the final finish. To do this, you can use wallpaper or other decorative materials. Hanging ceiling is ready.
Tools and materials
To make high-quality repairs in the house and make your own hands to make a hinged ceiling, you need to have a set of tools and materials. It includes a metal profile, brackets, drill, screwdriver, screws, screws or dowels, scissors for metal, thread, laser or water level, cross mounts. In addition, you will need a 1.5 meter rule, roulette for measuring, pencil, line, stationery knife, drill, hammer. To eliminate the defects of the old coating, you need to have a putty. For processing drywall, the primer will be required.
Article on the topic: Skuring walls after putty
Thus, drywall is an excellent material for the construction of the mounted ceiling. It is comfortable, has a small mass and a low price.
Much attention is required to pay the surface markup and montage technique.
From this largely depends the level of design and its aesthetics. If compliance with all the requirements described above, the ceiling will delight for many years of owners and guests at home.