
You can do everything from drywall, everything you need to improve your housing, and quickly and efficiently. In order to understand as much as possible, how the structures are installed from this material, you need to know which products are used for the framework of the framework, which is seized by plasterboard.
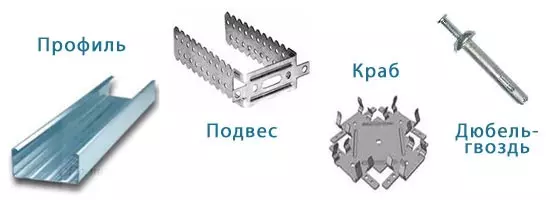
Types of plasterboard mounts.
What is required for mounting plasterboard structures
- Metallic profile. The most popular products of this plan - PP 60/27 (the profile ceiling with the size of the ribs 6 cm and 2.7 cm), PPN 28/27 (profile guide with the size of the ribs 2.7 and 2.8 cm), PS (rack profile) with dimensions Rib 50/50 and 50/75. Standard product length - 3 m, but there are 4 meter.
- Suspension straight or shortened. It is a thin but sturdy metal plate, which has several rows of holes. This product is intended for fixing metal products in a specific "suspended" position, that is, at some distance from the wall or ceiling. The mounting of the suspension is simple: first of all it needs to be bent over the existing grooves and give it a P-shaped form. Then the suspension is applied to a concrete or wooden base and in the holes that are located in the upper part of the metal, screws are screwed. Perforation, which is located at both ends of the suspension, serves to fasten the metal products to it.
- Spring suspension. In the event that the height of the "legs" of the direct suspension lacks and the design must be lowered well below, use products that have a wire with a crochet at its end. Its standard length is 12.5 -15 cm.
- Connecting elements. This is a rather large group of products that are used when it is necessary to increase the profile length (connector docking), strengthen the places of their cross-shaped intersection (connector single-level crab), coping the profile in the angles (corner connector), connect profiles (duplex connector). There are other options for fasteners, but the listed are used most often.
- Saws. To fasten metal products with each other and connecting elements, tapping sores 3.5 / 11 are taken, which is indicated in the trading network as a screw self-tapping with an acute end or with a drill on it. The builders are called "sharp seeds" or "seeds with a drill." You can use and self-tapping with a press washer. To mount on the frame of plasterboard, use self-taking screws or self-tapping screws on GWL.
- Dowels and Anchors. These fasteners are needed to fix the guide profile and suspensions to the concrete base.
Article on the topic: how to bring bed bugs at home by folk remedies
Align the walls with drywall
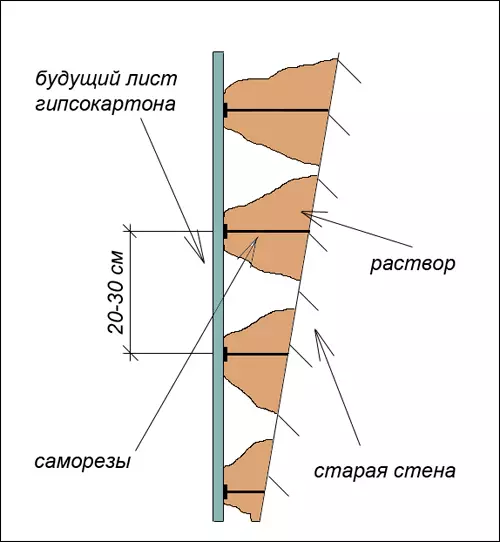
Wall alignment diagram with plasterboard.
In order to make smooth and durable walls in the apartment, you will need PPN 28/27, PP 60/27, the straight suspension (if the aligning wall is planned to be arranged quite close to the main, you can take the suspension), drywall and screws. If necessary, you can use dowels or anchors. You will need a screwdriver, roulette, pencil, construction level and perhaps the perforator. For cutting profiles you need scissors for metal.
Before the construction of the framework, you need to decide whether the wall will be insulated or simply aligned. It depends on what distance from the main wall there will be plasterboard. Due to the fact that there are suspensions, the width of the opening can be varied, as far as the length of their side sides allows. Further, it should be noted that each vertically installed profile will require a minimum of 3 suspension (with a standard height of the room 2.5 meters). That is, a metal rack must be fixed at the bottom (no more than 30 cm from the floor or ceiling), above and in the middle. The distance between the vertical profile should be 40-50 cm.
In accordance with these recommendations, on the wall of the pencil, there are points in the right places, which are attached to the screws or dowels curved in the form of the letter P suspensions. Next, you should install the guide profile. To do this, the distance is selected to which the plasterboard should be defeated from the wall, and strictly opposite each other, on the floor and ceiling, the PPN 28/27 is reliably fixed. It is in it that will be inserted from the ceiling profile 60/27. It should be noted that they should not be installed in principle to the guides. An obligatory clearance of at least 1 cm, which will prevent the deformation of the frame, if the room in any way "behaves."
Scheme of alignment of plasterboard walls on Krakas.
Another important nuance is to install plastic linings for vertical racks made of metal. The fact is that when walking it is possible to stringing the flooring and, thus, the profile will "try", shifting relative to each other. Losted plastic or rubber elements help to avoid this unpleasant moment. They are enough to put only at that end of the rack that rests on the floor. So, the suspensions are fixed, the guides are fixed, the racks from PP 60/27 are cut in height. Now it remains every one of them alternately insert up and downstairs into the guide and begged with self-tapping screws with suspensions. The verticality of the racks is tracked using a level.
Article on the topic: Cement crafts for the garden: more than 20 ideas, instructions and master classes
Further, if the Wall insulation is provided, the insulation is laid in the deepening between the frame racks. Most often use mineral wool in the form of mats or in a rolled version. You can take sheet foam or polystyrene foam, that is, the same foam, only a higher density. The thickness of the insulation layer is choosing at its discretion. After the execution of this stage of work, go directly to the framework of the frame of the frame of plasterboard.
Secrets and nuances of works with plasterboard
In order to make quality repair with your own hands, you need to know the basics of work with such material such as plasterboard. No one will arise difficulties in attaching a sheet of GLC to the frame and consolidate it with self-draws. But in order to subsequently did not appear cracks, distillations or other surfaces of the surface, it is necessary to observe some features of work with plasterboard, which are known only to those skilled in the art.
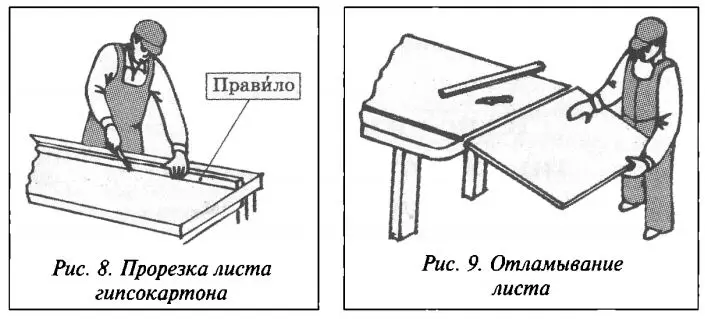
Scheme of proper cutting of plasterboard.
- It is recommended to avoid sharp and long-term temperature drops in the room where work with GLCs occur.
- A cycle of "wet works" should be completed so that there is no excessive humidity.
- Before starting the framework of the frame, it should be noted that the plasterboard should adapt at least two days to the temperature environment of the room.
- Glk is pretty simple, with the help of a conventional acute stationery knife. To do this, it is enough to cut the cardboard and make a small deepening in the gypsum. It should not put pressure on a leaf with a lot of effort: it will crack in the right place and from a small press.
- Do not be allowed to be allowed to be plasterboard, tightly customizing the sheet to the sheet. It is necessary to leave a small gap, which subsequently prevents the surface intimidation and its deformation.
- If the edges of the sheets are connected, which do not have a factory edge, and represent their own sliced pieces, which means that the joints must be cut off the champper at an angle of 45 *.
- Mounting drywall to the frame should be in such a way as to avoid voltage in it. To do this, use two methods: the self-tapping screws are located from the middle to the edges or from two sides of one direct angle of the GLC.
- In stores selling construction materials, three types of reinforcing tapes are offered for sealing: mesh (serpent), fiberglass and paper. Select the last one.
- Before starting work on the shovetling of the surface, it produces its priming with a mandatory occurrence of gaps between the sheets of GLC.
Article on the topic: Italian kitchen interior
Mount the plasterboard arch
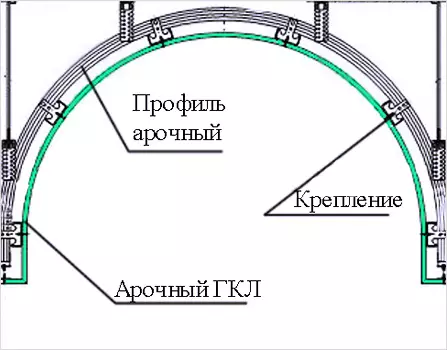
Scheme of arched opening of drywall.
To decorate with your own hands a living room with such a beautiful element as an arch, quite simple. Consider the option when it is mounted in the doorway. To perform work, you will need: two sheets of GLC thickness of 12 mm, one sheet with a thickness of 6.5 mm, four PPN 28/27 and one PP 60/27, a pair of reinforced arched corners. It is also necessary to decide on the radius of the arch. The most acceptable option is the one in which its height is equal to 1/2 width of the opening.
In order to make a beautiful arched opening hand, it first should be drawn on a 12 mm thick sheet. To do this, sitting on the floor and armed with a pencil, proceed to drawing the radius. In this case, there is a small trick that allows you to get a flawless semicircle of the desired diameter. For which at first it is necessary to find the middle of the sheet and spend a vertical line through it. Then, retreating from the lower edge of the GLC a pair of centimeters, screws up the self-tapping screw to which you need to attach a strong thread or a thin cord, at the free end of which you should make a loop and push the pencil into it. We choose the desired radius and, holding the cord of the latitude, draw the arc bending with your own hands.
After that, you need to apply both sheets of plasterboard with a thickness of 12 mm back side to each other and cut the resulting figure. This can be done with an electric bike or stationery knife. After two arched elements are ready, you can proceed to the installation of the frame. To do this, it is necessary to secure on both sides of the doorway of the PPN 28/27 in such a way that two identical letters P. The height of the "legs" of the shape must match the arches radius. After that, drywall is turned on the resulting design.
A turn came to arrange the arched opening army. To do this, we cut the guide with scissors for metal every 5 cm and bending it as it is necessary. After that, this "product" is fastened with self-draws along the entire length on both sheets of GLC. Next, jumpers from PP 60/27 are arranged, the length of which should correspond to the thickness of the arch. It remains to mount your own hand bending from drywall. To do this, the segment of the fine GKC should be moistened with water and climb on a table or chair. After it becomes enough plastic, you can arrange arched opening.