
Homemade knife sharpening machine
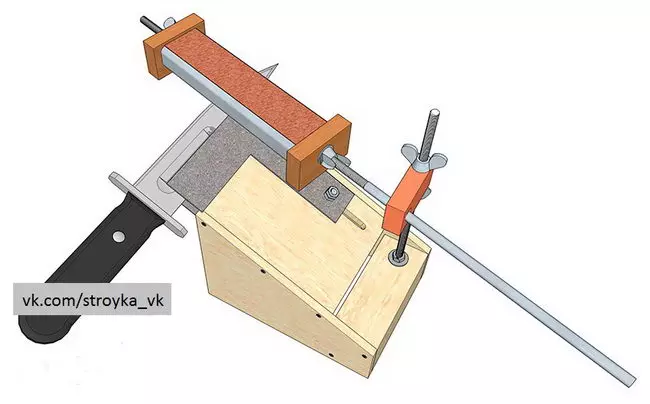
Most parts for a sharpening machine can be made literally from anything, following the general principle of the device. As an example, we take a laminated or polished cellular phanener with a thickness of 8-12 mm, which was used everywhere in the manufacture of cases of Soviet radio engineering.
The base should be hard - about 3.5-5 kg - otherwise the machine will be unstable and unsuitable for sharpening a heavy chopping tool. Therefore, the inclusion of steel elements in the design of steel elements is welcomed, for example, the base of the housing can be "cutting" with a corner of 20x20 mm.
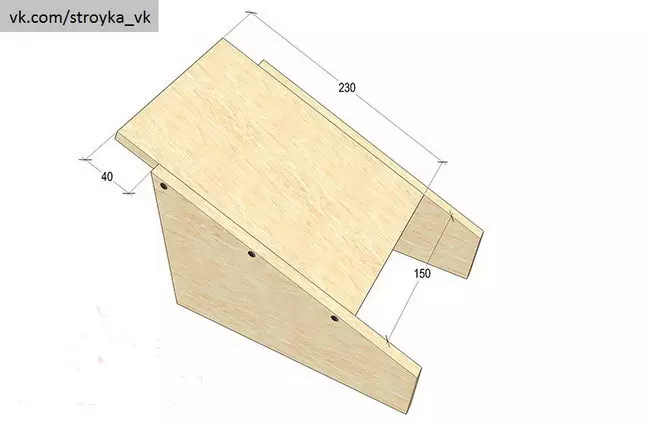
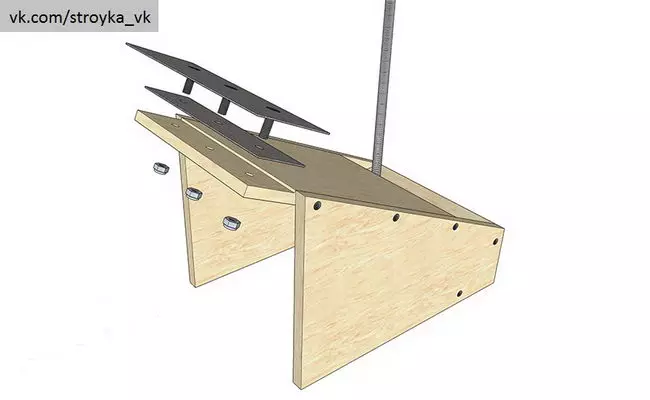
From plywood you need to cut two parts in the form of a rectangular trapezium with the bases of 170 and 60 mm and a height of 230 mm. With a cut, leave the allowance of 0.5-0.7 mm on the processing of the ends: they must be straight and accurately match the markup.
The third part is the inclined plane from the plywood plate with dimensions of 230x150 mm. It is installed between the inclined sides of the side walls, while the sidewall trapezoids are based on a rectangular side.
In other words, the base of the machine is a kind of wedge, but the inclined plane should perform in front of 40 mm. At the end of the side walls, postpone two lines with an indentation of plywood thickness in half. Drill in each plate three holes for fastening parts for screws. Transfer the drill to the ends of the inclined part, temporarily connect the base details.
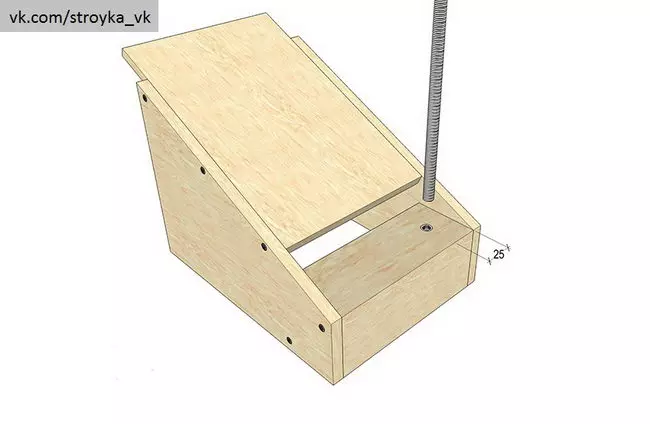
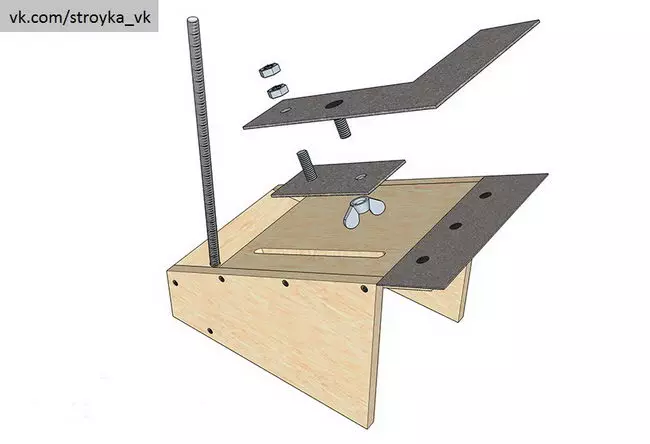
In the back of the side walls are connected by the bar 60x60 mm, which is attached to the end with two screws on each side. In Bruke, you need to make a 10 mm vertical hole with an indent of 50 mm from the center, that is, 25 mm from the edge. To be confident in verticality, it is better to drill a thin drill on both sides, and then expand. Top and bottom, screw two hollows with internal thread M10 into the hole, and in them - 10 mM stud 250 mm long. Here it may be necessary to adjust the lower feutside slightly if its carving does not match the hairpin.
Article on the topic: Children's room for the girl - 90 best design photos. The perfect combination of color and style!

Bearing device.
Remove the flat inclined part from the base - it needs to be modified by providing the fixation and clamping tool tool.
At first, set aside from the front edge of 40 mm and on this line with a suction knife, stuff a groove with a depth of about 2 mm. Sectional or shoe knife from the end of the plank chop the two top layers of the veneer, so that the sample was formed, into which you can invest 2 mm steel plate flush with a common plane.
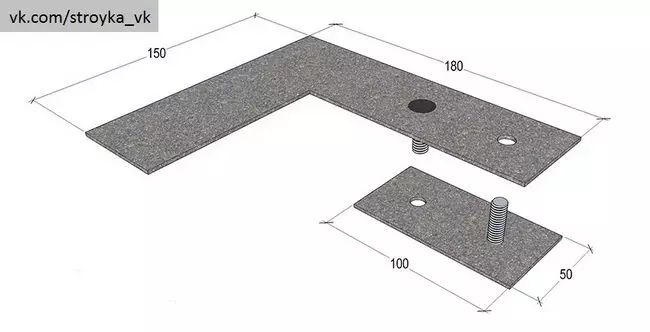
The girlfriend consists of two steel steels 170x60 mm and 150x40 mm. They need to be folded together along a long end with uniform deposits along the edges and produce three through holes by 6 mm. Planks for these holes need to be filled with bolts, placing hats on the side of the top, larger plate. Arc welding is leaking each hat, welding it with a plate, then remove the influx of metal and stick the plate until the perfectly flat plane is obtained.
Attach a narrower response plate to the sample on the edge and transfer the holes with the drill, then fasten the girlfriend bolts. Before installing it, it can also be magnetized with a constant current, it will help in sharpening small blades.
Fixation mechanism.
The second part of the girlfriend is a clamping plank. It is also made of two parts:
- Upper g-shaped bar 150x180 mm with a width of the shelves of about 45-50 mm.
- Bottom rectangular rectangular layout 50x100 mm.
Details need to be folded like how the parts of the girlfriend were folded, having a response to the long-range edge of the top presser. In the center we do two holes with an indent of 25 mm from the edges of a small part, through them we are tightened by the parts with two 8 mm bolts. It is necessary to start them in opposite directions, while the hat of the upper (near) bolt is located on the part side of the presses. Bolt caps are also welded to plates and pre-grind to obtain neat rounds.
Article on the topic: Overview of the mesh glue CMC
On the inclined plate with an indent of 40 mm from the edge, swipe the line with a line, and make one 8 mm opening 25 mm from the upper and lower edges. Connect the layout of the edge of the holes and the jigsaw, make a cut with the allowance. The resulting groove is brought to a width of 8.2-8.5 mm.
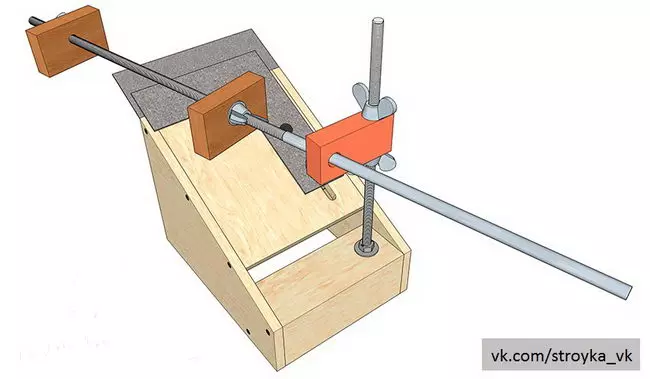
Create a clamping and retaliatory bar through the groove in the table. Topboard tighten the bolt to the nut so that the plane retains minimal mobility, then correct the connection with the second nut. To climb or leave the bar from below (in the base niche), screw the nut-lamb nuts to the second bolt.
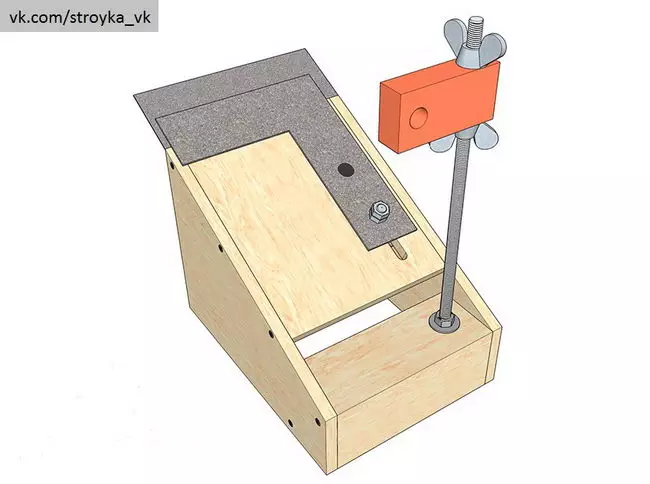
Adjusting the angle of sharpening.
On the heel, screwed into the base bar, sketch a wide washer and tighten the nut so that the rod does not turn into the fun.
The adjusting pad must be made of a small bar of solid material with dimensions of approximately 20x40x80 mm. Take carbit, textolite or wood solid rocks.
15 mm from the edge of the block is drilled in 20 mm end on both sides, the hole is expanding to 9 mm, then cutting the threads inside. With an indent of 50 mm from the axis of the hole, the second is drilled, but in a flat part of the part, that is, perpendicular to the previous one. This hole should have a diameter of about 14 mm, in addition, it is necessary to solve a round rashpil.
The block is winding on the heel, it is possible to relatively accurately adjust the height of the eyes without a complex system of screw fixators as in the original machine, which in practice it is difficult to implement a little more difficult. To the block be fixed when working, it is necessary to contact her lamb nuts M10 on both sides.
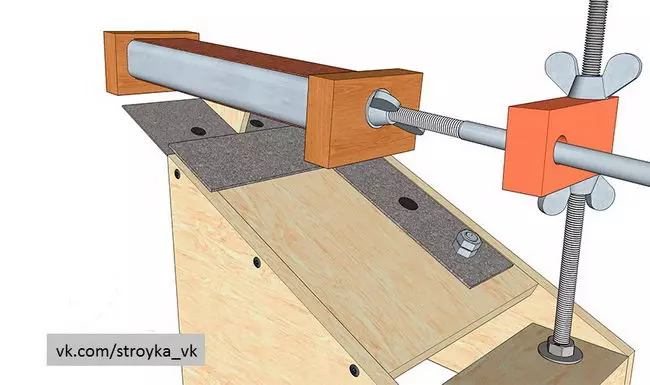
Carriage and replaceable bars.
For a grind carriage, you will need to cook 30 cm segments of the pylon M10 and a smooth smooth rod with a thickness of 10 mm. Two solid pavers with dimensions of approximately 50x80 mm thick up to 20 mm are also needed. In each bar in the center and with an indent of 20 mm from the upper edge, 10 mm should be done.
Article on the topic: How to assemble a sofa from pallets with your own hands?
A nut-lamb is cooled at the bar, then a wide washer and two bar, the washer and nut again. Between the strokes, you can clamp rectangular grinding stones, but it is better to make several replaceable grinding bars.
As the basis for them, take a light aluminum profile with a flat part of a width of 40-50 mm. It can be a profile rectangular tube or segments of an old carness profile.
The flat part of the whirlpool and degreased, the "moment" we stick to it the strips of sandpaper of different grain grain from 400 to 1200 grit. Choose a sandpaper on a tissue basis, and on one of the bars glue the suede leather strip to edit the blades of abrasive paste.
How to point correctly.
For proper sharpening, make a few templates from plywood with 14-20 corners? For cutting and 30-37? For chopping edges, the exact angle depends on the steel grade. Fix the blade parallel to the edge of the girlfriend and press it with a bar. Adjust the angle between the planes of the grinding pad and the tilt of the table.
Start sharpening a large (P400) bar, if the edge does not have the right angle. Whether the strip of the descent take the shape of a straight strip without intrusive and waves. Reduce the graininess and go through both sides of the blade first by the P800 BRANCOM, and then P1000 or P1200. When sharpening the blades, hold the Bru with a little effort in both directions.
After sharpening the blade you need to fix the "leather" bar, which caused a small amount of goe paste. If the blades are edited, the working motion is sent only towards the edge (on itself), but not against it. And, finally, a small advice: if you sharpen knives with polished blades and engraving, look at them with painting scotch, so that the squeezing abrasive leaves the scratches. Also it will not prevent the surface of the girlfriend vinyl self-tech.