
More and more developers are used in the construction of OSB plates (OSB, OSP). Despite some relationship with the chipboard, this material is distinguished by the unique characteristics of waterproof, strength and elasticity, besides, it is much easier to its predecessor. The OSP is the further development of a chipped extruded sheet, but rather long wood chips (up to 14 cm) are compressed in the oriented chip plate (up to 14 cm). Their thickness is less than a millimeter, but chips in one layer are oriented in one direction, and the direction of the chips in each next layer is perpendicular to the previous one, which significantly improves the properties of the material.
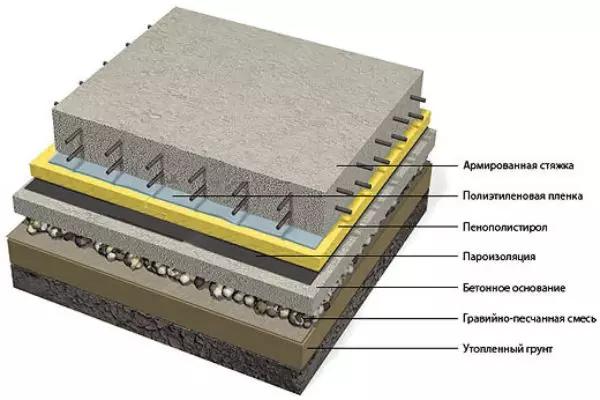
Concrete floor diagram for soil.
What plates to use for the floor?
OSB plates, the number of layers in which can reach 3 or 4-x, are designed with non-amineral resins. Often, the use in the production of OSB products containing formaldehyde makes it impossible to use plates in the interior decoration, but sheets made according to the OSB-3 standard are not distinguished by harmful substances and can be mounted in rooms with high humidity. OSB plates of this type are best suited for floor mounting. Experts recommend to make sex coating from plates issued by well-known manufacturers. As a rule, the highest quality products are produced in European countries, Canada and the United States, in which the requirements for environmental requirements are most accurately followed.The floor from the OSB can be a finish coating, as the outer texture of the slab looks quite interesting.
With it, you can align the floor under the finish by other materials. Nevertheless, the installation itself requires a preparatory stage. How to align the floor before laying OSB-boards, will be described below.
Plate laying on concrete surface
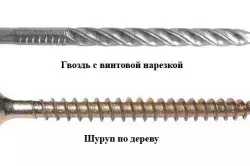
Elements for fastening OSB.
Quite often, not to lose in the height of the ceilings in the room, the builders laid rals on the concrete tie. Of course, in this case, the base should be smooth. Ensure the perfect surface can be removed the old coating and the bay is new. Although the oriented marginal plates are not afraid of moisture, the base needs additional waterproofing. This will protect the space under the stove from the accumulation of condensate and the formation of fungus.
Article on the topic: Sofas with their own hands: Masterclass + 49 photos
After laying on the surface of the rubberoid or polyethylene cleaned from the old screed or polyethylene are installed and mounted beam gypsum. For their alignment, level, bulk cord, roulette and transverse threads are used. Now details on how to align the floor with these devices:
- At some distance from the floor on the wall there is a mark.
- With the help of a water or laser level, another mark is made on it.
- A horizontal line is littered with grated chalk cord between points.
- The same operations are performed on the rest of the walls.
- At the height of the alleged screed is a mark.
- From the horizontal to it, the distance or tape measure is measured.
- Dots are applied to the rest of the walls.
- Marks are connected by lines.
- In the walls on the lines screw screws.
- From fasteners to fasteners on the opposite walls stretched the threads. It will be a plane screed. Lapered profiles are installed on them.
- A flooded concrete is aligned with the rule. Its length should be wider than the gap between the beacons.
True, complete drying of the solution will occur 4 weeks after its fill, but after that you can start laying the OSB panels.
Installation of OSB plates on a concrete base.
For their installation on a concrete base required:
- toothed spatula;
- Perforator;
- Dowel-nails;
- screwdriver;
- a hammer;
- Parquet glue.
On the perfectly even base, it is enough to put one layer of 10 mm material. This is a good heat and noise insulator. Stage order Next.
- The required number of OSB sheets is prepared. Their standard size is -2.44 x 1.22 m. If necessary, the plates are cut by a circular saw or a jigsaw, however, working the latter, it is difficult to provide smooth edges.
- The glue is applied to the OSB and is distributed over the surface with a spatula.
- Plates fit on the screed. Between them, it is necessary to leave a compensation gap of 3 mm.
- At the corners of the OSB panel are drilled. Holes and concrete are made. Dowels are inserted into them.
- Plates are fixed to the floor fastener.
- It is enough to apply a few protective layers of varnish so that the floor from the OSB is cleaned.
Article on the topic: We carry out the trim
Oriented chopping base under the pure layer
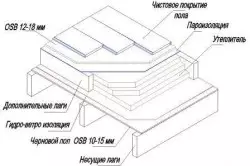
Floor appliance using OSB.
If you decide using OSB, align the floor under linoleum or other rolled material, then the gaps between the plates need to be lost, but for this you need to use elastic compositions like sealant. Laying the laminate on the surface of the OSB does not require any additional preparatory activities. But the installation of the tile requires a more rigid clutch panels (spike-grooves) with each other. True, the tile is steaming on the base from the OSP when it is laid on the lags. In addition, the OSB-stove is not able to provide reliable grip with ceramics. It needs to be laid another material, but about it later. In general, make a gasket between the screed and ceramic tiles from the oriented styling plate and simply does not make sense. On how to align the floor from OSB on wooden lags, tells on.
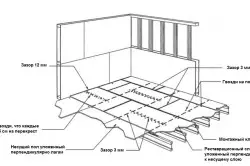
Installation of OSB boards on lags
Installation of OSB boards on lags.
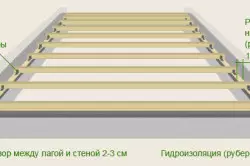
For BRUSIV, it is necessary to choose the most flat wood of coniferous rocks (pine, spruce, larch or fir). Wood moisture should not exceed 20%. If necessary, the bars need to be dried under the canopy. For small rooms, we can use lags with a cross section of 110 x 60 mm or 150 x 80 mm. If the length of the span in the room is more than 5 m, the bars of 220 x 180 mm are used. It is desirable that whole lags are installed in the span. The jokes are allowed in extreme cases. Make them better bills. On neighboring lags, the joints should be located not closer to ½ m from each other.
Now about the order of work:
- Wood lag is processed by antiseptics.
- Ruberoid is laid on the base of the mustache.
- Along the opposite walls, 4 bars are coated horizontally. The horizontal is displayed using a level and twisted cord. The distance of the lag from the walls should be 2-3 cm.
- If the base has drops in height, wooden lining are used to align the bottom strapping. The protrusions in the overlap are compensated by the decoration of certain areas on the lags.
- Bottom bars are attached to the base with anchor screws or bolts with a cross section of 10 mm. Their length depends on the thickness of the bar and lining (it is added another 50 mm for fixing in concrete).
- Cross bars are attached to the bottom strapping with the help of corners and screws. The step between them depends on the thickness of the OSB plates. For plates of 15 mm thickness, the distance between lags should be 450 mm, and for a 18 mm - 600 mm.
- Ceramzite is falling asleep into the crate or another insulation and soundproofer is stacked.
- Before fastening sheets, a moisture-repellent membrane is spilled.
- OSB sheets are stacked.
Article on the topic: Dust of concrete overlap or sex with your own hands

Table Characteristics of OSB-plates.
As a rule, 2 layers of the oriented chipboard are placed on the lags. The second layer is stacked in the first one, so that the joints do not coincide. The gap between the joints of the panels should be 3 mm. The gap between the wall and the OSP is 12 mm. Short edges of the plates should be shrinking on the supporting bars. Shakes of long sides must be on the supports. For better contact of the surface of the OSB and bars are processed by mounting glue. Plates are screwed to lags with self-drawing along short edges. Step fasteners - 15 cm. Glue is applied between the upper and lower plates. The laying of the upper panels ends with screwing the screws at the edges of each sheet.
When the surface is approved on the lags, you can return to the question about laying the tile. OSB, although they do not provide a reliable connection with it, still serve as a solid base that cement-chip plates are stacked. They are attached to the previous coating using PVA and self-tapping screws. It is desirable that the joints of the CSP do not coincide with the places of compounds of the previous layer. It is necessary to withstand 2-millimeter compensating gaps between adjacent plates, as well as between the CSP and the wall. After that, you can already start laying the tile coating.
Thus, the device of the floor from the OSB and its alignment with this promising building material for the subsequent finishing finish is not particularly difficult from other methods of installation of the flooring. It can be stated that OSB-slabs are not the best option when preparing the base for laying ceramic tiles, but in the rest of the oriented chipboard are ready for full competition and with modern, and with traditional building materials.