
The assembly and installation of an interroom door frame from MDF is a complex process consisting of several stages. To install on its own forces, it has been qualitatively and without errors, it is necessary to perform all the work in the correct sequence.
Build the door frame from the MDF is recommended to perform on a flat plane.
Preparatory work
Required:
- Roulette and pencil;
- laser level;
- Corolnic;
- hacksaw;
- chisel.
The installation of interior doors from MDF begins with checking walls to vertically. First, the height and width of the doorway is measured. It should be borne in mind that the walls in the house may not be perfectly smooth, so the measurements are made at different points and at different heights. It should be remembered that there should be gaps of about 10-15 mm between the door frame of MDF and the wall, both on the left and right side and at the top and bottom.
If the doorway is greater than the door size from the MDF, then with a small difference in the width, it is necessary to fill the block of the required width over the entire height of the width. In the event that the door is much already open, then it is partially laid or a brick or another suitable block, or a metal frame is made and is made of drywall. If the doorway is smaller in size, it should be expanded.
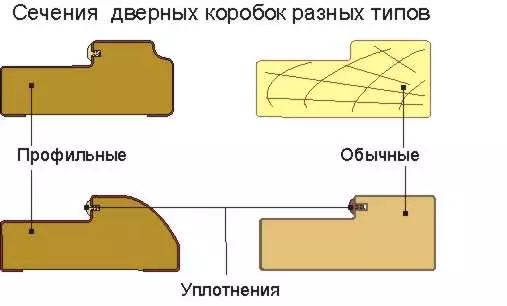
Section of door boxes of different types.
Then the workpiece of the future box of MDF is made. Since the standard door height is 2000 mm, then the size of the gap is added to it between the upper part and the web in 2-3 mm. If the installation of the door implies the presence of a threshold, then 2 gaps are added to the height of the door, equal to 6 mm. If you install the door from the MDF without a threshold, then in this case the clearance is added in 3 mm and the distance from the floor is 10 mm. This is necessary in order to do not cling to the floor covering when opening the door leaf. As a result, for installation with the threshold, it turns out: 2000 + 3 + 3 = 2006 mm; Without a threshold: 2000 + 3 + 10 = 2019 mm. Billets racks for the box of MDF are ready.
Article on the topic: Photo of brick houses and cottages - choose the facade
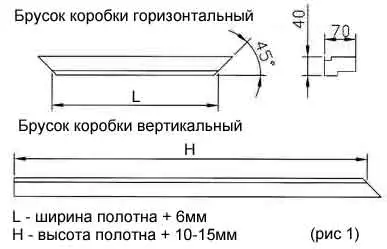
Next, the blanks of the threshold and the upper jumper are made. For this, the width of the door canvase is measured. It adds a gap in 3 mm and the thickness of 30 mm of the profile bar, which is installed on both sides. For example, with the width of the door of the MDF 600 mm, it turns out: 600 + 6 + 60 = 666 mm. After that, planting samples are made in the size of the elements, i.e. On each side, those parts that protrude and because of this, when closing, rests on the door. To do this, the segment equal to the thickness of the rack is measured from the edge of the jumper, and it is done using a handchie with small teeth. After that, the vertical installation of the jumper is carried out and its unnecessary part is cleaned or a knife or a chisel.
Build a box of MDF
Installation of door sketches.
Required:
- roulette;
- hacksaw or circular saw;
- Stuslo;
- hammer and nails;
- electric drill;
- Saws.
To obtain a qualitative result, the assembly of the door frame from MDF should be carried out on a flat horizontal plane. There are several ways to manufacture a door frame. First, it can be collected using a thickening connection. To do this, spikes are mounted in the neighboring bars, in height equal to the thickness of Bruusyev. At the same time, both the horizontal and vertical bars must have spikes with which they are connected to each other.
Secondly, the assembly can be carried out at an angle of 450. In this case, the vertical timber is only on the one hand (where its connection with the horizontal element occurs) is done at an angle of 450. In the case with a horizontal bar, the same propyl is done with both sides. When determining the length of the vertical bars, which should be the same, the height of the doorway, and the size of the gaps, and the thickness of the bars used are necessarily taken into account. The length of the horizontal timber is made up of the width of the door leaf, the values of the gaps and the thickness of each of the vertical elements. To secure the design, you need to use nails or screws. They must be cleaned at an angle of 450.
Thirdly, the design can be assembled at an angle of 900. For this, the horizontal bar is simply applied to the vertical element and is connected using self-samples. In this case, on the details that are located vertically, the beam is diverted. So that the MDF is not cracked, the holes are previously drilled, the diameter of which should be less than the diameter of the screw for 2-3 mm. To obtain a rigid and reliable design, each connection is fixed with 2 self-plugs.
Article on the topic: Clinker tiles for facade, base, garden tracks
Setting loop
Required:
- detachable or delicate loops;
- chisel;
- joiner hammer;
- drill;
- Saws.
Build door box.
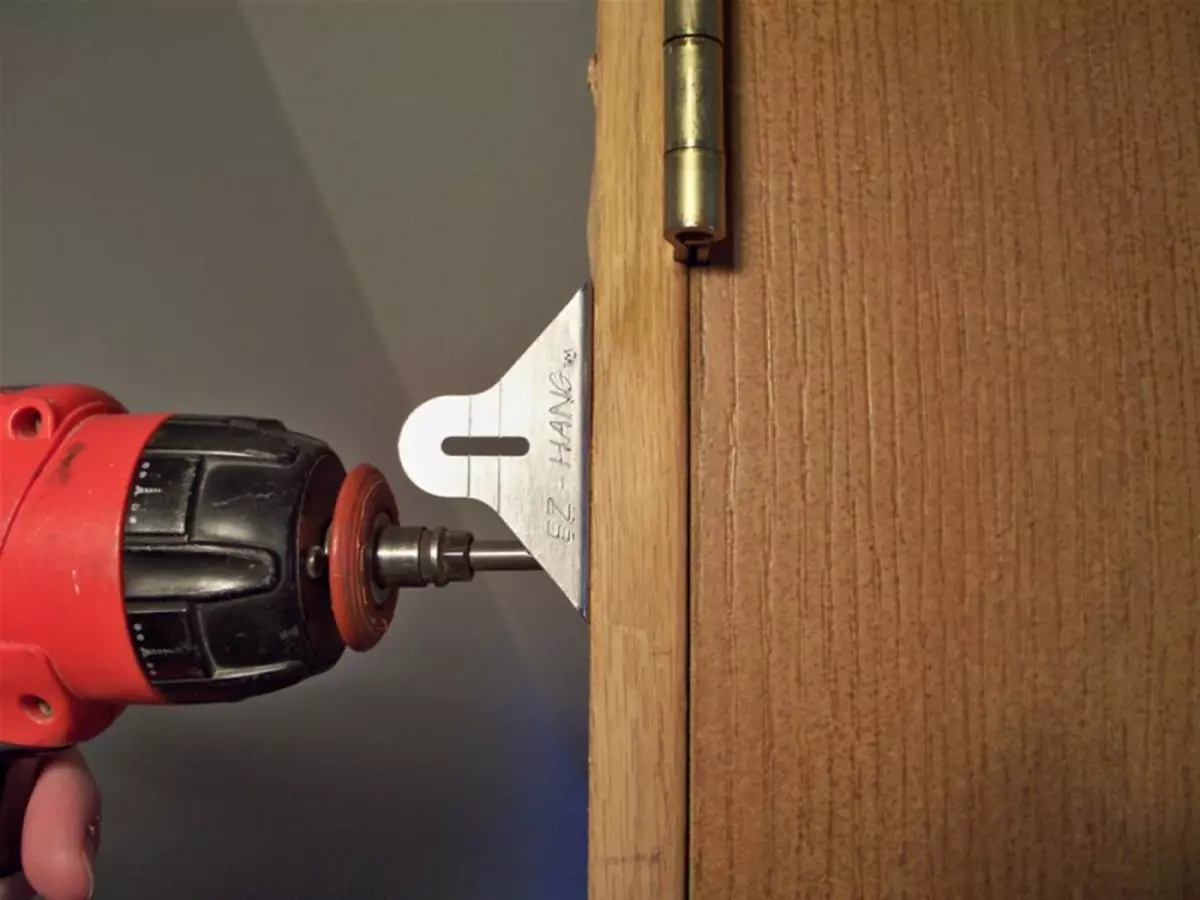
Before starting work, choose which way the door to the MDF will occur, i.e. towards the room or from it. Then the door loops, which have different types and because of this, their features during the insertion are purchased. To install interroom doors, 2 loops will be required. And if it is an input structure, then 3 loops are used to increase its strength. In this case, the additional element is mounted just above the middle of the door for the load distribution.
Next, 20 cm is measured from the lower and upper edges of the design, and marks are made at these places. After that, the product is applied to the door of the door from the MDF, combined with their start and are deployed along the contour. Then, with the help of a sharp knife, cuts are made according to the marked lines. The location for installation of the loop is cut with the help of the chisels and a joinery hammer. To do this, in the marked area, the tools are neatly made of the excavation, the depth of which should be equal to the thickness of the loop, i.e. Average 3-5 mm. This is necessary in order for the loop to be securely fixed and drank out the design.
Work on the installation of the loop is performed in stages. First, the perimeter of the structure is performed by small backs, which must be several pieces. Then the excess material is extracted from them. Cutting is carried out not for 1 approach. It is necessary to make a loop each time to the design for checking, with the help of this it is easier to achieve perfect recess. After that, the markup is applied in those places where the loops will be fixed with the help of screws. Then the second side of the loops on the door frame is fixed in the same way. At the end, the box of MDF is placed horizontally to the floor, the door canvas with already embedded loops are inserted into it. Next, with the help of a school line, a thickness of 3 mm inside the box is aligned with the cloth so that from all sides it turned out the same gap.
Article on the topic: 3D modeling in modern interior design
Installation of the door cloth
Required:
- mounting foam;
- wood shells;
- electric drill;
- self-tapping screw;
- acrylic lacquer;
- Tassel.
The door frame from the MDF is assembled so that all fasteners are hidden under the retold bar of the loop, as well as the lock for the door.

Installing the door leaf.
To get a gap with each of the sides of the wall and the rack boxes from the MDF, you need to install linings from the tree. It is best to mount 4 pieces one way. To fill the resulting gap, a mounting foam is applied, which is necessary to apply very neatly, because after drying it is traces, which cannot be removed. When it is applied, the fact that it increases in the amount of 3 times. Foam freezes about 3 hours, the total setting occurs in a day.
Then the collected box should be installed in the prepared doorway, while putting a stand with a vertical loop. To secure it, you need to use screws. After that, the door canvas is mounted, which is securely fixed. To vertically fasten the loop rack, you need to give the door canvase a fixed state. Next, the fixation of the cloth rack. In order to continue from the natural deformation and wear of the loops themselves, problems with the door did not arise, i.e. With its opening and closing, it is necessary to remove between the door web and the racks the gap, which is exactly 3 mm.
At the end, an acrylic varnish can be applied at the door from MDF. This work must be taken carefully. To the canvas and box for the door do not swallow, the first time is applied fine layer of varnish, after that it should completely dry. If necessary, then after that you can apply it 2-3 layers. But before coating the next previous layer should dry. This installation of the door frame and the MDF doors is complete.