
Preparatory work always play a prominent role during the repair of the premises - the quality of surface preparation necessarily reflects on the results of the finishing of the walls, the ceiling.
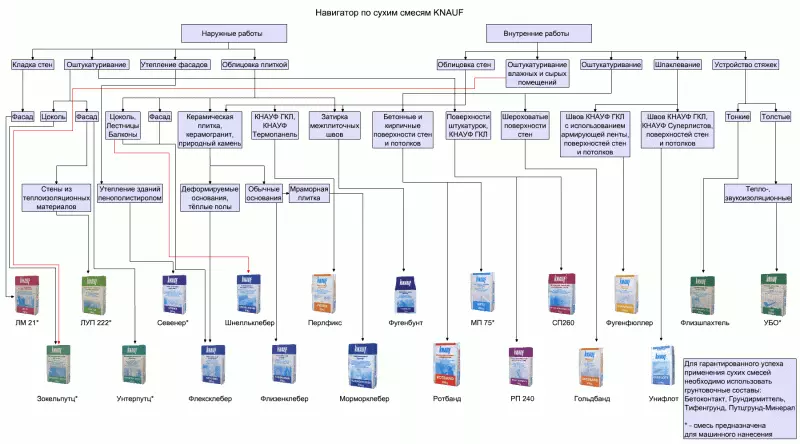
An example of a classification of mixtures for putting the appointment.
The putty of walls and ceilings in the apartment allows you to most effectively prepare the surface to the subsequent finishing work: painting, wallpaper sticker.
How to choose a putty
In the market today there is a large selection of finishing materials, including and putty, however, you can select 3 types used individually or together, depending on the quality requirements of the leveling surface in the apartment.- Starting putty. Used for sufficiently rough alignment of door openings, ceilings, walls. With a single application, replaces the plaster, but, unlike it, it has a higher elasticity, not "floating", allowing the imposition of a thick layer and dry faster. Such a putty is more expensive than plaster. When you close up the pits with a depth of 5 cm and a more starting putty must be mixed with clean sand, otherwise it will float and it is (when mixed, follow the clay pieces).
- Finish putty. Used to equalize the surface at the final stage. Well close defects, pits depth from the 1st to a few millimeters.
- Decorative putty. Surfaces various textures. You can change the color if you add the appropriate dye. There are also compositions with a finished tint. Released in dry or ready for use. The putty of the walls and ceilings by this type of material is carried out in accordance with the general design of the room.
Preparation of walls, ceiling to putty
Scheme of grinding walls.
- Before directing putty, the surface must be cleaned of dirt, dust, fat spots. This can be done via abrasive materials: emery skins or with a sandblasting machine. You can take advantage of the drill, inserting a circle-"velcro" in it and imposing a rude emery skirt in the form of a circle specially selling in the stores. For ceilings it is advisable to carry out the procedure of washing with soap water (you can use a 3% solution of soda, washing powder or ammonia solution). Then the surface is washed with clean water and dried.
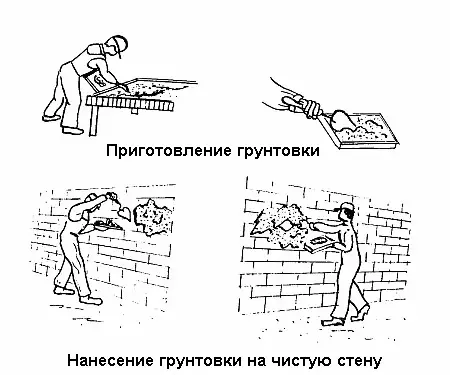
- The next preparatory stage is painting the surface of the primer. It is better to use special compositions commercially available. In the extreme case, you can very much to dilute the putty (consistency of thick milk). The primer must be applied with a brush or roller so that no lamps remain, traces from the painting tool. Movement - smooth and smooth. If you use a brush, it must be kept at an angle of about 70 degrees, continuously turning to ensure uniform wear of the hair part of the tool.
Article on the topic: Ceramic tile thickness
How to cook putty
Dry powder should be poured into a clean capacity with water (the proportion indicates the manufacturer in the attached instruction) and stir the construction mixer. As the latter, you can use a conventional drill, inserting a special nozzle in it. It is necessary to stir up to obtain a homogeneous composition. Calculate in advance how much putty you can work in about 40 minutes. After this time, the composition in the container will begin to harde. Already grabbed the mixture is not suitable for further work.Before you start stirring a new portion of the composition, you must carefully remove the remains of the old one. Otherwise, the new mixture will be attended by uncomfortable lumps that can spoil all the work. The finished mix must have mobility; i.e. calmly stitched manually, do not fall from the spatula.
Wall putty, ceiling
Plasterboard ceiling shtlock scheme.
- Take a small spatula and put the finished composition (starting putty). The thickness of the layer overlapped to the surface is adjusted by changing the angle of tilt the spatula. Without any devices, you can apply a layer to 1.5 cm. If the defect is deeper, then the putty is applied to several layers; At the same time, each previous layer must dry. The wall will turn out to be more even if used special metal profiles - beams.
- When the first starting layer is dry, it is necessary to proceed to its processing of the emery skirt. Before laying a new layer, the surface of the walls, the ceiling must be covered with primer again. To apply the second layer (it can be the last), the "Rotband" type is well suited (it is recommended to use and as a starting putty), "Wetonite", "Fugefueller".
- The finishing putty in the room is suitable for giving the surface of smoothness, liquidation of microcracks, pores. It is necessary to apply such a material with a thin layer. The use of finishing putty for rough decoration is meaningless - thick layer is invariably cracking, since this type of material has a completely different structure. With the final cluster of the walls or the ceiling, it is recommended to use a wider spatula. If, for example, a 30 cm wide tool was used with a rough putty, then it is better to use a spatula at 50-60 cm. Next, it is necessary to clean the entire surface with the sandpaper. During the work, keep the portable lamp next to the portable lamp; Lighting her surface at different angles, you can quickly identify a problem space.
Article on the topic: Wallpaper photo Design 2019: in the hall trendy, modern design, ideas, how to shove in the apartment, sticking, for walls, what in fashion, video
Nuances when finishing ceilings
- If you need to level the ceilings in the bathroom, in the kitchen, it is necessary to use a special, moisture-resistant putty.
- With significant defects, when the putty layer is assumed, it is possible to strengthen the material by means of a reinforcing grid. It also applies with more than 2 cm heights. As a bandage, a sulfyan resembles a medical bandage is usually used. It is glued through PVA or immediately acquire a self-adhesive option. With extensive damage, a metal mesh is used, reinforced with a bracket, special carnations with a wide hat.
- The secondary putty of the ceilings is possible only after complete drying of the first layer. Usually drying lasts from 6 to 24 hours, depending on the ceiling area, room humidity.
- The second layer should be applied, starting from the same place where the first and in the same direction began. The band-received bands need to spat immediately, - by this you reduce your work during the further processing of the ceiling by the sandpaper.
- The finish putty should be applied in the direction of "from the window" so that the light falling from it does not detect possible microscopic defects.
- After the end of the putty work, the surface must be cleaned with compressed air to remove the remnants of the chalk. If it is not completely removed, the surface can be additionally treated with natural olifa (diluting it in White-spirit) or diluted with primer.
Work on alignment with the removal of ceilings, walls does not require highly high qualifications. First, it makes sense to "fill the hand" on the preparation of the walls, then you can already move to a more complicated case - putting the ceiling in the apartment. And if it does not work perfectly in the first or second time, it is undoubtedly the results will be impressive in the future.