
Recently, laminate becomes one of the most popular flooring. Wear-resistant top layer, democratic price and simplicity of installation of such sex - these are the main components of this popularity.
The main characteristics of the laminate.
Laminate can be laid in several ways. If we are not talking about one room, but about several rooms, interconnected by doorways, then in this case the most convenient is the well-free laminate laying.
This method is characterized by the lack of door thresholds. In this way, the floor is obtained monolithic throughout its area. Although sometimes this dignity can turn into a disadvantage. After all, if even a small error is allowed when installing, such a floor will have to dismantle in the same room, but in all rooms.
Selection of tools and materials

Tools necessary for work: the kitchen, roulette, level, electric lobby or hacksaw with small teeth, marker or pencil.
Quality work is impossible without properly selected tools. If we are talking about laying a laminate without thresholds, then such tools will be needed:
- electrolovka or hacksaw with small teeth;
- level (preferably laser, but it is possible and the usual one, only to recover its testimony will have more often and more carefully);
- kiyanka (wooden or rubber);
- roulette;
- Corolnic;
- Marker or pencil.
The construction store can offer a special set for laying a laminate, which also includes stubs and plastic wedges. But they are easy to replace with appliant materials, instead of wedges, for example, you can use small laminate boards without compromising installation. So it is worth spending on such a set or not - decide for yourself.
High-quality floor laying is impossible without quality material. Choosing a laminate, many buyers are focused only on texture and color, forgetting that laminate can be of different strength classes. In construction stores you can find a laminate board 23, 31, 32, 33 and 34 classes. You can still meet laminate 21 or 22 classes, but it has already been removed from production.
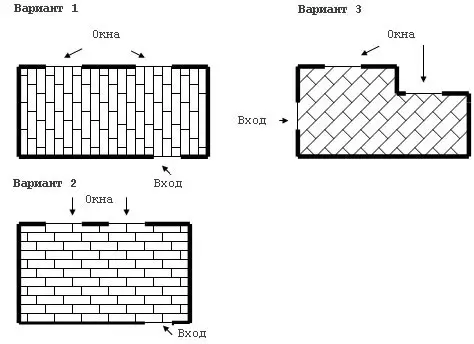
Laminate laying scheme.
If you need to put laminate in the bedroom or dressing room, you can take the material 31 or even grade 23. The latter has the lowest price. But it must be borne in mind that in its strength, grade 23 laminate is not suitable for use in rooms, where the load on the floor will be more, - hallway, corridor or living room. Therefore, if the entire apartment is put on grade laminate, then its service life will be short - no more than 5-6 years.
The higher the class of laminate, the longer it will last you as a floor. Grade 31 laminate will last 10-12 years. Interestingly, on the 3rd class laminate, which is intended for use in dance and sports halls, in case of its use in a residential apartment, manufacturers give an unlimited warranty. But the price of such a material will be appropriate.
When choosing a material, you need to pay attention not only to the class of laminate, but also on the density of the board itself, as well as on the quality of the castle connections.
The panel density directly depends on the floor reaction on the temperature and humidity differences - the more density, the better for the floor. And weak locks cause the rapid deformation of the floor.
Article on the topic: Embroidery works by cross: gallery ready, manufacturing technology, photos and videos, paintings and schemes, sewn handmade
And do not forget about the required stock of the material. Moreover, if with other methods of laying it is quite possible to do with a reserve of 7-8%, then for laying laminate without thresholds you need at least 10, or even all 12%. After all, with this method of laying, it is possible to cut the material on one side only in the first room, in all subsequent board you have to cut on both sides.
Paul preparation for laying
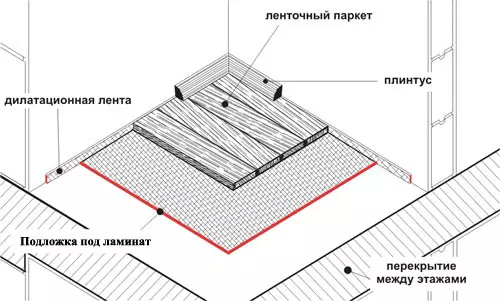
Floor Device Scheme.
Almost any instruction on laying, which manufacturers of laminate are placed on the package, suggests that the optimal area of laying room for a single array is 45-50 m². It follows that, from the point of view of the manufacturer, the gap between the rooms should be.
If strictly follow the laws of physics, then such a position is correct. The larger the floor area, the more it is exposed to deformation. Therefore, the danger that the floor laid by a single array is 100 m², swell, is much higher than that of the floor by 50 m². So that this does not happen, the boards between the rooms act as compensatory seams.
Therefore, to lay the laminate without thresholds can be exclusively on the perfectly smooth draft floor. In the overwhelming majority of cases, the deformation of the floor is due to the stacking between the laminate and the black floor there are airbags.
To start laying a laminate, you need to hold certain surface preparation work. First you need to remove the old floor covering. Getting started to dismantle, remember: the more careful you do, the less will have to work with alignment of the floor surface.
After dismantling, it is necessary to inspect and evaluate the condition of the draft floor. If the damage is small, then you can do with cosmetic alignment, smoothing the protrusions with a spatula and replete with a cement solution of pits and cracks. If the surface of the rough floor is badly damaged, then you will have to make a new screed.
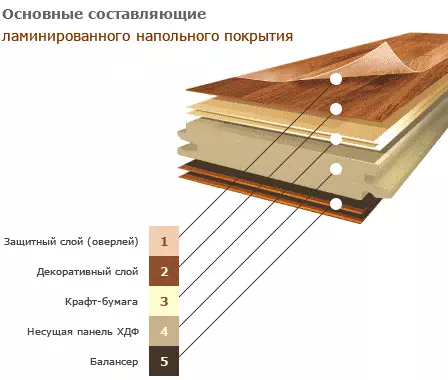
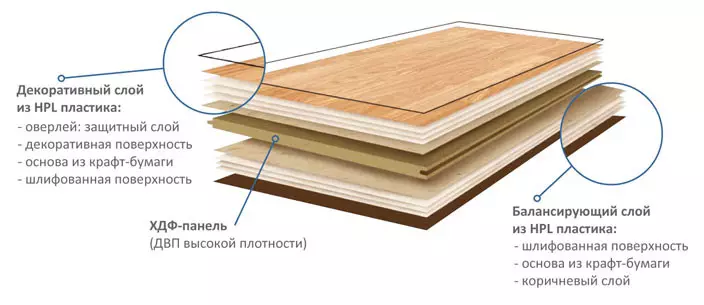
Laminate structure.
Having finished with the alignment of the draft floor, you need to decide from what space it is better to start laying, in which direction to lead and where its finish point will be. It is very important because the lining layer is better putting across the laying of boards. The substrate bands are joined with a small overlap (7-10 cm), in these places there is a small convexity. If, when installing the floor, such a bulge will be under the locking board of boards, then it does not have to wait for such work.
Article on the topic: Tape damper for screed: Does her thickness
If the laying is performed in a private house, then you need to equip reliable hydro and thermal insulation. In the case of laying laminate without thresholds, the installation of the floor is performed immediately throughout the area of the house. Therefore, it is necessary to isolate the entire area at once.
When the insulation device, you need to remember that the thin insulating layer will not reliably perform its functions, and too thick will cause the deformation of the floor. Therefore, it is important here to observe the golden middle.
If laying of the laminate will be carried out in an apartment in a high-rise building, then the thermal insulation layer can be neglected, since inter-storey floors provide sufficient protection from cold. But in both cases there is a laying of a laminate substrate, which will simultaneously perform the functions of sound insulator and shock absorber. Usually this substrate is produced in the form of a fine, rolled into the roll of the strip.
Installing floor without beams
Laminate laying scheme with angular lock.
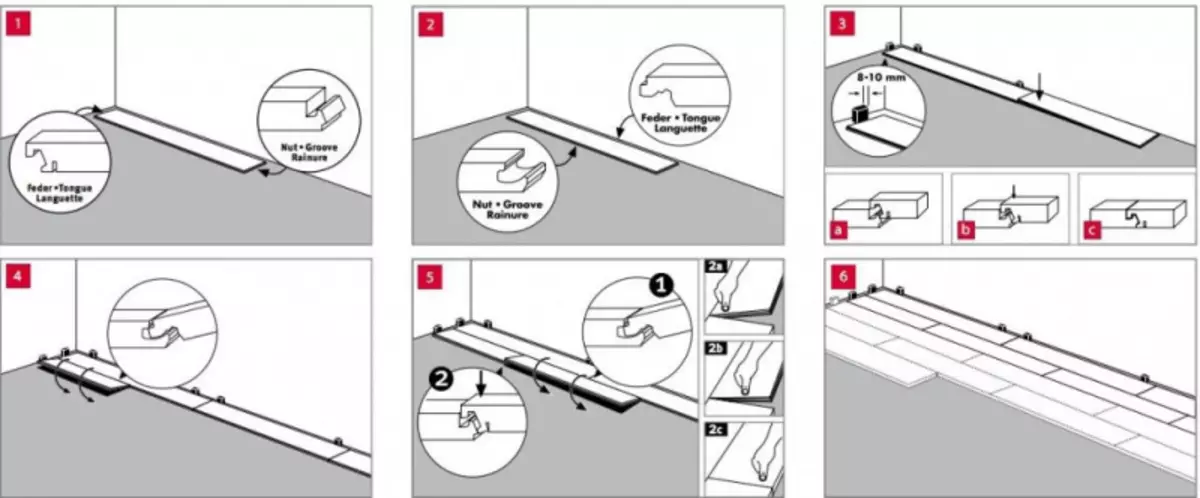
Only by completing the arrangement of all the necessary layers, you can move directly to the floor mounting. Floor mounting technique from laminate without thoring is not particularly different from the usual, with threshings. Styling starts, as usual, from the window. The first three laid layers will be fundamental, so require special attention when installing.
Laminate boards are connected to each other with the help of locks, which makes them the laying available to almost everyone. On the one side of the board there is a protrusion, and with another groove, in which this protrusion you need to insert.
At the first board from the end, which will be from the wall, the lock is spilled, the second one is joined from another end to it. The locks are connected simply: the second board with its protrusion is inserted into the groove of the first at an angle of 30º, then pressed to the floor, snaps up the lock. It is important here to make sure that the grooves in the boards are connected tightly, without gaps, if you do not enter, you can fasten with Cyanka, but rustle, otherwise you will break the castle.
All laminate boards that will lie at the wall, you need from the side adjacent to the wall, cut the fastener, otherwise your gender will look not very aesthetic in this place. Each board before you put, you need to carefully examine that there are no defects: shot down angles, broken and twisted lock connections, etc. It is better to detect such defects initially than to disassemble the laid floor.
In this way, the whole range is mounted, only the last board is unlikely to fit entirely (it happens extremely rarely), so you need to sprinkle too much. But do not forget that the floor of the laminate is a floating floor, it is not attached to the base floor, and when the temperature changes, its movements are possible.
Article on the topic: Installation of platbands on the doors: several installation techniques
Therefore, it is impossible to lay the laminate to the walls in any way - you need to make a small indent from the walls, fixing it by a restrictive peg. But if, with other methods of laying, such a gap is admissible to 5-10 mm, then when laying a laminate without thresholds it is better to take 15 mm, since in a larger massif of the floor and the deformation will be greater.
The second row begins with a scaled piece of the first row board, so that the strips go in a checker order. But if a sipped piece is small, less than 0.5 m, then it is better to cut a whole board in half. The transverse seams between the boards in the neighboring rows should have a minimum of 0.4 m difference. Among themselves rows are connected in the same way as the boards. Then joins the first two third row. These three rows are very important to assemble correctly, without protrusions, cracks and other defects, otherwise you can find out in surprise that in the middle of the room you got a rather impressive gap.
Features of the transition from the room in the room
When moving through the doorway, it is important to remember that the door frame must be installed in such a way that the laminate can breathe under it under it. If the door frame has already been installed on the old floor, then she needs to be neatly done, then in width a little less drank to connect the laminate boards and put them in this propyl so that the gap remains 10-15 mm from both sides. By installing the floor, the canvas doors better remove.
It all depends on the direction of laying. If the transition through the doorway needs to be done parallel to laying boards, depending on the width of the boards and the doorway, you can have two, or even one board. In the next room, laying a laminate continues, taking a laminated board for a landmark, and the gap between the wall and laid first is eliminated by posting the laminate boards on the desired size.
But if the direction of laying goes to the end, you will have to recruit more boards. In this case, laying a laminate in the second room should be conducted first from the doorway to the opposite wall, and then connecting to the ladded rows, lead new rows to the side walls.
Choosing a way to put a laminate in your apartment or in the house, you need to understand that laying of laminate without damage is the most difficult of all ways. Therefore, it is not worth it for it without having theoretical training and practical skills. But the final choice remains yours.
Regardless of the choice - good luck! Smooth and durable floors to your home!