
The suspended toilet with installation is becoming increasingly popular, and it should be noted that it is possible to install the suspension toilet independently. But the installation of installation for the toilet is a process that most people prefer to charge specialists. However, nothing complicated in this process is not, you can install the installation of the toilet.
Installation installation is quite simple, the main thing is to stock the necessary tools, and the knowledge of its installation.
How to choose installation?
When the toilet is selected, then it should be borne in mind that the toilets from different manufacturers differ in the smoothness of the surface and the shape of the bowl.
But from the installation of the suspension toilet, all problems with the toilet are largely dependent, so you need to choose it carefully. It should be borne in mind that both the frame, and the tank, and all other communications will be hidden, respectively, to get to them will be difficult. The choice of installation depends in many respects from taste preferences, but it is necessary to purchase it only from the well-known manufacturer. This is exactly the situation when the overpayment for the brand pays for itself repeatedly.
In most cases, it should be preferred by frame, and not block installation.
Installing the installation of the suspension toilet can be installed in the presence of the following tools:

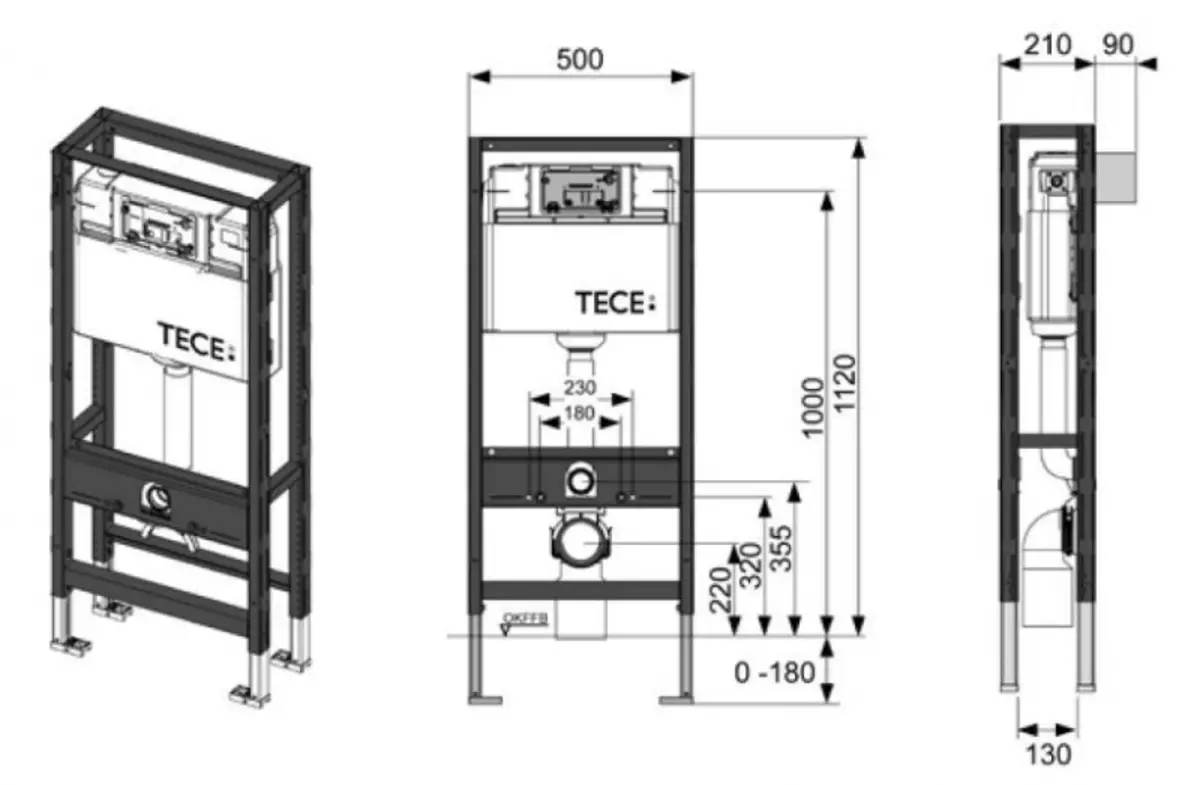
Possible repair of the toilet and installation will be easier if at the bottom of the drain button to make a technological hatch.
- Deployed keys, they are needed to mount the installation to the wall or to the floor. Included, as a rule, there is fasteners - screws with heads under keys.
- The level, the frame is inserted when installing precisely in terms of the level - vertically and horizontally. If the level does not use, then you can easily miss the mount.
- Roulette, which is needed in order to fix installation, while the top of the toilet must be at a height of no more than 45 cm from the floor. It should be borne in mind that when the tile is placed, the floor always rises somewhat. We still need skillful hands and attentiveness.
Article on the topic: Tennis table do-it-yourself drawings and schemes
It is at this stage of the work that it is recommended to check the installation of installation and toilet bowl. It is necessary to make sure that the fasteners are included in it, as it may have to acquire anchor. Some manufacturers do not put a damper gasket, which is installed between the wall and the toilet, but it can be easily replaced by a layer of silicone sealant.
Installing the installation of the toilet with your own hands - Instructions for beginners
Many people concerns the question of how to install the installation with their own hands. Montage with your own hands should begin before the tile is laid on the floor and on the walls:
Approximate toilet installation scheme.
- It is necessary to place holes under the frame, and it is impossible to forget about the distance from the floor and that it is necessary to use the level.
- It is necessary to scroll holes, then a dowel is placed in place and mounted on the place of the frame, it can be fixed with anchor bolts, which is a more reliable option.
- Connecting a tank to the water supply system, in most cases, the tanks are connected to the water from the bottom and side. The tank connects to water exclusively by the pipe, it is not worth using the corrugation.
- Now you should connect installation to the sewage pipe. In most cases, it is possible to use pipes whose diameter does not exceed 90 and 110 mm, the additional adapters are not needed. Well, if the toilet will be with the insert in the riser, in this case the sewer pipe that leads from it will not be overgrown with the plates that in the kitchen sewage is inevitable. If the holes do not match, then you can use the corrugation, but it is undesirable because it is not as strong and durable like a pipe.
- After that, the installation can be sewn, as a material for this, you can use a moisture-resistant sheet of plasterboard, the thickness of which does not exceed 10 mm. Such a sheet is better to fix not to the frame, since the metal is too thick, but to the brushed along the edge of the profile made of plasterboard.
- Mounting continues to masonry the tile, but before putting the tile on the plasterboard, the place of the future plum button is specifically designed for this cuff and plug. The plug is needed so that the reinforcement is protected from the construction waste, the cuff must be trimmed when the button is installed, it is made exactly along the edge of the tile.
- Installing the installation of the toilet should begin not earlier than the one and a half weeks after the tile is laid. It is necessary to accurately adjust the air and sewage and sewage system. Make it with your own hands is easy, then you need to put the gasket between the tile and the toilet, then Silicone should be applied to the appropriate surfaces. The toilet is mounted on studs and nuts are delayed. Then the water merges and the tightness of the compounds is checked.
- Installation continues in that it is necessary to install the drain button, if it is connected to the reinforcement of the tank with pins of plastic with a thread, then before cutting it, you need to measure everything thoroughly. With an ideal defold, the drain button must have a small free entry, it must be pressed without effort.
Article on the topic: Krepim Plasterboard on the wall and ceiling with glue
Useful advice
- If the drain buttons below provide a technological hatch in advance, the repair and maintenance of the tank will be carried out much easier.
- When the reinforcement of the tank and the drain button is selected, it is better to choose those that have a water saving system. As a rule, these are two separate buttons to use all the existing water in the tank and half of the volume, and there may still be a start / stop button. Thus, water is consumed significantly more economical.
- When installing the installation of the toilet bowl, the drain button should be located or in the center of the tile, or on the seam between the tiles. Tile must be put in the direction from the button to the edges.
When installing, the instructions should be clearly followed, and then you can not doubt that the result will be positive. It should be noted that the bidet can also be installed with their own hands, there is nothing difficult in this, since the attachment of the bidet does not differ from the attachment of the ordinary toilet. It is necessary to take into account that the bidet will look better if the pipe wiring is carried out in a hidden way in the wall. When the bidet is connected to the sewer system, a test start of water should be made, and then check the operation of all equipment. Thus, the installation of the bidet is also not different complexity.