
Starting repairs in your own apartment, people usually know what they want. However, as practice shows, not always conceived without consultation with designers then pleases the owners. This also applies to redevelopment. In order not to make mistakes in demolition, it seemed that interfering with the walls and free the doorway from the unnecessary door, you can resort to the redevelopment method - the arches device. It is beautiful, functionally and solve many problems without capital investments.
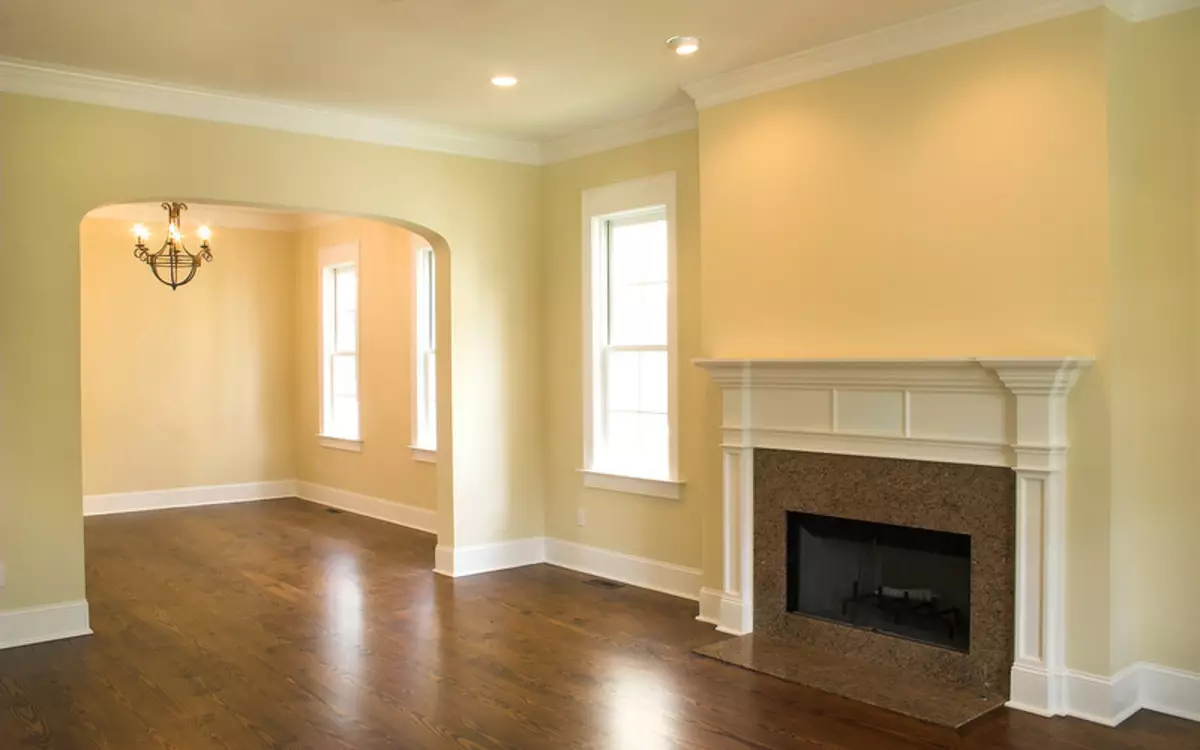
Arched outlook is a popular architectural reception that makes an apartment more elegant and aristocratic.
The arrangement of such a design does not require any titanic efforts or call brigade of the masters. All work can be carried out independently, following the instructions. In addition, the variety of materials used in such a design will allow you to find non-standard solutions for the design of your own interior. So how to make the arch in the apartment? Step-by-step execution is presented as follows:
- Select shape.
- Preparation of opening.
- Installation.
- Finish finish.
Selection of shape design
The form completely depends on the preferences of the owners. It can be low in height, ellipsed or even gothic. The usual radius archway remains popular, which is used in the standard opening. For the manufacture, materials such as plasterboard, plastic, natural or artificial stone are used. Forms wear such names like:
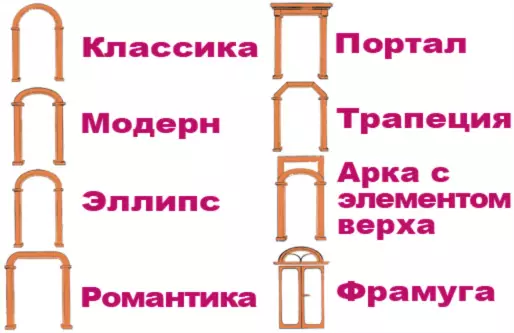
Types of arched openings.
- Classic. These are the most common types of arches. They have the coolest radius of bending, and to the low ceilings, this kind is not suitable due to the dissonance of the decor and architecture.
- Modern. The radius of the arch is smoothed, that is, only a small bend is visible. Ideal for small rooms.
- Romance. Made in a very wide opening. Corners have only a small rounding.
- Portal. In the form of the letter "P". No bends do not have, only a beautiful scenery.
Also, the arches are made using stucco, wooden arrays, with glass and metal elements.
Before mounting, the arches prepare the doorway: remove old doors, box and platbands. Then draw the contours of the arches according to his own sketch: it needs to be done in advance so that then do not destroy most of the wall.
Necessary materials and tools
The most applied are:- Plasterboard, plastic or wooden forms, decorative stone (material depends on the preferences of the owners of the apartment);
- metallic profile;
- fasteners for the main design (usually they are self-tapping screws and / or decorative nails);
- glue for stone or tile;
- plaster formulations;
- rule, spatula;
- grouts and sealants;
- Level and square.
Article on the topic: Instructions How to insert glass into the interroom door
Stages of work: recommendations
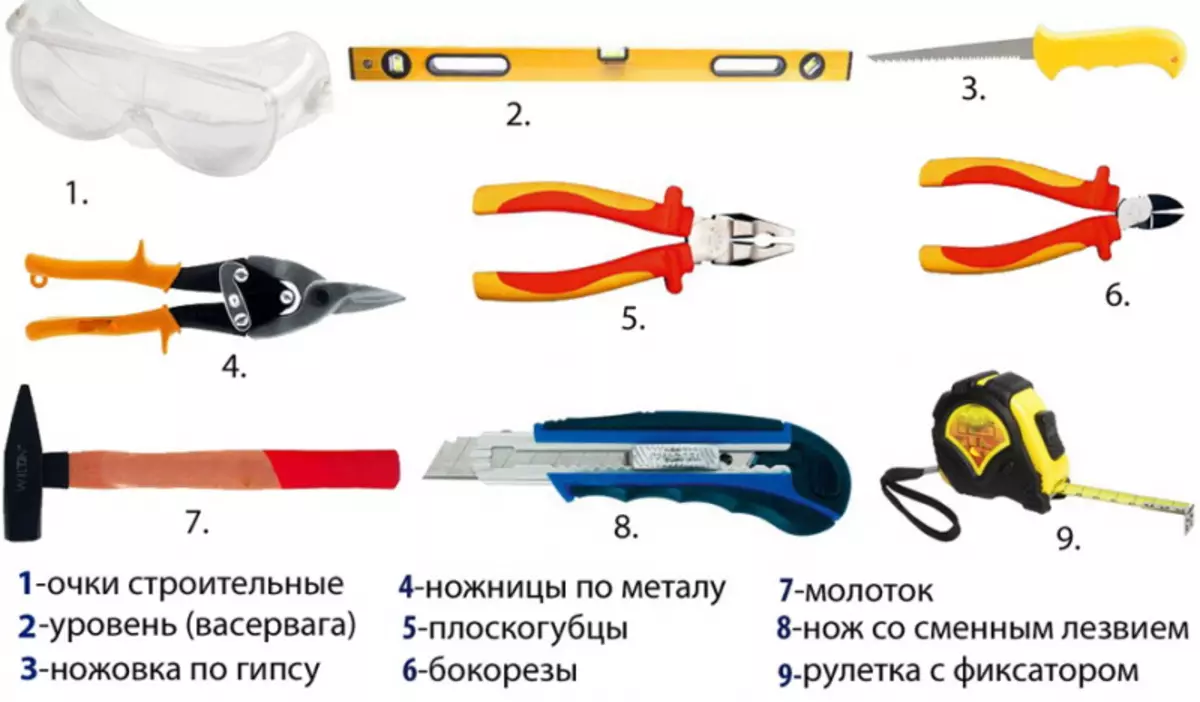
Tools for mounting arches.
Identifying and clearing the doorway for the future arch, first it gives it an ideal flat form. To do this, cement or plastering with the rule or grater is equalized to the inner surface of the opening so that later the material lay down on it, I perfectly cling to it. Unacceptable irregularities or dents: they will create emptiness, and the material can crack.
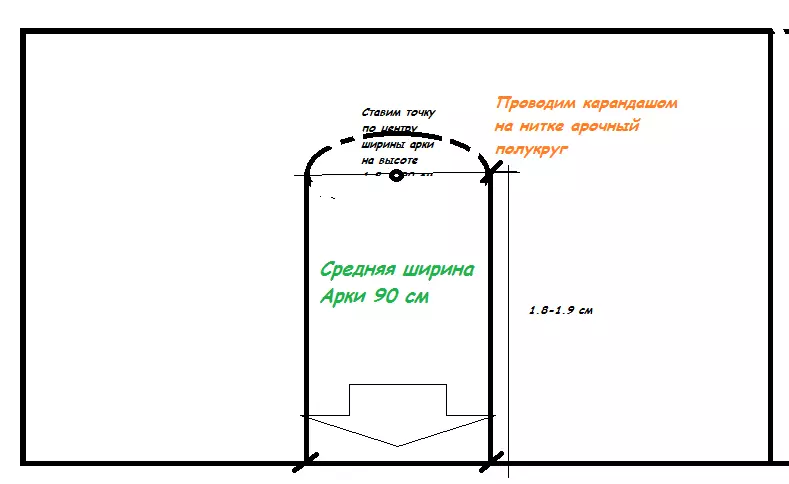
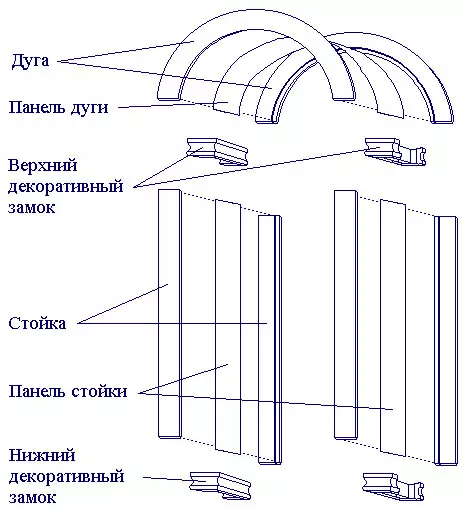
After the wall is converted into a smooth surface, a blank is cut out of the material. Industry offers finished arches - plastic. In this case, it is not necessary to cut anything: the strip will enter the packages of the platbands fixed on the wall. The use of plasterboard requires cutting. For this purpose, the basic parts with a semicircular radius equal to the width of the opening are cut into the measured earlier. Circle can serve a thread, tightly tied to the pencil. The second blank makes the template first. Now you can fix them to the imaging with a metal profile. This is done like this: the desired profile length bends in accordance with the arch. In order for the metal to be bent around the circumference, it is cut through 5-6 cm throughout the entire length. Now the profile can be screwed.
Then there comes the turn of a long strip closing the concrete surface of the opening. It is measured by the thickness of the wall from the edges of plasterboard blanks. The side of the strip must be perfectly parallel to each other. The billet is cut.
So that the trigger element from drywall is firmly lay down in the opening, it is recommended to establish a frame. It is attached to a metal profile all over the entire length of the arch. Inside it can be laid filler so that there is no void. In his quality will perform Minvata, foam, etc.
Arch mounting scheme.
The long strip of plasterboard, if it is bent in a dry state, can crack and abominate when installed. Therefore, the surface is recommended slightly moistened with water and handle needle roller. Then the band will easily take the necessary shape. It is applied to the impeach and attach to the frame by self-drawing so that the caps are indulge.
Article on the topic: How to replace siphon in the kitchen?
After the installation of the arch is completed and the design is completely dried, you can start the finish finish. The joints between the details should be missed with an acrylic sealant or any grout. The surface of the plasterboard is ground. Now you can start finishing.
Errors when installing arched openings:
- Wrong measurements. How much material can be ruled, and not say. And all this due to the fact that the markup was made wrong. The front side workpiece looks like this: the width of the doorway = the length of the rectangle from drywall, the height of the workpiece = radius + 10 cm. Strip width = wall thickness + double drywall thickness.
- Non-use profile. In this case, the arch will be curved in different places, and it will not be possible to fix it with a concrete or brick wall with self-draws.
- Litness of drywall. If you are not wetted with water, then do not be surprised.
- The unpreparedness of the opening to the installation, which threatens with voids and poor fasteners to the wall.
- The use of expensive materials amateurs.
High cost can only be in decorative elements. No need to make an army from a mahogany, without having any idea about it.
Features of materials for arch
Production of plastic arch
It is not about the finished arched openness. Plastic is used from wall panels. This material is cheap, has bending and perfectly handled. Working with him, you should not wonder how to make an arch. To do it in the same way as on the example of plasterboard. Moreover, the manufacturer took care of the variety of sizes and colors, if it is not supposed to decorate it.
Plastic arch assembly scheme.
Production of the arch of the tree. The technology is practically no different from the plasterboard option. The complexity will occur only with a curved strip. It consists of three parts: two straight on the edges and one upper semicircular. Direct parts can be made of wooden planks, a thickness of 12-15 mm, and the arc should be cut out of the array, the volume of which is equal to the wall thickness. You can also cut down somewhat thin and bonded with each other. Lobzik blanks are cut. Wooden elements to the nails or glue are attached. Then the joints of the joints are polished to the invisibility, and the design is covered with varnish or other finishes. So you can make an arch from the tree.
Article on the topic: Primer before putting drywall - the need or caprice of designers
Arch of brick. Typically, these types of arches are manufactured for the entrance gate of the built-in garage house. Sometimes they make a brick arc over a fireplace or a stove. In the aisles between rooms, such a reception is rarely used, so the question of how to make a brick arch in interior aisles, it rare occurs. Stacking technology requires working skills with brick and welding business if you have a bent design from steel profiles. Nonprofessionals will not cope.
To reliably put bricks on bending, we need a profile metal of the desired bent. It is mounted in the opening with the help of anchor bolts and perforator. The bricks are then stacked on it in such a way that the part is the part of the decorative element. If you make it more, that is, the risk that when cracking the solution, the brick can fall and fall. Typically, such structures are elapsed at the construction stage of a house or a fireplace of bricks. If you do it later, the openings will become below the previously planned earlier.
Nuances of decorative decoration
In order for any type of arches to look adequately, use a diverse decoration.
The plasterboard arches can be fermented as the walls as the walls: paint, wallpaper, detection. Plastic and finishing with a stone - natural or imitation became the most common decoration. With plastic, everything is simple: already finished elements are superimposed and attached with the help of decorative nails or self-tapping screws. The stone will require durable salary and planting per solution. Technology simple, but troublesome. But the question of how to make the arch and decorate it, is decided very effectively. Adhesive stucco elements give nobility. Of course, imitation, and not natural options. It looks beautiful and expensive, but requires a common designer approach to housing: there will be no stucco and wallpaper in the flower will not be combined.
Everything's possible. And how to make the arch and how to decorate? These are questions that have a personal decision. Moreover, Handmade is always in price. Applying the right knowledge, accommodation can be turned into an example for imitation.