
Plasterboard or plasterboard sheets (GLC) - material, with which you can give the desired shape both walls and ceiling, as well as to level the walls and the ceiling in the room. The most common way to install this material is to install it on a metal frame.
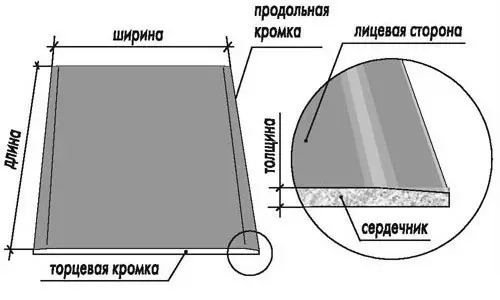
The structure of the leaf of plasterboard.
However, plasterboard sheets can not only be mounted on the frame, but also stick onto the wall. This is especially true for small premises, when in any way I want to keep the existing area.
Consider how to glue drywall on the wall and ceiling. To work, you will need the following tools:
- The perforator with a stirrer or mixer is necessary in order to stir glue. In addition, the perforator may need to drive holes in the walls under the wires.
- Level or rule - are used to determine the verticality of the wall and horizontal ceiling. Note that it can be limited to the level if its length is 1.5-2 m.
- The toothed spatula - allows you to apply glue by grooves and is used in the case with smooth walls.
- An ordinary spatula or trowel is necessary to apply glue with slaps when the wall is originally uneven.
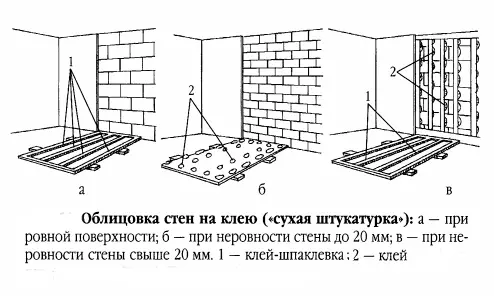
Glue glcons on relatively smooth walls
This method is applicable for concrete walls. Of course, concrete walls can not be called absolutely even, but still they are much more smaller than the same bricks. The glue layer with this method of installation of plasterboard will be quite thin. Wiring under the sheet will not be able to pass - in this case it is laid in advance the elevated holes in the wall.
Mounting plasterboard for glue
The concrete wall must be projected to ordinary primer. Special primer may be needed in the case when the concrete wall is initially not naked, but painted. In this case, the special primer is much easier than to flush the paint layer. It is necessary to place in advance and cut the holes for the sockets and switches in the concrete and on the sheet.
Article on the topic: Plugging of slopes of drywall
After conducting preparatory work directly glue drywall on the walls. Stir the glue according to the instructions on the package, but do not dive too much, because the glue is captured quickly and can dry. Glue on GLC is applied using a toothed spatula along the perimeter of the sheet and in the middle.
Next, the plate is installed on the wall on the pre-prepared linings, which can perform pieces of the same plasterboard, and the ends of the wires are outlined due to it. The next sheet must be aligned using the rule or level, and only after that pick up a sheet to the wall. The lining should be removed only after the glue hardened. After mounting plasterboard plates, the seams are finished, which we will describe below.
Glue to less smooth walls
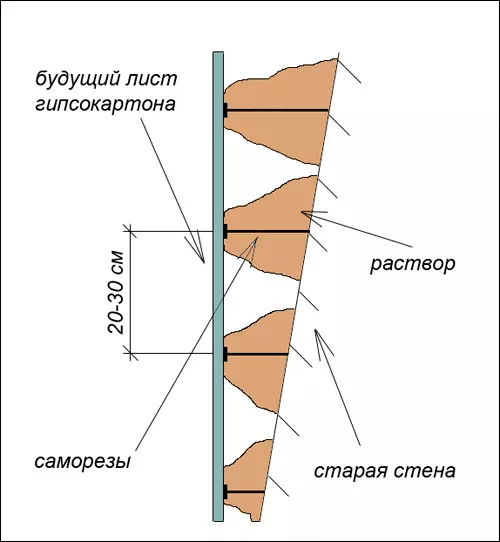
Wall alignment diagram with plasterboard.
To glue drywall on a brick wall, which is not even, it will take a thicker layer of glue. Note that the preparatory work will be the same as in the previous case, that is, the walls are strobered under the wires, the holes for the sockets and switches are drilled, the walls are ground.
In this case, another adhesive should be used - the pellfix is most often used. Glue in this case is applied in other way. It should be applied using a conventional spatula (or use trowel) slaps over the entire sheet of plasterboard at a distance of about 250 mm between slaps.
In addition, glue can be applied not throughout the leaf, but around the perimeter and middle of the sheet, as in the previous case. At the same time, the distance between the slaps should be about 250 mm around the perimeter, and along the middle of the sheet it is desirable to make two rows of such slaps with an interval of 500 mm from each other. The distance between the slaps should be about 300 mm.
Further, as in the previous case, the sheet is placed on the lining and is aligned with the rule or level, and then attached. After hardening glue, lining is cleaned.
Article on the topic: What is a compressor for painting and how to choose it correctly?
Glue to completely uneven walls
When the walls are completely uneven, then the installation of drywall will be impossible without the use of a small frame. Only the frame is not done from the metal profile, but from the same plasterboard.GLC is cut on a 10-15 cm wide strip - so-called beacons. These bands should be placed on the wall throughout the perimeter and vertically after half a meter. Each band is aligned with the rule or level and attached to the wall. Equality of the wall is achieved by a different layer of glue in different areas of the beacon.
As for wiring, in the case under consideration, the wiring can be hidden directly into the wall without a sticking, appropriately between the beacons.
After the glue under the beams hardens, glue drywall on the walls. For mounting drywall on the wall, the simplest gypsum glue is used. Note that you can glue on any glue, including on the mounting foam. Glue or foam is applied directly to those places where the sheet will stick to the strips. When installing the foam, the composition is applied in a small amount, and it is necessary to press much to the beacons until complete solidification, otherwise the foam is dispersed. GLC from beacons will be very difficult to tear off, so if you do not press foam in time, the bugs that have formed in connection with this will not be possible to correct, only break and completely redo. Therefore, if you do not know how to contact the foam, it is better to use gypsum glue.
Plasterboard on the ceiling
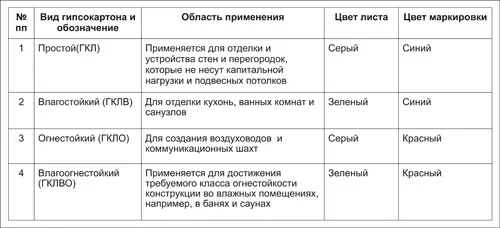
Types of drywall and their color marking.
Is it worth glueing plaster on the ceiling? Perhaps undesirable. When the plasterboard is glittered with whole sheets, then the adhesive mixture must be applied not to a whole sheet, but slaps. The glue may not withstand, and the leaf can fall. If you apply glue to the entire surface of the sheet, then the sheet will become very difficult, it will be difficult to raise it, it can bother.
If you still decided to stick GLC on the ceiling, then first of all you need to choose the right sheets. All plasterboard sheets are divided into:
- fire-resistant;
- ordinary;
- moisture-resistant.
Article on the topic: How to independently make a bas-relief from plaster?
For non-residential premises, moisture-resistant are used for kitchen, bathroom, toilet and hallway, as well as ordinary - for other rooms. The required sheet thickness for fastening to the ceiling is 9 mm.
Then it is necessary to determine the horizontal ceiling. As a rule, the slabs in typical houses are rarely laid strictly horizontally - usually they are laid with a slope. It is necessary to determine the lowest angle of the ceiling by measuring the distance between the ceiling and the floor in each corner. Starting the installation is necessary from the lowest angle, that is, from where the measured distance is the smallest.
For the installation of drywall on the ceiling, it is necessary to use the most durable glue. The glue should cover as much surface of the sheet, but not all the sheet is completely.
Processing of seams between plasterboard sheets
After mounting the plasterboard on the wall or ceiling, the joints are carried out. In the room it is necessary to observe the required temperature mode and humidity. Invalid the jumps of these parameters and drafts.
Suts between plasterboard plates need to be placed. First, the seams are treated with sandpaper, dust and dirt are removed. After that, the joints are stuck with the reinforcing ribbon. For joint processing, a special putty is used.
When processing seams, you should follow the following sequence of actions:
- first layer of putty;
- reinforcing tape (applied by indulging in the first layer of putty);
- second layer of putty (after solidification of the first layer).
The decoration of the seams is allowed and without the use of the reinforcing ribbon - only with a putty in 2 layers.
After that, we turn to the processing of angles of plasterboard structures. Metal profiles are installed on the outer angles, which are pressed into the first layer of putty. After drying the first layer, the second layer is applied. Internal angles are sweeping using an angular reinforcing tape.
The final decoration of the walls is carried out using the finish putty.
Now you know how to glue drywall on the wall and ceiling, as well as how to finish the joints between the sheets of plasterboard. It's time to start repair!