
Table of contents: [Hide]
- Where to start the process of creating
- Construction process on the construction of a crib for a newborn
- Production of details
- Assembly of this design
- Some recommendations
The birth of a child is a significant and joyful event in almost every family. However, at the same time, this is the various troubles associated with the preparation of the necessary space for a newborn baby. This primarily concerns the bed. Few can afford to buy a bed for newborns, given the prices today.
It must be remembered that the children's bed must have stability and be safe for the child.
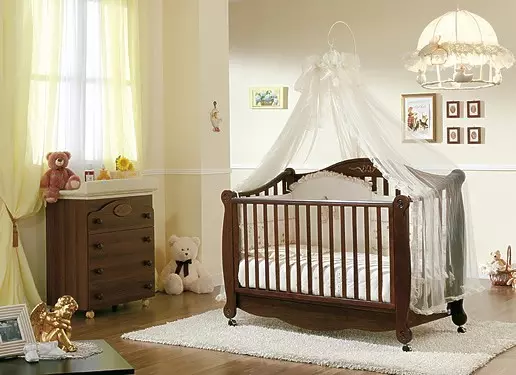
But there is an alternative, which will save, is a cot for a newborn with his own hands. And if you approach this case very responsibly and with the knowledge of the process itself, it turns out the bed is not worse than purchased in the store.
Where to start the process of creating
Everyone knows that children never sit in place. Therefore, the children's room should be the safest place in the house. Those. It is necessary to exclude objects that can damage the baby (for example, not clogged to the end of a nail or ordinary screw).
Baby cot must have stability and be secure for your child.
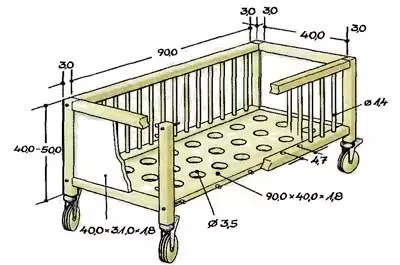
Size sizes of a crib for a newborn.
In addition, it is desirable to equip it with a removable sidewall (the so-called decorative side). This will help the child yourself, without adults, climb into your bed.
What will take in the construction process? It:
- electric drill and drills;
- Melter (manual);
- plane;
- rasp;
- roulette;
- Corolnic;
- hacksaw;
- pencil or marker;
- a hammer;
- level;
- Vaima (glue blanks);
- brush;
- screwdriver.
From building materials:
- nails and selflessness;
- epoxy adhesive;
- Furniture plugs;
- plywood sheets;
- Corners for connecting bed parts;
- Children's mattress;
- Morilka, varnish;
- Edged board (4 cm) and bars (3x5 cm).
Article on the topic: Smokehouse in the country with your own hands
Back to the category
Construction process on the construction of a crib for a newborn
Drawing of a crib for a newborn.
Before moving to the installation, you need to purchase a children's mattress. After all, it is from him and will depend on what size the bed will have.
- For a full-fledged holiday, it is advisable to build in size 120 × 60 cm (and not closely, and very convenient). As for the height of the sides from the floor itself, it is 8-10 cm, the backrest height is 110 cm. The position of the bedside of the bed from the base of the floor is determined with the safe height. Since the bed, originally intended for newborns, will be used and subsequently (about 4 years of age), the height should be about 30-35 cm;
- The distance between the rods of the cot for the newborn should be 10-12 cm. This is necessary to avoid the child to be able to push the head between them (which may happen later, it is not necessary to explain to anyone).
Back to the category
Production of details
The strapping for the backs and transverse sidewalls is made from boards of coniferous rock.Material itself must be treated with a planer or using a woodworking machine. In this case, the thickness will be 3.5 cm, and the width is 7 cm.
For the manufacture of the frame, you need to take the bars (cross section 3x5 cm) in the amount of 6 transverse and 2 longitudinal.
With roulette, points are placed with the same intervals between them on long bars.
Next, with the help of a milling mill, hacksaws or the chisels, it is necessary to make the marking of the excavation by half of the bar. The same recesses are made on the scraps, but only at the ends.
Then this frame is drawn up, the drill is taken and through the joints are made through holes in which it is necessary to insert spikes (you can use conventional wooden clins). At the same time, for a more reliable fastener, you can use the glue that is applied to the joints. Do not forget to check the design with the help of the square.
Article on the topic: Gradate flowers on the balcony in boxes, pots and porridge!
Frames of the backs of a baby bed for a newborn.
Here you need to take 4 long bar and 4 short. In this case, each of them should be the same sizes (110 cm and 60 cm, respectively).
- 2 pairs of structures are compiled. Those. 2 long on 2 short products (in the form of "P"). At the same time, all bases of bars should be in the same plane. Height to the lower crossbar - 30-35 cm. Fasteners occurs with nails or spikes;
- Then 10 bars are taken (length from the bottom to the upper crossbar). These items will serve as a "lattice". In the upper and lower crossbar, markup is made, 5 points for each. For these points, bars are inserted (5 for each back).
Using drill, end-to-end holes are made in which the spikes are clogged. Backs are ready.
Making rods
For these purposes, rails are used, having a section of 2 × 2 cm (oak or beech). The number of products is 22 pieces (11 per sidewall).
- All the same drill is done by holes on each of the ends of all the plates. With the help of a roulette, the same segments on the cooked frame are measured and drilled;
- Then there are 2 more vehicles (in the length of a bed for a newborn) and the holes identical to the previous one are done in the same way. From the ends also requires removing for spikes.
Back to the category
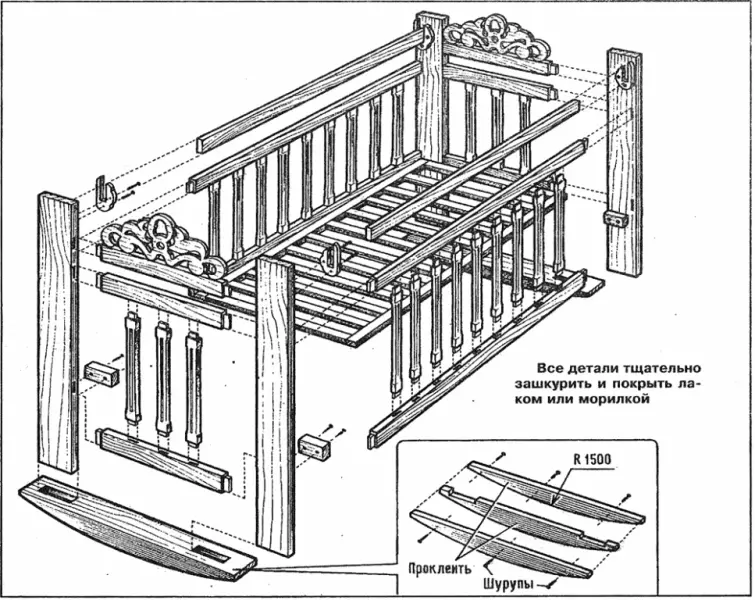
Assembly of this design
Here is practically design and ready. Two backs are taken, with the help of furniture corners, fasten the frame itself. The bed is already worth.
In the rods on the frame, the spikes are inserted to which rods are attached. From above to these elements (in the ends) also clog the spikes and put on 2 cooked bars. They will be attached to the backs and nails and self-drawing, or the same method, drawn way.
Article on the topic: Hangers in the hallway - wall, outdoor or panel
However, in this case, it turned out a cot without a decorative side. How to do it? Everything is very accessible. At that moment, when the rods are made, it is necessary to make a smaller length of them (you can even halfway). Further, everything is identical (fasteners, insert, etc.).
But it turns out that one sidewall is less than another. But it does not matter, they can be level with a removable bar.
- Two rails are taken with a length of 8-10 cm (they must be 3 times less in cross section than the bars themselves, of which the backs of the bed for a newborn) are made. Approximately 1x1.5 cm;
- Then they are attached to racks with small carnations. In this case, through the bottoms are drilled through holes. Spikes are inserted (the yield of the spike is outward from the rail side - about 0.5 cm);
- Bar is taken on the bed length. From the ends are made (the size is such that they can pass the rails);
- You can install. Removable side is ready.
It remains to be displayed by the Phaneur on the bottom of the bedroom for a newborn and consolidate it (can be glue).
Back to the category
Some recommendations
By building a children's bed with your own hands, you need to protect your baby from damage.
First, you need to clean the entire design using sandpaper.
Secondly, with finishing work, use the presence of a special harmless varnish. Consultation can be obtained from the seller. Varnish apply a triple layer. After drying, it needs to be carefully sanded. This does not apply to finishing application.
Baby cot, created with love and care with their own hands, will serve faithfully for a long time. And your baby will be in full security, both during wakefulness and during sleep. Good luck with business!