
The base of the house performs not so much a decorative function as practical. In many cases, it serves to reduce heat losses (it is specifically insulated), it also prevents the spread of atmospheric and underground moisture to the walls of the house. Also transfers the load from the walls to the foundation - if the foundation is ribbon or slab. Therefore, the cladding of the base of the house should be not only beautiful, but also functional. In accordance with this task, the finishing material is selected.
When to start finishing the base
It is best to separate the base after the scene is made around the house. In this case, the finishing material will hang over the path. As a result, even the most oblique rain or flowing through the walls of water streams will not be able to get between the wall and the breakfast - water hits the path at a distance of several centimeters from the place of the joint. Namely through this joint and water penetrates the foundation, bringing dampness and other problems.
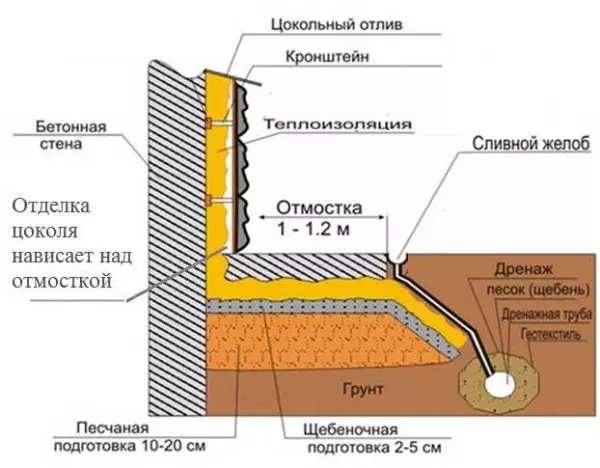
Starting the cladding of the base of the house after the scene is made around the house
Another point. Many ponder over the insulation of the base or not. If you want to save on heating, the answer is to warm up, as well as the breakfast. The zode of insulation and cladding of the base is one of the options - is shown in the photo below.
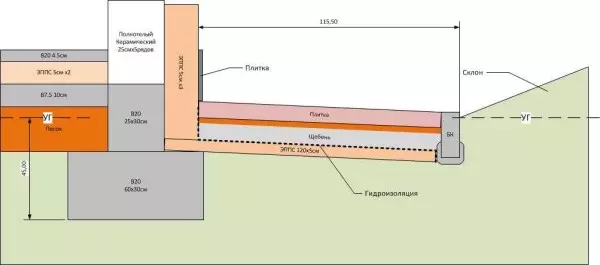
In the device of the warmed base under the finishing stoves the plates of EPPS
When using the basement of the ground floor as residential, insulation, it does not occur, since the answer is unequivocal - of course insulate. But even if you do not have an imagination, the costs of heating will be much reduced, and the floor in the house will become much warmer.
How to bind the base of the house
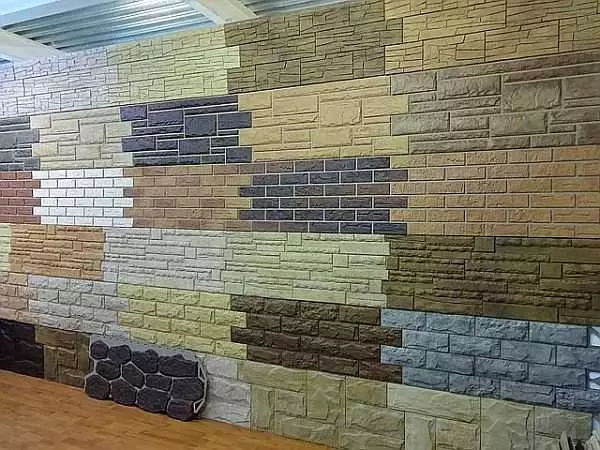
Materials for finishing the base is very much. Main requirements: moisture resistance, frost resistance, strength. These requirements satisfy the following materials:- Natural stones sawn on the plates (plastic) or the cheat, the so-called "torn stone":
- Sandstone (plug);
- granite;
- marble;
- slate;
- dolomite;
- Shugnit.
- Small cobblestone.
- Large river pebbles.
- Clinker tile (clinker brick).
- Paving tile.
- Porcelain stoneware.
- Finishing brick.
- Facade panels, base siding, PVC panels (these are all names of one material).
- Plaster (decorative and "under a fur coat").
- Professional flooring.
Some of them are a lot, some costs are insignificant, but they can all be used. Select the material based on the financial capabilities and previously used finishing materials - the aesthetic component plays the last role. On the technologies of finishing the caps of different materials and will be discussed.
Preparation and insulation
First of all, if the existing base is uneven, its surface is leveled with plaster. A mortar for plastering base is used cement-sand: on 1 part of cement (portland cement M 400) 8 pieces of pure construction sand are taken, preferably river. For greater plasticity, you can add some lime or liquid soaps (on the bucket of the solution 50-80 grams). The solution must be medium density: so that not pleasing from the wall. There is another option - use the special composition. For example, such as in the video.
If the laying of tiles, stone or other similar material follows, after aligning the solution on its surface, the tip of the cell (spatula) make notches. They are applied in the form of a grid on the entire surface. These shallow grooves will give the necessary support for decoration.
If the base is insteading, notches are not needed. Epps plates (extruded polystyrene foam) or foam flaps are glued directly to the plastered surface. They are lungs and go well on glue. Their surface is labeled with diluted tile glue and pressed to the plaster. Finishing materials are then fastened to the surface thus prepared.
Article on the topic: CSP or cement-chipstop
Painting, plaster and "fur coat"
In principle, if the plaster is well aligned, after drying the solution, the surface can be painted and stopped at it. It is an inexpensive, but quite a viable option. If the paint took the facade, which is designed for use on the street, a couple of years, the base will have a good look. Then you have to remove the old paint and paint again - to maintain the appearance.
The following method is on top of ordinary plastering to apply a layer of decorative. And again, choose those compositions that are intended for outdoor use. They can be smoked in the desired color or take color. The only minus - plasterers are often porous and clean the mud splashes falling on the walls during bad weather, and sometimes with a detergent.
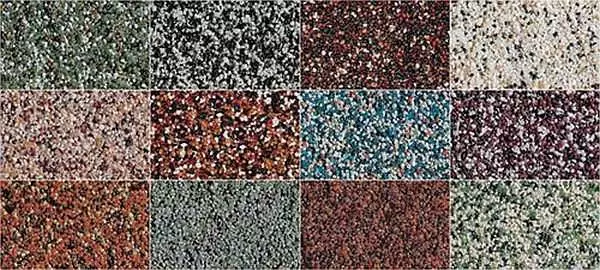
Types of decorative plaster for decorating the base: beautiful and relatively inexpensive
Until now, in some localities, the method of finishing the base "Under the fur coil" is popular. This is when the solution is applied not to a smooth layer, but in small fragments. Previously, they did it with a broom of twigs. Pickle it into the liquid solution, hit the handle along the stick so that the splashes flew on the wall. So they did a "fur coat" - finishing with a ribbon surface. Today there are special devices for applying plaster operating from the compressor. With their help, make such a finish easier.
Finishing the base of the house with the use of materials in the form of plates or tiles is technologically more complicated. So that it does not fall off, you need to know some subtleties.
How to make a house brick read here.
How to fix porcelain tiles or clinker tiles
If heavy materials such as ceramoranite or clinker bricks simply put on glue, on a plastered surface with grooves, maybe they will hold normally. And they can even simult one time. Even a few years. But then they will start falling off with the solution. Especially in those places where the grooves are not or they have insufficient depth. To improve the clutch, you can apply a layer of impregnation, which improves the adhesion (clutch), but this is not a guarantee, especially if the material is heavy.The same picture will be, if we glue the materials directly on the insulation. Surface is smooth, glued simply. But after a while the finish will fall. Faster than with a plastered surface. About this - video.
So that this does not happen, it is necessary to secure the metal painting mesh, preferably galvanized. It is fixed with dowels, putting on a dowel-nail piece of galvanized, the size of which is more than the magnitude of the cell. Fasten up, downstairs in the middle and in a checkerboard. It turns out a reliable basis for material of any gravity.
The glue is applied to the base and on the tile. On the tile is removed by a toothed spatula, applied into place, tapping the knob of the Kelma put in place, aligning the plane. The distance between the tiles is withstanding with the help of crosses, only the thickness of them is taken by a significant 3-5 mm.
In general, the laying technology is similar to the tile laying. With the only difference that glue should be special, for outdoor work. The second difference: finishing materials for the base are started to lay down: they are heavy and they need a support. Lay on the bottom of the lower row, on it - the second, etc.
Finishing base houses by natural stone (rikushnyak, granite, dollyt, slate)
As artificial shiny surfaces did not seem attractive, the grungy stone for some reason causes greater sympathy. But putting the foundation from Bout - difficult and not everyone can do so well so that it could stand on it. But to separate the ready-made monolithic or prefaby foundation with natural stump with your own hands can anyone, especially if at least some of the construction works are made personally.
It is clear that no one will fix entire stones: too heavy finish will succeed, and very voluminous. Therefore, he invented a stone to fill or prick. Depending on the technology, it turns out either smooth "plate" - with almost smooth surfaces, or the "torn stone" with an uneven face. Sometimes these materials are cut into identical rectangles, sometimes left in the form of uneven plates, but in any case it is a natural stone and the trim of the base of the house from it turns out beautiful and waterproof.
Article on the topic: Electric kettle does not turn off when boiling
There is this material from expensive stones, for example - marble, there is cheaper - slate, dolomite, shignit, lemzit, granite, etc. It looks very impressive. Especially if it is a tornstone, although the plane sometimes looks no worse.
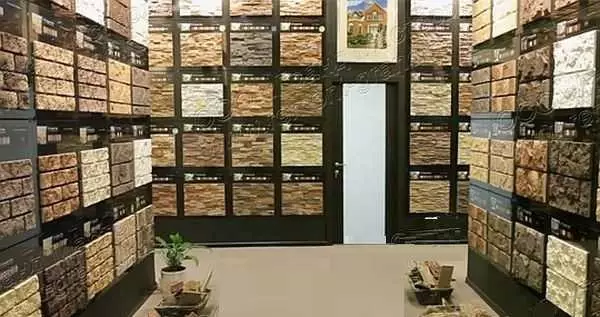
Part of the Natural Finishing Stone Offer in a specialized store
The preparation of the surface will be exactly the same: it is best to fill the painting mesh on the plastered base, and the plates of the stone are already on it already on it. If they are smooth - natural stone with processed edges - laying technology will be one to one to repeat the above described above.
If the stone with torn edges, the decoration of the base of the house becomes more difficult: it is necessary to pick up the plates of such a form so that the seams are not too large. When using this version of the finishing stone, a Bulgarian with a stone disk will be needed: Most likely you will have to direct the plates of the lower and top row. It will take correction and when designing the corners. For example of such technology, see the video.
There is a second way. The plastered surface of the base is first urged to improve adhesion (clutch), then fragments of finishing are installed on it. They are fixed in a predetermined position using cropping of the same stone or pieces of materials of the desired size. The seams remain empty. After the glue "grabbed" the seams are filled with a roasting solution from the construction syringe, as it is necessary to pour and vyting.
In any case, the glue fell to the finish must be deleted in a timely manner. With the frozen to do it, it will be very difficult, and the look at the adhesive is far from attractive.
Sometimes for a clearer picture of the seams between the plates of the stone draws dark paint. Then the surface is covered with protective impregnation. It gives a stone light glitter, as well as often increases water-repellent properties.
An example of the cladding of the base of natural stone by the second technology, see the next video.
About the lining of the house siding is written here.
Clay or fine cobblestone
Boulder or cobblestone is not necessary to buy. It can be scored on the river or on a pebble beach on the sea. The rolled stones choose more flat - round more difficult to "mount". The order of work and all other subtleties are almost the same as in the case of finishing with natural stone. The only difference is these stones need to wash in water with detergent. First, the water in our water bodies can have oils, and they need to be removed, and secondly, they can be in clay or algae, which can cause the finish fall off.So that everything looked is organically, you can on the track next to the place where you will be facing the base, pre-lay out the "picture" of cobblestones facing. They have different shades and random combinations are far from always attractive. Having all the next to the side you will have an idea of what happens as a result.
About the features of the trim of the base of the cobblestone, see the video.
How to install plastic (PVC) base panels
This type of finish is called differently: base or facade panels, base siding. They have a diverse appearance: under different types of stone, tile, brick.
To install PVC panels on the base, you must collect the framework. It is made from a wooden bar of 50 * 50 mm. Since the finish will be on the street, wood must be protected by impregnations that prevent rotting and protecting from pests.
Article on the topic: How to make installation for the production of foam concrete with your own hands
The sequence of actions is as follows:
- Using the level (laser or hydroeer), at all corners of the house there is a desired height of the finish.
- In these places, nails are nailed (screws screwed), the marker (lace) is stretched between them, which marks the height of the basement of the base.
- On this cord all over the perimeter of the house the bar is nailed. His top face must be accurately directed along the cord.
- If the height of one panel is not enough, you will need to make another row of a bar on which two sheets will be shrinkable, and you still need the same blockage under the bottom end of the panel.
Another finishing material for the base - PVC panels, which are also called "base siding"
- After about 50-60 cm, short transverse bars are stuffed - they will not give PVC panels to fake.
- Start mounting from one of the corners. For the design of the angle there are special elements. They are fixed on the crate of wood screws.
- The edges of the sheets of plastic facade panels are uneven - with protrusions. The edge of the first from the corner must be cut into exactly. It is possible to do this by an electric bolt or a grinder, a hand saw with a metal blade (less cloves, it turns out a more even edge).
- Cropped edge is inserted into the angular element. At the top and bottom of each panel there is perforation under fasteners. Here in them the screws are fixed. Only they do not need to tighten to the end: the backlash is needed on the thermal change. Therefore, the perforation is made by the oblong form, and install the self-coming career in the middle: when the sizes change, the panel will move freely and does not burst.
- The next element is mixed with a special lock, and is fixed in the same way.
Assembly simple. Only after fixing, it will be necessary to make tops from above: the shapper and panels have a fairly decent volume and the slot remains on top. You can close it with roofing iron, as in this video. Immediately look at the finishing technology with plastic panels.
Similarly, the base can be separated and made a professional flooring. There is only one note: in the emptiness between the crate, it is desirable to lay insulation. Much warmer in the house will be.
Finishing the base of the pile foundation
As you know, the pile foundation of the base is not. But if you do not block the space, drafts are walking under the house, the floor will always be cold, and still under the house he likes to settle all living creatures. Therefore, the base, although decorative is necessary. It can be done in two ways.
- On the perimeter between the supports, they dig a trench, removing the fertile layer of the Earth and rearing 10 cm into the soil, the bottom of the trench trambets, put the gravel intro, again, whenever possible. Then 2-3 rods of longitudinal reinforcement (10-12 mm) and all poured concrete. On the concrete base after 10-14 days put the wall in Pollipich. You can immediately use the finishing brick, and you can be folded from used, and then separated by any of the methods described above.
- This method is suitable for the trim of the base with the front panels (baseline siding) or professional flooring. The frame is attached to the pile of the barcass treated by impregnation. The rest of the finish process is no different from the standard. Is that the fact that this option is very desirable to inspire.
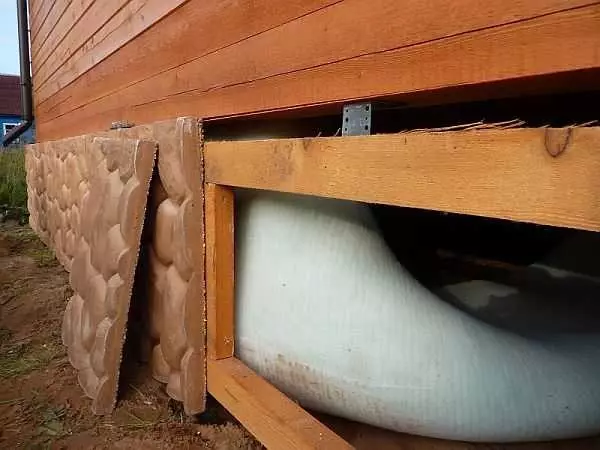
The easiest way to finish the pile foundation - to the frame to attach some tire finishing material
There is one subtlety if the house is installed on the screw piles or stamps of tees. Such foundations often put on very bunchy soils. So that when picked up the soil, the finish is not destroyed, it is not brought to a certain distance to the Earth. So that animals do not swallow in the gap, the metal grid is fixed to the bottom.