
Modern finishing work today is impossible to imagine without a dry-fiber sheet (GVL). The popularity of this finishing material is due to a number of advantages, such as environmental friendliness, strength, fire resistance, available cost, simple installation. Laying of GBL on any surface, as well as its cladding tile make this surface perfectly smooth, giving an aesthetic look to any room. Therefore, this type of finishing work was the most widespread. Technology of work with GVL consists of several consecutive stages.
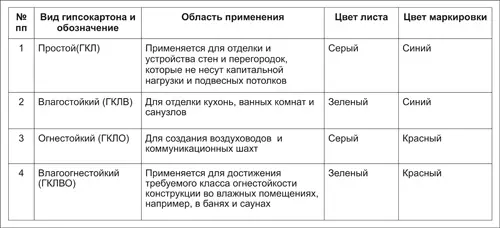
Types of drywall and their color marking.
Stage of preparatory work
Preparation of the premises and the work surface is the priority stage of work. Preparation of the premises includes work on the dismantling of the existing equipment, exemption from furniture items, dismantling the old coating (paint, whitewashing, linoleum and other types). The working surface (wall or gender) should not have large flaws in the form of cracks, cracks or voids. The screed must be durable, not to have detachals. The surface must be smooth on the lumen.If the floor is concrete, it is determined, aligned and placed by a polyethylene film. If the floor is wooden, it is processed by an antiseptic. The wooden floor is subject to the processes of rotting, the formation of fungi and must be maximally protected. Next, waterproofing is needed. Therefore, the rubberoid should be laid on a wooden base, then the reinforcing mesh and cement screed. The waterproofing material can serve both the usual film and bitumen mastic.
GWL can be laid both on wooden and reinforced concrete structures, observing the features of each technology.
For this work, the following main tools and materials will be required:

Tool for working with plasterboard.
- A hammer.
- Saws.
- Mounting foam.
- Knife for cutting GWL.
- Hacksaw.
- Platekorez.
- Screwdriver.
- Putty knife.
- Primer.
- Grinding devices.
- Level.
- Rubber hammer.
- Roulette.
- Marking cord.
- Building stapler.
Article on the topic: What to choose insulation for walls inside the apartment?
Installation work GVL
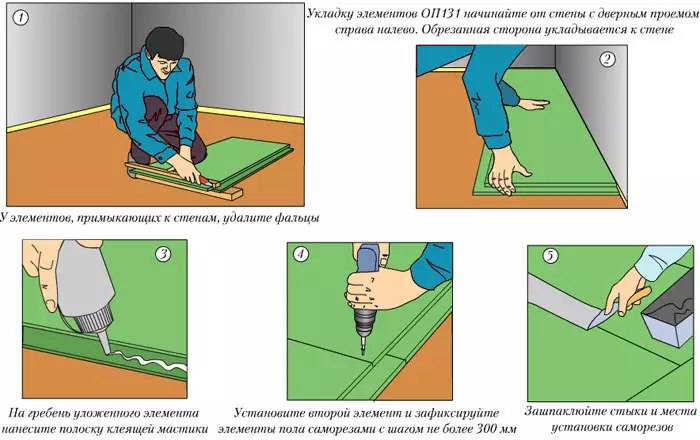
Stages of laying GVL on the floor
After all the preparatory work was carried out, the remnants of the old coating were removed, the slots were shown, defects, wall or gender were treated with primer, should be moved to the GWL laying step.
Flooring gypsum fiber sheets on the wooden floor, the wall or ceiling has its own characteristics. So, when laying on the floor, you must write the doorway due to the lifting of the floor level. In addition, the wooden floor is better to remove and make a screed. If you remove the wooden floor is not possible, then the removal of rotten boards will be a prerequisite.
One of the installation options is as follows: HBLE sheets should be laid on the tile glue, secure self-drawers around the perimeter, while adhering to parameters: the thickness of the sheet is 10-12.5 mm; self-tapping screws 30-40 mm; Step between self-drawing - 40 cm; The depth of the screw of the screws is 2-3 mm. Fastening sheets by self-drawing will save from cracks. After a day, you can move to the next step.
Another option is the installation of GBL with metal guides (profiles). Alternatively, a wooden frame frame can be used, but the metal profile is longer and reliable. The distance between the guide plars should be 40 cm. For the strength of the structure, the plaster mesh, fixed with glue and brackets, can also be used. Features of the frameless lining of the walls with a gypsum fiber sheet are to comply with a certain width of the gap between sheets (5-7 mm), sealing the joints with a special gypsum putty, using special glue for GWL.
Work on the facing of GVL
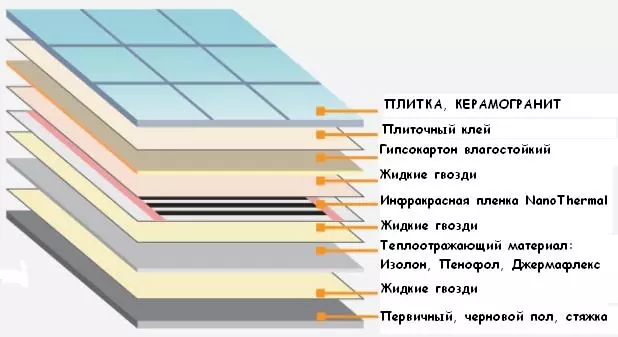
An example of a floor device from tiles on GWL.
Facing GWL implies the use of wallpaper, paint, tile. Speaking of tiled cladding, you can select a common work scheme consisting of preparation of tiles, floor marking, glue preparation, styling of the tile and stamps of the seams. It is necessary to predict the sheets and after complete drying to stack tiles. After removing the measurement of the width and the length of the room, dividing the tile to the size, taking into account the width of the seam, you can calculate the amount of entire tiles in each row. And the residue divided into two will indicate the number of incomplete tiles. Wall-mounted and outdoor types of tiles have a different degree of strength and are selected taking into account the necessary surface.
Article on the topic: From what you can do the hedgehog: 3 crafts do it yourself (10 photos)
With the help of a special marking cord, it is necessary to connect the middle of the long and short walls. The lines will intersect in the center of the floor. Paul marking will allow to avoid a large number of chopped tiles at the walls. When laying a tile on the floor, the technology is observed either from the corner or from the middle of the room. It depends on the drawing of the laying. Laying diagonally does not avoid cutting tiles. Stacking along the walls should be started from the edge opposite to the entrance to the room.
Adhesive (mastic or cement solution) is uniformly applied to the entire surface with a spatula and carefully smoking. Then the tile is put on the floor (or other surface) and pressed a bit. You can use a rubber hammer to increase the strength of the mount. The correctly selected glue composition plays an important role, since the quality of the attachment depends on this. It is recommended to prepare a solution for tile glue by portions, in the required quantity for a plot of 1 sq.m. In addition, the level of tiles along the operation should be monitored. There are no more than four rows of tiles on the floor immediately and, if possible, make time interruptions to eliminate the voltage at the base. Between the seams, it is necessary to leave the same gaps, cleaning them from glue. After two-three days, the seams are maintained by a special solution. And after another 24 hours, the surface is thoroughly washed. When laying the tile on the wall of the seams, it is still losing a day. It is recommended to provide in the room the minimum humidity for the entire period of operation.